Thinking about sharing your photography with the world? Shutterstock is a fantastic platform where photographers and artists can showcase their work and earn money. But before you start uploading, it’s important to understand the process and what makes a good submission. In this guide, I’ll walk you through each step, from preparing your images to successfully uploading them. Whether you’re a beginner or already familiar with stock image platforms, this post will help you navigate Shutterstock’s requirements with confidence. Let’s get started on turning your creative shots into potential income!
Preparing Your Reference Image for Upload
Before you even think about clicking the upload button, it’s crucial to ensure your reference image is ready. This means paying attention to quality, format, and other technical details that can make or break your submission. Here’s a step-by-step rundown to help you prepare your image:
- Choose a high-resolution image: Shutterstock prefers images with a minimum of 4 megapixels. Higher resolution images look better and are more versatile for buyers.
- Ensure proper lighting and focus: Clear, well-lit images with sharp focus tend to perform better. Avoid blurry or pixelated shots.
- Check for noise and artifacts: Use editing software to reduce noise, especially in low-light photos. Clean images look more professional.
- Remove watermarks and logos: Your images should be free of any watermarks or branding unless they’re part of the creative concept and properly licensed.
- Crop and straighten: Make sure your image is properly framed. Crop out unnecessary elements and straighten horizons if needed.
- Color correction and editing: Adjust brightness, contrast, and color balance to enhance the image’s appeal. Keep edits natural unless artistic effects are intended.
- File format and naming: Save your image as a JPEG file with a high-quality setting (usually 8-10). Use a clear, descriptive filename, avoiding spaces or special characters.
Taking the time to properly prepare your reference image not only increases your chances of acceptance but also ensures you’re presenting your best work to potential buyers. Remember, Shutterstock is a professional platform, so quality is key. Once your image is polished and ready, you’re all set for the upload process. Next, we’ll cover how to make sure your image meets all the platform’s requirements for a smooth submission experience.
Creating a Shutterstock Contributor Account
So, you’ve decided to share your amazing photos and reference images with the world through Shutterstock. The first step is setting up your contributor account — think of it as your personal storefront in the vast marketplace of stock images. Don’t worry; it’s pretty straightforward, and I’ll walk you through each step.
Here’s what you need to do:
- Visit the Shutterstock Contributor Website: Head over to submit.shutterstock.com. This is the official portal for photographers and artists who want to upload their work.
- Click on “Sign Up” or “Become a Contributor”: You’ll find a clear button to start the registration process.
- Fill in Your Personal Details: Enter your full name, email address, and create a strong password. Make sure your email is valid, as Shutterstock will send you important notifications and verification links.
- Agree to the Terms & Conditions: Read through the contributor agreement, and if you’re comfortable with it, check the box to accept. It’s crucial to understand Shutterstock’s policies about image rights, payment, and content guidelines.
- Verify Your Email: Check your inbox for a verification email. Click the link to confirm your email address. This step helps keep your account secure.
- Complete Your Profile: After verification, log in to your account and fill out additional details like your payment information, tax details, and portfolio links if applicable. Providing accurate information ensures smooth payments and compliance with Shutterstock’s requirements.
Once your account is set up, you’re officially a Shutterstock contributor! Take some time to explore the dashboard, familiarize yourself with the platform’s guidelines, and review the types of images that perform well. Setting up your profile professionally can help attract buyers and increase your chances of making sales.
Uploading Your Reference Image to Shutterstock
Now that your account is ready, it’s time to upload your reference image. This process is pretty simple, but there are some best practices to keep in mind to ensure your image gets approved and stands out.
Here’s a step-by-step breakdown:
- Log in to Your Contributor Dashboard: Head over to your Shutterstock contributor account and click on the “Upload” button. Usually, it’s prominently displayed on the dashboard.
- Select Your Image Files: Click “Choose Files” or drag-and-drop your reference image into the upload window. Shutterstock accepts various formats like JPEG, TIFF, and EPS, but JPEG is most common for reference images.
- Enter Image Details: Fill out the required fields:
- Title: Make it descriptive and relevant. For example, “High-Resolution Image of a Sunset Over Mountains.”
- Keywords: Add relevant keywords to help users find your image. Think about what someone might search for, like “nature,” “sunset,” or “mountains.”
- Description: Write a brief but informative description highlighting the content and quality of your image.
- Select the Appropriate Category: Choose the category that best fits your image. This improves discoverability and ensures it appears to the right audience.
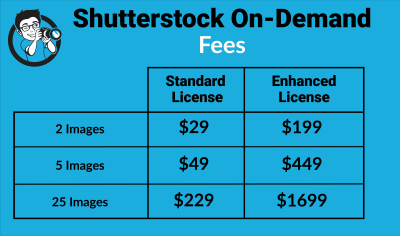
- Set Licensing Options: Decide whether you want to submit the image under standard or enhanced license. For reference images, standard licensing usually suffices.
- Review and Submit: Double-check all your details. Make sure your keywords are relevant and your description is clear. Then, hit the “Submit” button.
Once submitted, Shutterstock will review your image to ensure it meets their quality and content standards. This review process might take a few days. If your image gets approved, it will be added to your portfolio and available for licensing. If not, Shutterstock will provide feedback, and you can make necessary adjustments and resubmit.
Pro Tips:
- Use high-quality, well-lit images to increase approval chances.
- Include relevant keywords, but avoid keyword stuffing.
- Follow Shutterstock’s content guidelines strictly to prevent rejection.
Uploading your reference images is just the beginning. As you continue to contribute, keep learning about what sells best and refine your portfolio accordingly. Happy uploading!
Adding Relevant Metadata and Tags for Better Visibility
Once you’ve uploaded your reference image, the next crucial step is to add metadata and tags. Think of these as the clues that help your image get discovered by the right people. Properly tagging your images can significantly boost their visibility on Shutterstock, leading to more downloads and potential earnings.
Why is Metadata Important? Well, Shutterstock’s search engine relies heavily on keywords, titles, and descriptions to match images with user searches. If your metadata is clear, accurate, and well-thought-out, your image will be more likely to appear in relevant search results.
Here’s what you should focus on:
- Title: Make it descriptive and straightforward. Instead of something vague like “photo1,” try “Sunset over Mountain Lake with Reflections.” Keep it natural and avoid keyword stuffing.
- Description: Write a concise yet informative paragraph about the image. Mention key elements, mood, colors, and possible uses. For example, “A tranquil sunset scene featuring a calm mountain lake reflecting vibrant orange and pink skies, perfect for travel or nature-themed projects.”
- Keywords/Tags: Use relevant keywords that describe the image. Think about what someone might search for. Include both broad and specific terms. For example: “sunset, mountain, lake, reflection, nature, tranquil, evening, landscape.”
Pro Tips for Effective Metadata:
- Use all available keyword slots—more relevant keywords improve visibility.
- Include synonyms and related terms. For example, “car” and “automobile.”
- Be honest and accurate. Misleading tags can harm your reputation and lead to rejection.
- Update metadata if you notice your images aren’t performing well; sometimes small tweaks can make a difference.
Remember, the goal is to make it easy for someone searching for a specific type of image to find yours. Take your time to craft thoughtful, accurate metadata—it’s well worth the effort!
Reviewing and Submitting Your Image for Approval
Almost there! After you’ve uploaded your image and added all the metadata, it’s time to review everything before hitting that submit button. This step ensures your image meets Shutterstock’s quality standards and that all details are accurate.
Check the Technical Quality first. Look over your image to confirm:
- It’s in the correct format (JPEG for photos).
- Resolution is high enough (usually at least 4 megapixels).
- Colors are accurate, and there’s no pixelation or noise.
- The image is well-lit, properly exposed, and free of distracting elements.
Review Metadata: Double-check your title, description, and keywords. Make sure they are accurate and free of typos or grammatical errors. Remember, clarity is key!
Preview the Submission: Shutterstock often provides a preview mode. Use this to see how your image and metadata will appear to viewers. This helps catch any last-minute issues or mistakes.
Understand Shutterstock’s Content Guidelines: Before submitting, revisit their content policies to ensure your image complies. For example, avoid copyrighted material, offensive content, or images with identifiable people without proper model releases.
Once everything looks good, click the “Submit for Review” button. Your image will then go into Shutterstock’s review queue. This process can take anywhere from a few hours to several days, depending on their workload.
While waiting, it’s a good idea to keep an eye on your email for any feedback from Shutterstock. Sometimes, they might request additional information or suggest edits to improve your chances of approval.
Remember, don’t be discouraged if your first few images are rejected. Review the feedback carefully, make the necessary adjustments, and try again. Persistence and attention to detail are key to building a successful portfolio on Shutterstock!
Tips for Ensuring Successful Image Approval
Getting your images approved on Shutterstock can sometimes feel like navigating a tricky maze. But don’t worry—there are some tried-and-true tips to boost your chances of approval on the first try. Here’s what you should keep in mind:
Follow Shutterstock’s Content Guidelines
First and foremost, familiarize yourself with Shutterstock’s content standards. This includes avoiding images with illegal, offensive, or sensitive content. Make sure your photos are high-quality, well-lit, and properly composed. Remember, Shutterstock prefers images that are technically sound and visually appealing.
Pay Attention to Technical Specifications
- Resolution: Upload images at a minimum of 4 megapixels (e.g., 2400×1600 pixels).
- File Format: JPEG is the standard. Ensure your images are saved in high-quality JPEG format.
- Color Profile: Use sRGB color profile to ensure colors display correctly across devices.
- File Size: Keep the file size below Shutterstock’s maximum limit, usually around 50MB.
Proper technical setup helps avoid rejections due to poor image quality or format issues.
Ensure Your Image Is Free of Model and Property Releases (or Include Them)
If your image features recognizable people or private property, make sure you have the relevant releases. Shutterstock requires these for legal reasons, and images lacking proper releases are often rejected. If no models or private property are visible, you’re good to go!
Be Mindful of Composition and Focus
Ensure your subject is sharply in focus and well-composed. Blurry, overexposed, or underexposed images are common reasons for rejection. Use editing tools to enhance clarity, brightness, and contrast if needed.
Review and Edit Before Upload
Take a moment to review your image for any distractions, watermarks, or imperfections. Cropping and minor edits can make a big difference in how your image is perceived. Remember, Shutterstock values professional-looking images that stand out.
Use Descriptive Titles and Keywords
Once uploaded, your image will be reviewed, and then you’ll add keywords. Use relevant, specific keywords that accurately describe your image. This increases discoverability and can improve the chances of your image being accepted and downloaded.
Conclusion and Next Steps After Uploading
Congratulations! You’ve successfully uploaded your reference image to Shutterstock. Now, what’s next? Here’s a quick rundown of what to expect and how to stay proactive:
Wait for Review and Feedback
Shutterstock typically reviews images within a few days. During this time, you might receive feedback if your image was rejected or needs some adjustments. If approved, your image will be visible in your author dashboard, ready for licensing.
Monitor Your Portfolio
Keep an eye on your dashboard for approval status, downloads, and earnings. Use this feedback to understand what types of images perform well and refine your future uploads accordingly.
Engage with the Shutterstock Community
Join forums or social media groups for Shutterstock contributors. Sharing experiences and tips can help you improve your submissions and stay updated on platform changes or trends.
Continue Creating and Uploading
The key to success on Shutterstock is consistency. Keep uploading high-quality, relevant images and stay aligned with current market needs. Over time, your portfolio will grow, and so will your potential earnings.
Explore Other Platforms
While Shutterstock is a fantastic starting point, consider diversifying your portfolio across other stock photo sites like Adobe Stock, iStock, or Getty Images. This broadens your reach and increases your chances of making sales.
Remember, patience and persistence are your best friends here. Every upload is a step toward building a successful stock photography business!