Hey there! If you’re looking to showcase your work or connect with the vibrant Shutterstock community, having a professional profile picture is a great way to make a strong first impression. Uploading your profile picture might seem straightforward, but knowing the right steps and tips can make the process smoother and ensure your image looks sharp and professional. Whether you’re new to Shutterstock or just updating your profile, this guide will walk you through everything you need to know to successfully upload your profile picture and make your profile stand out.
Preparing Your Profile Picture for Upload
Before you hit that upload button, it’s important to get your profile picture ready. A well-prepared image not only looks more professional but also helps you connect better with potential clients and collaborators. Here are some key tips to help you prepare your profile picture:
- Choose a clear, high-quality image: Make sure your picture is sharp, well-lit, and in focus. Blurry or pixelated images can give a sloppy impression.
- Stick to the recommended dimensions: Shutterstock typically suggests a square image with at least 400 x 400 pixels. Larger images are fine, but avoid overly tiny ones that can get pixelated when scaled.
- Use a simple, professional background: Aim for a clean background that doesn’t distract from your face. Solid colors or simple settings work best.
- Focus on your face: Your face should be centered and clearly visible. Avoid full-body shots or images where your face is obscured.
- Maintain a friendly and approachable look: Smile or have a neutral, approachable expression. Remember, this is your professional identity!
- Mind the file format and size: JPEG or PNG are preferred formats. Keep the file size under 2MB to ensure quick uploading without compromising quality.
Once you’ve selected the perfect image and made the necessary adjustments, it’s a good idea to review it on different screens or devices. This helps ensure it looks great everywhere. After that, you’re ready for the next step—uploadting your polished profile picture to Shutterstock with confidence!
Step-by-Step Instructions for Uploading Your Profile Picture
Ready to give your Shutterstock profile a fresh new look? Uploading a profile picture is a straightforward process, and I’m here to walk you through each step so you can do it with confidence. Let’s get started!
Step 1: Log Into Your Shutterstock Contributor Account
First things first, head over to the Shutterstock Contributor website and sign in using your email and password. If you haven’t created an account yet, you’ll need to register — but for those already set up, just enter your credentials and click Login.
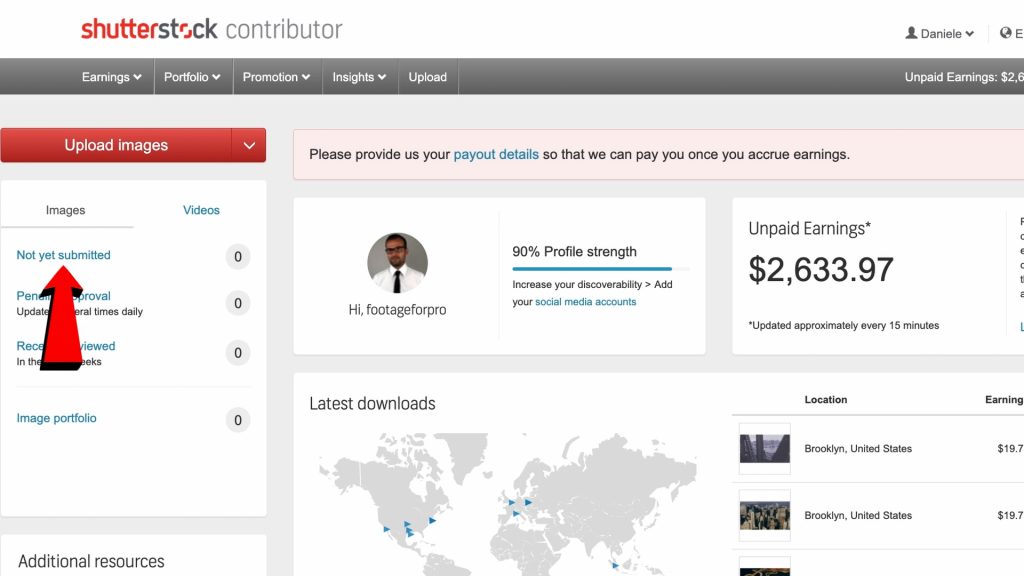
Step 2: Access Your Profile Settings
Once logged in, look for your profile icon or your username at the top right corner of the page. Click on it and select Profile Settings from the dropdown menu. This is where all your profile details, including your profile picture, are managed.
Step 3: Locate the Profile Picture Section
Scroll down until you find the section labeled Profile Photo. You should see an existing image (or a placeholder if you haven’t uploaded one yet). Click on the image or the Change Photo button — this will open a file browser window.
Step 4: Choose Your Picture File
Navigate to where your image file is stored on your device. Shutterstock recommends using a clear, high-quality image that represents you professionally. Supported formats typically include JPG and PNG. Select your preferred photo and click Open.
Step 5: Adjust and Crop (if available)
Some platforms allow you to crop or adjust your image before finalizing. If this option appears, make sure your face is centered and clearly visible. Keep in mind that a square or close-to-square aspect ratio works best for profile pictures.
Step 6: Save Your Changes
After confirming your image looks good, click the Save or Upload button. Your new profile picture will be uploaded and should appear almost instantly on your profile page.
Step 7: Verify the Upload
Finally, visit your profile page to double-check that your new photo is displayed correctly. If something looks off, repeat the process or choose a different image. It’s all about making a great first impression!
Tips for Choosing the Right Profile Image
Your profile picture is often the first thing people see when they visit your Shutterstock profile. It’s worth taking a moment to pick the right image. Here are some friendly tips to help you select a photo that makes a positive impact:
1. Use a Clear, High-Quality Photo
Blurry or pixelated images can look unprofessional. Opt for a high-resolution photo where your face is sharp and visible. Avoid overly dark or overly bright images — good lighting makes a big difference!
2. Focus on Your Face
Since this image represents you, a close-up of your face works best. Make sure your face fills most of the frame, and your features are easy to recognize even at smaller sizes.
3. Choose a Professional and Friendly Expression
Smile or maintain a friendly expression to appear approachable. You don’t need to look overly formal, but avoid extreme or distracting expressions that might not convey professionalism.
4. Keep Backgrounds Simple
A cluttered or busy background can distract from your face. A plain or softly blurred background helps keep the focus on you.
5. Dress Appropriately
Wear attire that aligns with your brand or the type of work you do. For example, if you’re a professional photographer, a casual but neat look is fine. If you work in corporate design, opting for business casual might be better.
6. Be Consistent with Your Brand
If you have an existing brand or online presence, try to use a similar style or image to maintain consistency. This helps followers or clients recognize you easily.
7. Update Regularly
As you change your look or if your appearance evolves, don’t forget to update your profile picture. Fresh images keep your profile active and engaging.
Remember, your Shutterstock profile picture is a small but powerful part of your online presence. Putting a little thought into choosing the right image can help attract more viewers, clients, or collaborators. Happy uploading!
Troubleshooting Common Upload Issues
Uploading a profile picture on Shutterstock should be a smooth process, but sometimes, you might run into a few hiccups. Don’t worry—most issues are easy to fix once you know what to look for. Here’s a quick rundown of common problems and how to troubleshoot them.
Problem 1: File Format or Size Errors
Shutterstock typically accepts JPEG, PNG, and GIF formats. If your upload is rejected, double-check that your image is in one of these formats. Also, ensure your file size doesn’t exceed the platform’s limit (usually around 10MB). If it does, resize or compress your image using free tools like TinyPNG or Compress JPEG.
Problem 2: Image Resolution and Quality
Uploading a blurry or low-resolution picture can cause issues. Make sure your profile picture is at least 600×600 pixels for clarity. Avoid heavily compressed images, as they can look pixelated or fuzzy. A high-quality, well-lit photo makes a better impression and reduces upload problems.
Problem 3: Slow or Failed Uploads
If your upload stalls or fails, check your internet connection. A stable, high-speed connection makes the process smoother. Sometimes, browser issues cause trouble. Try clearing your cache, switching browsers, or disabling browser extensions that might interfere. Also, ensure your browser is up to date.
Problem 4: Browser Compatibility
Some browsers work better than others with upload features. Chrome, Firefox, and Edge are usually reliable. If you’re experiencing issues, switch to a different browser to see if that helps.
Problem 5: Platform Restrictions or Bugs
Occasionally, Shutterstock might have temporary glitches. Check their status page or community forums for updates. If you suspect a platform bug, contact Shutterstock support—they’re usually quick to assist.
Remember, if you’re stuck, don’t hesitate to reach out to Shutterstock’s support team or consult their help center. They often have specific tips and solutions tailored to common upload issues. With a little patience and troubleshooting, you’ll have your profile picture uploaded in no time!
Finalizing Your Profile and Maintaining Your Image
Congratulations! Once your profile picture is uploaded successfully, it’s time to finish setting up your profile and think about how to keep your image fresh and professional over time.
Complete Your Profile Details
Your profile isn’t just about the picture—it’s also about the information you share. Make sure to fill out all relevant fields:
- Bio: Share a little about yourself, your expertise, and your interests. Keep it friendly and professional.
- Skills and Tags: Highlight your specialties to attract the right clients and collaborators.
- Contact Info: Ensure your email is current so people can reach you easily.
This complete profile helps build trust and makes sure you appear professional to potential clients and collaborators browsing Shutterstock.
Maintaining Your Profile Image
Your profile picture is often the first impression people have of you. To keep it looking sharp:
- Update Regularly: If your appearance changes significantly, consider uploading a new photo. A current image shows authenticity.
- Stay Consistent: Use the same or similar images across your social media and portfolios for brand consistency.
- Choose High-Quality Photos: Avoid pixelation or over-compression. A clear, well-lit photo remains professional.
- Be Approachable and Friendly: Smiling photos tend to resonate better and make you seem more approachable to clients.
Engage and Update Your Profile
Periodically review your profile to ensure all information is current. Engage with the Shutterstock community by commenting, updating your portfolio, and staying active. This not only boosts your visibility but also reinforces your professionalism.
Finally, remember that your profile is your personal brand on Shutterstock. Keeping it polished, consistent, and up-to-date helps attract the right opportunities and builds your reputation. Take a moment every few months to review your profile—your future self will thank you!