If you’re a designer or an artist looking to turn your creative vectors into a steady source of income, Shutterstock is a fantastic platform to consider. It’s one of the largest stock image sites out there, giving your artwork exposure to millions of potential buyers worldwide. But getting started with submitting vectors can seem a bit daunting at first. Don’t worry—once you understand the process, it’s straightforward and efficient. In this guide, we’ll walk through everything you need to know to submit your vectors smoothly and start earning quickly. Let’s dive in!
Preparing Your Vector Files for Upload

Before you hit that upload button, it’s crucial to make sure your vector files are properly prepared. High-quality, well-organized files not only increase your chances of acceptance but also ensure buyers get exactly what they’re looking for. Here are some key steps to prep your vectors for Shutterstock:
- Use the Correct File Format: Shutterstock primarily accepts vectors in AI (Adobe Illustrator) format, but EPS files are also widely accepted. Make sure your files are saved in the latest compatible versions for best compatibility.
- Keep Files Clean and Organized: Remove unnecessary layers, hidden objects, and unused swatches. Flatten complex effects if needed and ensure your artwork is tidy. Name your layers clearly, which can help during review and editing.
- Check Image Quality and Resolution: Since vectors are scalable, resolution isn’t as critical as in raster images, but make sure your artwork looks sharp at different sizes and doesn’t have pixelation or artifacts.
- Ensure Proper Licensing and Originality: Only submit your original work or assets you have rights to. Avoid copyrighted content unless you have explicit permission or licenses.
- Follow Shutterstock’s Content Guidelines: Familiarize yourself with their content policies to avoid rejection. For vectors, this includes avoiding overly complex or cluttered designs, ensuring your artwork is versatile and marketable.
Additionally, it’s a good idea to prepare descriptive and accurate metadata—titles, tags, and descriptions—that will help your vectors get discovered by buyers. Well-prepared files and metadata make the submission process smoother and boost your chances of earning fast and often.
Creating an Account and Setting Up Your Contributor Profile
So, you’re ready to start earning from your vector art? Great! The first step is to create an account on Shutterstock as a contributor. It’s a straightforward process, but taking a little time to set up your profile properly can really pay off in the long run.
Head over to the Shutterstock Contributor website and click on the sign-up button. You’ll be prompted to enter some basic information like your name, email address, and creating a password. Make sure to choose a strong password to keep your account secure. Once you’ve registered, Shutterstock will send you a confirmation email—just click the link inside to verify your email address.
Next, you’ll need to fill out your contributor profile. Think of this as your digital storefront—potential buyers will see your profile and decide whether to explore more of your work. Here’s what to focus on:
- Profile Picture: Use a clear, professional-looking photo or logo that represents you or your brand.
- Bio: Write a brief but engaging bio about your background, style, and what kind of vectors you create. Keep it friendly and personable—people love to connect with artists they can relate to.
- Keywords and Tags: Add relevant keywords to help buyers find your vectors easily. Think about what terms someone might search for—like “minimalist icons,” “nature illustrations,” or “tech vectors.”
- Payment Details: Set up your payout information, whether through PayPal, bank transfer, or other options available. Double-check everything to avoid delays in receiving your earnings.
Remember, your profile is your chance to make a good first impression. Fill it out completely, keep it professional but approachable, and make sure your contact info is accurate. This sets the stage for a smooth journey as a Shutterstock contributor.
Uploading Your Vectors to Shutterstock
Now that your profile is set up and looking sharp, it’s time to upload your vectors. Here’s how to do it efficiently and maximize your chances of fast earnings:
Step-by-step Uploading Process:
- Log in to your contributor account. Once logged in, click on the “Upload” button usually found on your dashboard.
- Select your files: Choose the vector files you want to upload. Make sure they’re in supported formats like AI, EPS, SVG, or ZIP (containing multiple files). Ensure your vectors are high-quality, well-organized, and free of errors.
- Add metadata: This is super important! Fill out the title, description, and keywords thoughtfully. Use descriptive language and relevant tags to help your vectors appear in search results. The more accurate your metadata, the better your chances of sales.
- Choose categories: Select the best categories that match your vector’s content. Proper categorization makes it easier for buyers to find your work.
- Set licensing options: Shutterstock offers different licensing options—standard and extended. For vectors, usually the standard license suffices unless you have specific commercial needs. Make sure to select the appropriate license for each upload.
- Preview and submit: Before hitting submit, review all details to ensure everything looks good. Check the preview image and metadata for accuracy.
Tips for Fast Earnings:
- Upload consistently: Regular uploads keep your portfolio fresh and improve your chances of being discovered.
- Quality over quantity: Focus on creating high-quality, unique vectors rather than just uploading lots of similar work.
- Use relevant keywords: Don’t stuff keywords—be precise and relevant to avoid rejection and boost visibility.
- Follow Shutterstock guidelines: Make sure your vectors meet technical and content standards to prevent rejection or delays.
Once your vectors are uploaded, Shutterstock will review them—this can take anywhere from a few hours to a couple of days. If approved, your work will be live and available for purchase. Keep an eye on your dashboard, monitor your sales, and continue creating and uploading new vectors to build a steady income stream.
Optimizing Your Vector Listings for Better Visibility
Let’s face it — creating stunning vectors is just the first step. If you want to earn fast and consistently from Shutterstock, you need to make sure your vectors are easy to find. That’s where optimization comes into play. Think of it as giving your listings a little boost so they stand out in the crowded marketplace.
First off, keywords are king. When you upload a vector, you get to add tags and descriptions. Use relevant, specific, and popular keywords that accurately describe your artwork. Instead of generic tags like “flower,” try “watercolor sunflower illustration” or “minimalist geometric logo.” The more precise your keywords, the better the chances your vectors show up in search results.
Next, craft a compelling and clear description. Describe what your vector is, its potential uses, and any unique features. Remember, this is not just for the algorithm but also for buyers who want to quickly understand what they’re getting. Use natural language and include keywords naturally within the description.
Here are some additional tips to maximize visibility:
- Use high-quality preview images: Make sure your preview images are crisp, well-lit, and showcase the best parts of your vector. A good preview can convince buyers to click and purchase.
- Organize your portfolio: Group similar vectors together and maintain consistency in your style. This helps your profile look professional and encourages repeat buyers.
- Stay current with trends: Keep an eye on trending topics, colors, and styles. Creating vectors that align with current design trends can significantly boost visibility.
Finally, consider engaging with the Shutterstock community and social media. Sharing your vectors or behind-the-scenes content can increase exposure and direct traffic to your portfolio. Remember, optimization isn’t a one-time task — keep refining your listings based on what’s working and stay active in the platform.
Understanding Shutterstock’s Submission Guidelines for Vectors
Before you start uploading your vectors, it’s crucial to understand Shutterstock’s submission guidelines. These rules ensure that your artwork meets quality standards and that your vectors are accepted smoothly, getting you closer to those fast earnings.
First off, file format and technical specifications. Shutterstock accepts vectors in AI, EPS, and SVG formats. Make sure your files are saved in the correct format and that they are clean, well-structured, and free of unnecessary data. Use standard fonts or convert text to outlines to avoid font issues.
Next, pay attention to quality and content standards:
- Resolution and clarity: Your vectors should be sharp, with clean lines and no pixelation or artifacts.
- Originality: Only upload vectors you’ve created yourself. Plagiarism or heavily copied work can lead to rejection or account issues.
- Appropriate content: Ensure your vectors do not contain offensive, inappropriate, or copyrighted material not owned by you.
Another key point is organization and naming conventions. Name your files clearly and descriptively, avoiding vague titles. This helps both the reviewers and buyers understand what your vector represents.
Shutterstock also recommends checking for common issues such as:
- Missing or incorrect layers
- Unnecessary embedded images or linked files
- Overly complex or overly simple vectors that don’t meet the platform’s quality standards
Lastly, review the specific content restrictions. Shutterstock prohibits vectors that promote violence, hate symbols, or infringe on trademarks. Always double-check your work to ensure it aligns with Shutterstock’s policies.
By carefully adhering to these guidelines, your vectors are more likely to be accepted quickly, meaning you can start earning faster. Take the time to learn and follow the rules — it’s an investment that pays off in smoother submissions and quicker earnings!
Tips for Increasing Your Vector Earnings on Shutterstock
When it comes to boosting your income from vectors on Shutterstock, a little strategy can go a long way. The good news is, with some simple tweaks and consistent effort, you can see your earnings grow steadily. Here are some practical tips to help you maximize your vector sales:
Focus on Trending and Niche Topics
Stay ahead of the curve by creating vectors around trending topics, seasonal themes, or niche markets that have less competition. Use tools like Google Trends or Shutterstock’s own trending sections to discover what buyers are looking for. For example, if eco-friendly products are trending, designing vectors around sustainability can attract more buyers.
Optimize Your Titles, Descriptions, and Tags
Think of your titles and tags as the breadcrumbs that lead buyers to your work. Be descriptive and specific. Incorporate relevant keywords naturally, and avoid keyword stuffing. Well-optimized listings make your vectors easier to find in searches, boosting your chances of sales.
Create High-Quality, Versatile Vectors
Invest time in making your vectors clean, professional, and versatile. Offer different color schemes or styles within a single project, so buyers can easily adapt them for various uses. Remember, the more useful your vectors are, the more likely they are to be purchased repeatedly.
Offer Bundles and Packaged Sets
People love getting more value for their money. Consider creating bundles of related vectors—like a set of icons or a themed collection. Bundles not only increase your overall sales but also improve your visibility on the platform.
Stay Consistent and Keep Creating
Consistency is key. The more vectors you upload, the higher your chances of making sales. Set a schedule for creating and submitting new work regularly. Over time, your portfolio becomes a trusted source for clients seeking fresh, high-quality vectors.
Engage with the Community and Keep Learning
Join Shutterstock forums or social media groups to connect with other artists. Share your experiences, get feedback, and stay updated on platform changes or new trends. Continuous learning helps you refine your craft and adapt your strategies for better earnings.
Monitoring Your Sales and Managing Your Portfolio
Managing your Shutterstock portfolio effectively is just as important as creating great vectors. Keeping an eye on your sales and understanding what works helps you make smarter decisions and grow your income over time. Here’s how to stay on top of things:
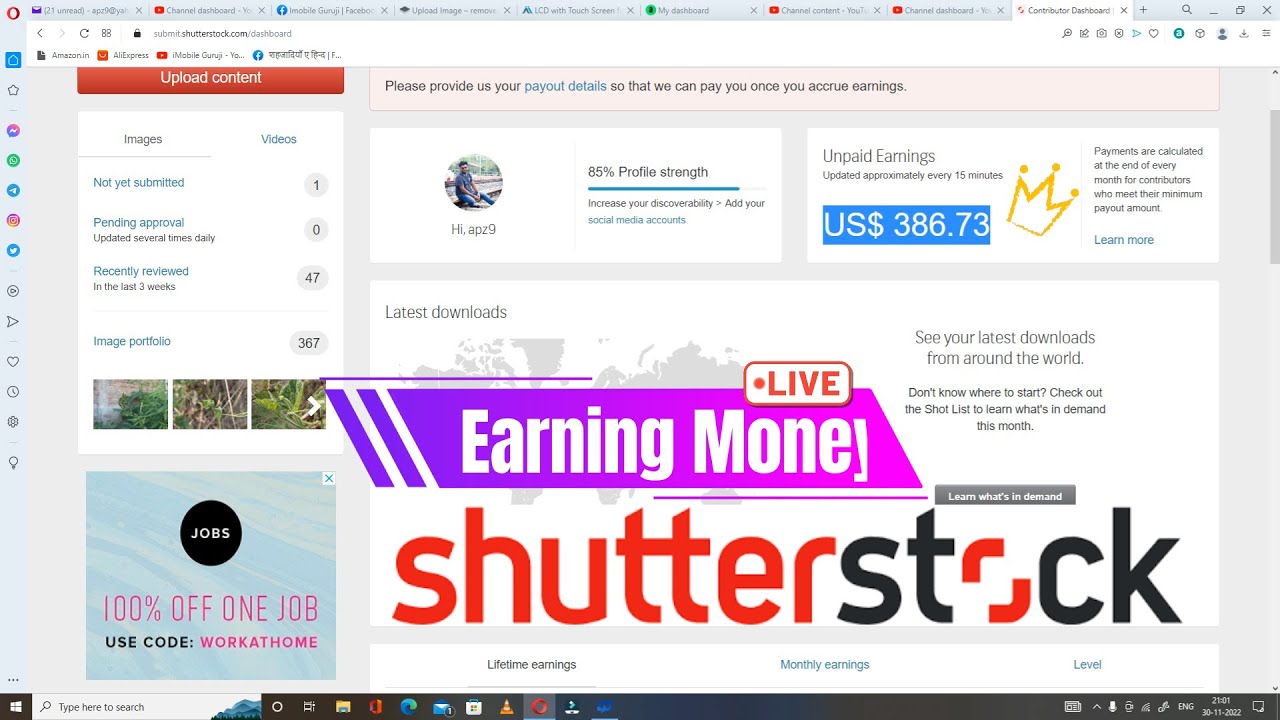
Use the Shutterstock Contributor Dashboard
The dashboard is your command center. Regularly check your sales reports to see which vectors are performing the best. Look for patterns—are certain styles, topics, or formats selling more? This insight guides your future creations.
Analyze Your Sales Data
Break down your earnings by:
- Individual vectors: Which ones are top-sellers?
- Categories or themes: What topics generate more sales?
- Time periods: Do sales spike during certain months or seasons?
Understanding these patterns helps you focus on what works and eliminate less profitable ideas.
Update and Refresh Your Portfolio
Keep your portfolio fresh by periodically updating old vectors—adding new color schemes, improving quality, or re-optimizing tags. Remove underperforming vectors that no longer attract buyers to keep your collection focused and appealing.
Organize Your Files for Easy Management
Use folders or labels to categorize your vectors by theme, style, or sales performance. This makes it easier to review your work, identify gaps, and plan future projects.
Set Goals and Track Progress
Establish clear objectives—for example, aiming for a certain number of sales per month or increasing your earnings by a specific percentage. Regularly review your progress and adjust your strategies accordingly.
Stay Informed About Platform Changes
Shutterstock often updates its submission guidelines, royalty rates, or featured collections. Subscribe to their contributor newsletters or follow their social media channels to stay informed. Being proactive ensures your portfolio remains compliant and competitive.
By actively monitoring your sales and managing your portfolio, you set yourself up for continued growth and success. Remember, the key is consistency, analysis, and a willingness to adapt to new trends and platform features. Happy creating and earning!
Conclusion and Final Tips for Successful Vector Submission
Submitting vectors to Shutterstock can be a highly rewarding experience if approached correctly. To maximize your chances of earning quickly and consistently, keep in mind the following final tips:
- Ensure high quality and originality: Your vectors should be well-designed, free of errors, and unique to stand out among thousands of submissions.
- Follow Shutterstock’s guidelines: Adhere to their technical specifications, such as file format, resolution, and keywording standards, to avoid rejection.
- Optimize keywords and descriptions: Use relevant, descriptive keywords to improve discoverability. Think about what buyers might search for.
- Maintain consistency: Regular submissions increase your portfolio visibility and chances for faster earnings.
- Promote your work: Share your vectors on social media or design communities to attract more buyers.
Remember, patience is key. Continually improve your skills, stay updated with Shutterstock’s requirements, and keep submitting high-quality vectors. Over time, this consistent effort will lead to increased earnings and a thriving portfolio.