Getting your photos onto Shutterstock can be an exciting way to share your work and earn some income. But, if you’re new to the platform, the submission process might seem a bit overwhelming at first. Don’t worry! Shutterstock has a straightforward process designed to help you get your images approved quickly, provided you follow their guidelines. In this guide, I’ll walk you through the basics of submitting your photos and how to prepare them so they meet
Preparing Your Photos for Submission to Shutterstock
Before you hit the submit button, it’s essential to make sure your photos are fully prepared to meet Shutterstock’s requirements. This isn’t just about quality—it’s also about following their technical specs and best practices to increase your chances of fast approval.
1. Check Technical Specifications
- Resolution: Your images should be at least 4 megapixels (e.g., 2400 x 1600 pixels) to ensure good quality for buyers.
- File Type: JPEG is the preferred format. Make sure your images are saved in RGB color mode, not CMYK.
- Compression: Save your JPEGs with minimal compression to avoid artifacts; aim for a quality setting of around 80-100%.
2. Ensure Your Photos Are Well-Edited
Good editing can make a big difference. Adjust brightness, contrast, and sharpness to make your images pop. Remove any distracting elements or blemishes. Remember, Shutterstock values high-quality, polished images that look professional.
3. Avoid Common Pitfalls
- Watermarks: Remove any watermarks or logos from your images. Only submit your original work.
- Over-Editing: Keep edits natural—overly manipulated images may be rejected.
- Copyrighted Material: Don’t submit images that contain copyrighted logos, trademarks, or recognizable private property unless you have a model or property release.
4. Organize and Label Your Files Properly
Use clear, descriptive filenames that include relevant keywords. This helps reviewers understand what your image is about and can speed up the review process.
5. Include Appropriate Metadata
When uploading, add accurate titles, descriptions, and keywords. Use relevant tags to improve discoverability. Be honest and precise—this not only aids in approval but also helps buyers find your images more easily.
By taking these steps to prepare your photos, you’re setting yourself up for a smoother submission experience and increasing the likelihood of quick approval. Remember, quality and compliance are key. Take your time to perfect your images before submitting, and you’ll be well on your way to sharing your work with the world on Shutterstock!
Creating a Shutterstock Contributor Account
Getting started with submitting your photos to Shutterstock is pretty straightforward, but the first step is creating a contributor account. Think of it as your personal gateway to sharing your images with a global audience and earning money. Here’s how to do it smoothly:
- Visit the Shutterstock Contributor Website: Go to submit.shutterstock.com. This is the dedicated portal for photographers and illustrators who want to contribute.
- Click on Sign Up: You’ll find a clear button to create an account. You can sign up using your email address or connect via your existing Adobe or Google account for quick access.
- Fill Out Your Details: Enter your personal info, including your name, email, and a secure password. Make sure the email you use is active because Shutterstock will send you important updates and verification links.
- Accept the Terms and Conditions: Take a moment to read through Shutterstock’s contributor agreement. Once you agree, you can proceed to the next step.
- Verify Your Email: Check your inbox for a verification email from Shutterstock and confirm your account. This step is crucial to activate your contributor profile.
Once your email is verified, you’ll be prompted to complete your profile, including adding a payment method and tax information. Be honest and precise—this helps avoid delays when you start earning from your photos.
Also, consider uploading a professional profile picture and writing a friendly bio. It makes your profile more trustworthy and appealing to buyers browsing the site.
And that’s it! Your account is now set up, and you’re ready to start uploading your stunning photos. Remember, creating a complete and professional profile can boost your credibility and help you get approval faster on your submissions.
Uploading Your Photos to Shutterstock
Great, your account is ready! Now comes the exciting part—uploading your photos. The goal here is to make sure your images are optimized for fast approval and appeal to buyers. Here’s a step-by-step guide to help you upload efficiently:
- Prepare Your Files: Before uploading, double-check that your photos meet Shutterstock’s technical requirements:
- File format: JPEG
- Minimum resolution: 4 MP (preferably higher for better quality)
- Color profile: sRGB
- File size: Less than 50MB
- Organize Your Photos: Create a folder on your computer specifically for submissions. Name your files clearly and include relevant keywords in the filename if possible.
- Login to Your Contributor Dashboard: Head over to your Shutterstock contributor account and click on the ‘Upload’ button.
- Select Your Files: Drag and drop your images into the upload window or browse to select them. You can upload multiple files at once—just keep an eye on the total size and batch limits.
- Add Metadata: This is a crucial step for fast approval:
- Titles: Make them descriptive and engaging but avoid keyword stuffing.
- Keywords: Use relevant, specific keywords to help buyers find your images. Think about what words a user might search for.
- Categories: Choose the appropriate categories and subcategories to classify your photo accurately.
- Description: Write a brief but detailed description highlighting the main elements of your image.
- Review and Submit: Before hitting submit, review all the details, ensure your images are correctly tagged, and meet Shutterstock’s guidelines. Then, click on the ‘Submit for Review’ button.
Once submitted, Shutterstock’s review team will evaluate your images. To speed up approval:
- Ensure your photos are technically perfect and free of noise, dust spots, or distracting elements.
- Stick to the themes that are currently popular or in demand.
- Use accurate and relevant keywords and descriptions.
- Upload high-quality images that stand out visually.
Remember, patience is key. If your images are rejected, Shutterstock usually provides feedback. Use this to improve your future submissions and increase your chances of fast approval next time.
Tips for Ensuring Fast Approval of Your Photos
Getting your photos approved quickly on Shutterstock can be a game-changer, especially if you’re eager to start earning from your work. While the approval process can sometimes feel like a waiting game, there are a few smart strategies you can use to give your submissions the best shot at speedy approval.
First and foremost, focus on quality. Shutterstock is all about high-quality, professional-looking images. Make sure your photos are sharp, well-lit, and properly exposed. Avoid grainy or blurry shots unless they serve a specific artistic purpose. Use a good camera and take the time to compose your shots thoughtfully.
Next, pay attention to technical details:
- Resolution: Upload images that meet Shutterstock’s minimum resolution of 4 megapixels. Higher resolution images are often preferred.
- File format: JPEG is the standard, with a high-quality setting (around 12-14 compression quality).
- Color profile: Use sRGB for consistent color display across devices.
Another tip is to thoroughly review Shutterstock’s content guidelines. They have specific rules about what is acceptable and what isn’t, including restrictions on copyrighted material, offensive content, or images that lack commercial value. Familiarize yourself with these guidelines to avoid common pitfalls.
Before submitting, do a quick self-check:
- Ensure your images are free of watermarks or branding.
- Remove any visible logos or trademarks unless they’re your own or you have permission.
- Check for any distracting elements or imperfections.
Adding relevant, descriptive keywords is essential. Use accurate, specific tags that relate directly to the content of your photo. This helps reviewers understand what your image depicts and increases the chance it will be approved quickly.
Finally, consider submitting images that are more likely to be in demand—think popular themes like business, travel, lifestyle, or nature. Keeping an eye on current trends can make your photos more appealing and streamline the approval process.
Common Reasons for Photo Rejection and How to Avoid Them
Even the most talented photographers encounter rejections. Understanding common reasons why photos get rejected can help you avoid those pitfalls and improve your chances of quick approval.
One of the main reasons is poor image quality. Blurry, pixelated, or underexposed images often don’t meet Shutterstock’s standards. To prevent this, always shoot with a good camera, use proper lighting, and review your photos carefully before uploading.
Another common issue is copyright infringement or the presence of recognizable trademarks, logos, or copyrighted artwork within the photo. Shutterstock is strict about intellectual property rights. Always ensure your photos are free of copyrighted elements unless you have explicit permission or they’re your own.
Offensive or inappropriate content is also a frequent cause for rejection. This includes images that contain nudity, violence, or sensitive subjects that could be considered offensive. Review Shutterstock’s content guidelines thoroughly to make sure your images are suitable for a broad audience.
Technical issues like incorrect file formats, low resolution, or missing EXIF data can also lead to rejections. Double-check your files before submitting to ensure they meet all technical specifications.
Lastly, photos that lack commercial appeal or don’t tell a clear story are less likely to be approved. Shutterstock favors images that are useful for commercial projects. To avoid this, focus on capturing images that are clear, well-composed, and relevant to common themes or needs.
In summary, pay close attention to quality, legality, and relevance. Taking the time to prepare your photos properly can save you from multiple rejection cycles and get your images approved faster. Remember, each rejection is just a learning opportunity—use it to refine your portfolio and improve your future submissions.
Final Steps After Submission and Tracking Your Approval Status
Once you’ve uploaded your photos to Shutterstock, you’re not quite done yet. This is a crucial phase where patience and attentiveness play a big role. First, double-check that all your files were uploaded correctly and that the images meet Shutterstock’s technical and content guidelines. It’s always good to review your uploads for any unexpected issues, like incorrect file formats or missing keywords.
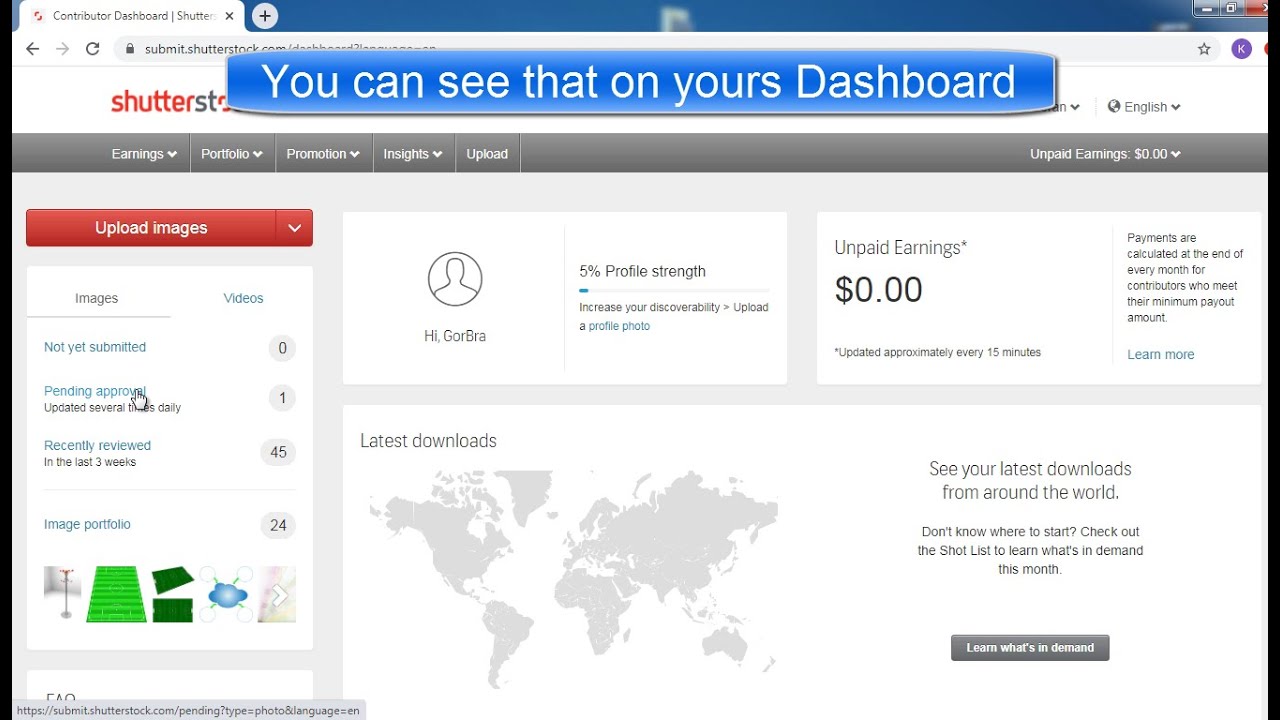
After confirming everything looks good, the next step is to wait for the review process. Shutterstock’s review team typically assesses submissions within a few days, but it can sometimes take longer during busy periods. During this time, you can log into your contributor account and navigate to the “Dashboard” or “My Uploads” section to see the status of your images.
How to Track Your Approval Status
- Pending Review: Your images are in the queue and awaiting evaluation. No action needed yet.
- Under Review: The Shutterstock team is currently assessing your submission. Be patient!
- Accepted: Congrats! Your image has passed the review process and is now available for licensing.
- Rejected: Unfortunately, your image didn’t meet the guidelines. Don’t get discouraged—review the feedback provided, make necessary adjustments, and resubmit.
Shutterstock usually provides feedback on rejected images, so take the time to understand their reasons. Common issues include poor image quality, inappropriate content, or missing keywords. Use this feedback as a learning opportunity to improve your future submissions.
Tips for Managing Your Submissions
- Stay Organized: Keep track of your uploads, approval statuses, and feedback in a simple spreadsheet or document.
- Respond Quickly to Feedback: If Shutterstock requests revisions or additional information, act promptly to keep the process moving.
- Be Patient: While fast approval is ideal, quality review takes time. Avoid submitting multiple versions of the same image repeatedly, as this might slow down your overall approval rate.
By staying proactive and organized during this stage, you’ll streamline the approval process and get your photos into the marketplace faster. Remember, every submission is a learning experience, so stay positive and keep refining your work!
Conclusion and Best Practices for Successful Shutterstock Submissions
Submitting photos to Shutterstock can seem daunting at first, but with the right approach, you can speed up the approval process and increase your chances of success. The key is to understand their guidelines, prepare your images meticulously, and stay patient during the review process.
Here are some best practices to keep in mind for your future submissions:
- Follow Technical Standards: Use high-resolution images (at least 4 MP), shoot in raw or high-quality JPEGs, and ensure proper exposure and focus.
- Pay Attention to Content Guidelines: Avoid prohibited content like trademarks, copyrighted material, or offensive imagery. Make sure your photos are original and appropriately styled.
- Optimize Metadata: Use clear, descriptive titles, relevant keywords, and accurate descriptions. Good metadata helps your images get discovered.
- Maintain Consistency: Regularly upload high-quality images that align with current market trends. Consistency builds your reputation as a reliable contributor.
- Review and Edit: Always review your images before uploading. Remove any distractions or imperfections and ensure they meet Shutterstock’s quality standards.
- Learn from Feedback: If rejected, read the feedback carefully, learn from it, and improve your future submissions. Don’t be discouraged—every rejection brings you closer to success.
- Stay Updated: Keep an eye on Shutterstock’s contributor guidelines and updates. Market trends change, and staying informed helps you tailor your portfolio accordingly.
Remember, patience and persistence are your best allies. The more you understand Shutterstock’s expectations and refine your work accordingly, the faster you’ll see your images approved and earning revenue. Happy shooting, and good luck with your submissions!