If you’re eager to get your photos approved quickly on Shutterstock, the first step is understanding their submission guidelines. Shutterstock is a popular platform for photographers and artists to sell their images, but they have specific rules to ensure quality and consistency. Knowing these rules can save you time and increase your chances of fast approval.
Shutterstock‘s guidelines cover several key areas:
- Image Quality: Your photos should be sharp, well-lit, and free of noise or pixelation. Avoid over-compression or heavy editing that distorts the image.
- Content Restrictions: No offensive, copyrighted, or inappropriate content. Make sure your images don’t include recognizable people without model releases, or private property without permission.
- Technical Specifications: Files should be in JPEG format, with a minimum of 4 megapixels and a maximum file size of 50MB. The recommended color profile is sRGB.
- Metadata: Properly keyword your images with relevant, accurate tags. This helps reviewers understand your content and improves discoverability.
Additionally, Shutterstock prefers images that are unique and original. They look for fresh perspectives and high creative standards. Before submitting, review their content guidelines and make sure your photos align with their quality benchmarks. This upfront effort can significantly speed up the approval process and get your work in front of buyers faster.
Preparing Your Photos for Submission

Preparation is everything when it comes to submitting photos to Shutterstock. Properly prepared images not only meet guidelines but also give your portfolio a professional edge, increasing your chances of quick approval.
Here’s a step-by-step guide to preparing your photos:
- Choose the Best Shots: Select images that are sharp, well-composed, and properly exposed. Eliminate duplicates or photos with technical flaws.
- Crop and Resize: Ensure your images meet the minimum resolution requirements (at least 4 megapixels). Crop to improve composition if necessary, but avoid excessive editing.
- Color Correction and Editing: Adjust brightness, contrast, and color balance to make your images pop. However, avoid over-editing or adding heavy filters that distort the natural look.
- Remove Watermarks and Logos: Make sure your images are free of any watermarks, logos, or branding elements unless they are a part of the image and relevant to the content.
- Rename Files Properly: Use descriptive, keyword-friendly filenames. Instead of “IMG_1234.jpg,” use “sunset-over-mountains.jpg” to help reviewers understand the content.
- Optimize Metadata: Add accurate, descriptive keywords and categories. Think about what buyers might search for and include relevant tags. Be specific—mention the location, subject, mood, and colors if applicable.
- Check File Format and Size: Save your images as JPEG files in sRGB color profile, with a resolution of at least 300 dpi if possible. Ensure the file size is within Shutterstock’s limits.
Once your images are polished, it’s a good idea to review Shutterstock’s latest submission checklist to ensure nothing is overlooked. Taking the time to prepare your photos properly can make the submission process smoother, reduce rejections, and help you get your images approved quickly. Remember, quality and attention to detail are key to standing out and succeeding on Shutterstock!
Creating a Shutterstock Contributor Account
Ready to share your amazing photos with the world and start earning? The first step is creating a Shutterstock contributor account. Don’t worry — it’s straightforward and quick to set up. Just follow these simple steps, and you’ll be on your way to submitting your images in no time.
Step 1: Visit the Shutterstock Contributor Website
Head over to https://submit.shutterstock.com. This is the dedicated platform where contributors upload their photos, manage their portfolios, and track earnings. Take a moment to explore the site so you get familiar with the layout.
Step 2: Click on Sign Up
Look for the “Sign Up” button, usually located at the top right corner. You’ll be prompted to choose whether you want to sign up as an individual or a business. For most photographers, selecting “Individual” is the way to go, but if you own a photography business, you can choose the business option.
Step 3: Fill Out Your Details
Next, you’ll need to provide some basic information:
- Your full name
- Email address
- Create a strong password
- Country of residence
- Tax information (depending on your location)
Make sure to use an email address you check often—this will be your main point of contact for notifications, updates, and payment info.
Step 4: Agree to the Terms & Conditions
Read through Shutterstock’s contributor agreement carefully. It covers important details about licensing, payments, and your rights. If everything looks good, check the box to agree, then click “Create Account”.
Step 5: Verify Your Email
Shutterstock will send a verification email. Open your inbox, find the email, and click the link to verify your account. This step is crucial to ensure your account is active and ready for uploads.
Step 6: Set Up Your Profile
Once verified, you can add some optional details like a profile picture, a brief bio, and payment preferences. Filling out your profile makes your account look professional and helps build trust with buyers.
And voilà! You now have a Shutterstock contributor account. The next step is uploading your photos — but before that, it’s worth reviewing Shutterstock’s content guidelines to ensure your photos meet their quality standards. Let’s dive into that next!
Uploading Your Photos to Shutterstock
Great! Your contributor account is set up. Now, it’s time to share your photos with the world. Uploading to Shutterstock is designed to be user-friendly, but there are a few tips to keep in mind to speed up approval and avoid common pitfalls.
Step 1: Prepare Your Photos
Before uploading, make sure your images are:
- High quality: Sharp, well-exposed, and properly focused.
- In the right format: JPEG is preferred, with a minimum of 4 megapixels (preferably more).
- Correctly named: Use descriptive, keyword-rich filenames (e.g., “sunset-over-mountains.jpg”).
- Edited appropriately: Remove any watermarks, borders, or logos unless they’re part of the content.
Step 2: Log Into Your Contributor Dashboard
Head over to your dashboard and find the “Upload” button. It’s usually prominently displayed. Click it to start the upload process.
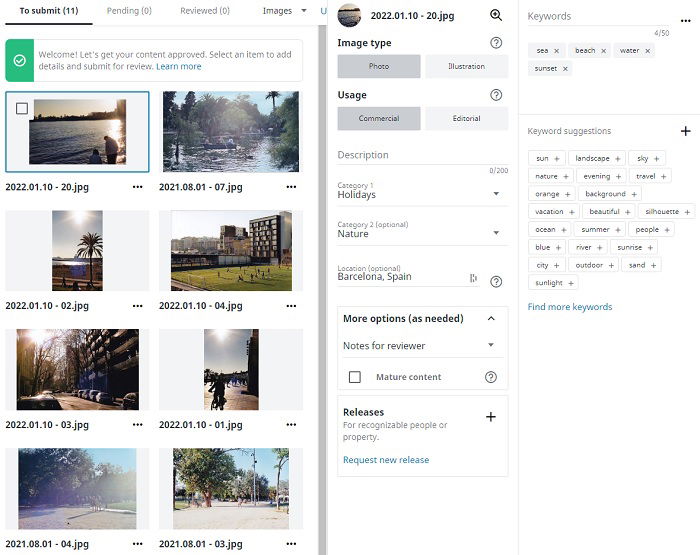
Step 3: Select Files and Enter Metadata
You can upload multiple images at once. After selecting your files, Shutterstock will prompt you to enter essential details:
| Field | What to Enter |
|---|---|
| Title | Use descriptive, keyword-rich titles that clearly explain the image. |
| Keywords | Add relevant keywords to help buyers find your images. Think about what people might search for. |
| Description | A brief, engaging summary of the photo. |
| Model/Property Releases | If applicable, upload release documents to verify legal rights. |
Providing accurate and detailed metadata accelerates approval and improves your chances of sales.
Step 4: Choose the Licensing Options
Shutterstock typically offers Standard and Enhanced licenses. For most photos, the default Standard license is fine, but read the options to select appropriately based on your content.
Step 5: Submit for Review
Once everything is filled out, click “Submit”. Your images will go into the review queue. The review team typically assesses images based on technical quality, relevance, and adherence to guidelines.
Tips for Fast Approval:
- Ensure your photos are sharp, well-exposed, and free of noise or artifacts.
- Avoid over-editing; keep images natural-looking unless intentionally artistic.
- Use relevant keywords and accurate descriptions.
- Upload images that meet Shutterstock’s content policies—avoid copyrighted material, logos, or identifiable people without releases.
Once approved, your photos will be available for sale, and you’ll start earning royalties. Remember, consistency and quality are key—regular uploads can boost your profile and sales over time. Now that you know how to upload, happy shooting and uploading!
Tips for Increasing Your Approval Speed
Getting your photos approved quickly on Shutterstock can feel like a bit of a game, but with the right approach, you can speed up the process and start earning sooner. Here are some handy tips to help you get your images approved faster:
Follow Shutterstock’s Submission Guidelines
The first step is to really understand what Shutterstock expects from contributors. This means reading their content quality standards and submission guidelines carefully. Make sure your photos are sharp, well-composed, and properly exposed. Avoid overly edited images or those with heavy filters unless they serve a specific creative purpose. Adhering to their technical requirements (like file size, format, and model releases) can prevent unnecessary delays.
Upload High-Quality, Unique Photos
Shutterstock loves fresh, original content. Before submitting, double-check that your photos are high-resolution and free of noise, blurriness, or distracting elements. Try to upload images that stand out—whether through compelling subject matter, creative composition, or unique perspectives. The more originality you bring, the more likely your images will catch the reviewers’ attention and get approved faster.
Organize Your Portfolio
Having a well-organized portfolio can sometimes help speed up the review process. Use relevant, descriptive keywords and titles for each image to make it easier for reviewers to understand what they’re looking at. A clear, professional presentation shows that you’re serious about your work, which can facilitate quicker approval.
Stay Consistent and Regular
Uploading consistently and maintaining a steady flow of submissions signals to Shutterstock that you’re an active contributor. This can sometimes lead to quicker reviews because the platform recognizes your commitment and familiarity with their standards. Don’t flood them all at once, but aim for regular, manageable batches of high-quality images.
Be Patient but Persistent
While these tips can help speed things up, remember that review times can vary. If your images are rejected, use the feedback to improve and resubmit. Keep uploading, stay updated with their guidelines, and gradually build a robust portfolio. Over time, your approval speed and acceptance rate will improve.
Common Reasons for Rejection and How to Avoid Them
Even the most talented photographers face rejection sometimes. Recognizing common pitfalls can save you time and frustration, helping you get your images approved on the first try. Here are some of the most frequent reasons Shutterstock rejects photos—and how to steer clear of them:
Low-Quality or Blurry Images
- Why it happens: Poor focus, camera shake, or incorrect settings can lead to images that lack sharpness.
- How to avoid: Use a tripod or stabilization tools, shoot in good lighting, and always review your photos before uploading. Make sure the resolution meets Shutterstock’s standards (usually at least 4 MP).
Overly Edited or Filtered Photos
- Why it happens: Excessive filters, heavy Photoshop edits, or unnatural effects can make images look fake or unprofessional.
- How to avoid: Keep edits subtle and natural. Focus on enhancing the photo’s clarity, color balance, and contrast without overdoing it.
Non-Commercial or Inappropriate Content
- Why it happens: Photos with offensive content, or images that are not suitable for commercial use, are often rejected.
- How to avoid: Ensure your content is appropriate, respectful, and adheres to Shutterstock’s content guidelines. Avoid controversial or sensitive subjects unless handled carefully.
Missing or Improper Model/Property Releases
- Why it happens: Photos featuring recognizable people or private property require legal releases.
- How to avoid: Obtain signed model and property releases before submitting. Upload these documents along with your images if applicable.
Poor Composition or Subject Matter
- Why it happens: Cluttered backgrounds, uninteresting angles, or weak focal points can detract from an image’s appeal.
- How to avoid: Practice good composition techniques like the rule of thirds, clean backgrounds, and clear subject focus. Think about what makes your photo compelling.
By paying attention to these common pitfalls and proactively addressing them, you’ll improve your chances of getting your photos approved quickly and consistently. Remember, rejection isn’t the end—it’s an opportunity to learn and refine your craft. Keep experimenting, stay patient, and soon enough, your Shutterstock portfolio will be thriving!
Final Steps After Submission and Tracking Your Approval Status
After submitting your photos to Shutterstock, the next phase involves monitoring your submission status and ensuring your images meet the platform’s standards. Once uploaded, you will receive a confirmation message, and your images will enter the review queue. It’s essential to regularly check your contributor dashboard for updates on each submission’s progress.
Shutterstock’s review process typically takes a few days, but it can vary depending on the volume of submissions. You can view the status of your images under the “Submissions” tab, where they will be marked as “In Review,” “Approved,” or “Rejected.” If your images are rejected, carefully read the feedback provided. Common reasons include poor image quality, inappropriate content, or lack of model/property releases. Address these issues promptly and consider resubmitting improved versions.
To streamline your approval process, consider these tips:
- Review Shutterstock’s guidelines regularly to ensure compliance.
- Maintain high-quality standards by submitting sharp, well-exposed images.
- Use relevant keywords and accurate descriptions to improve discoverability.
- Track your submissions’ performance to identify popular themes or styles.
Remember, patience is key during the review process. Keep refining your portfolio based on feedback and trends, and continue submitting new content to increase your chances of fast approval and sales.
Staying proactive and attentive to your submission status will help you navigate the approval process smoothly and maximize your success as a Shutterstock contributor.