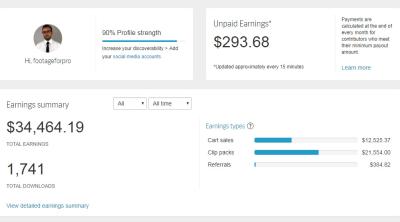
Thinking about sharing your photos with the world and earning some extra income? Shutterstock is one of the most popular platforms for photographers and graphic artists to showcase and sell their work. But if you’re new to the process, it might seem a bit overwhelming at first. Don’t worry! This guide will walk you through the basics of submitting your images to Shutterstock, making the whole experience smooth and stress-free. Whether you’re just starting out or looking to improve your submission game, you’ll find tips and insights to help you succeed and get your images approved quickly.
Preparing Your Images for Upload
Before you hit that upload button, it’s important to make sure your images are properly prepared. High-quality, well-edited photos stand a much better chance of getting approved and selling. Here are some key steps to get your images ready:
- Check Image Quality: Ensure your photos are sharp, well-exposed, and free of noise or distracting elements. Use a good editing software to enhance colors, contrast, and clarity.
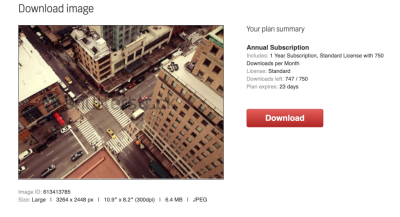
- File Format and Size: Shutterstock accepts JPEG files with a minimum of 4 megapixels (roughly 2400 x 1600 pixels). Save your images in RGB color mode for the best results, and make sure they are under 50MB in size.
- Keywording and Metadata: Think about relevant keywords that describe your image. Accurate and descriptive keywords help buyers find your photos easily. Keep your keywords specific and avoid spammy tags.
- Remove Watermarks and Logos: If your images contain any watermarks or logos, make sure to remove them before submitting. Shutterstock prefers original, clean images.
- Check for Model and Property Releases: If your photos include recognizable people or private property, ensure you have the necessary releases. This can be a deciding factor for approval and licensing.
- Organize Your Files: Upload your images in batches and keep track of what you’ve submitted. Naming files descriptively can also help during the review process.
Taking these steps not only increases your chances of approval but also speeds up the overall submission process. Remember, quality and attention to detail are key when preparing your images for Shutterstock. Once your images are polished and ready, you’re all set to upload and start sharing your creativity with the world!
Step-by-Step Guide to Uploading Images on Shutterstock
Ready to get your stunning photos out into the world and start earning? Uploading images to Shutterstock isn’t as complicated as it might seem. Let’s walk through the process step-by-step so you can do it smoothly and confidently.
Step 1: Sign in or Create an Account
If you haven’t already, head over to Shutterstock’s contributor portal and sign up. It’s free and straightforward. Just fill in your details, agree to the terms, and verify your email. Once you’re in, you’ll see your dashboard, ready for uploads.
Step 2: Prepare Your Images
Before uploading, make sure your images are ready. This means:
- Ensuring they are high resolution (at least 4 MP recommended)
- Saving in JPEG format with a high-quality setting
- Naming your files clearly and descriptively
- Removing any embedded watermarks or branding
Step 3: Click on the Upload Button
On your dashboard, find the “Upload” button. It’s usually prominently displayed. Clicking it will open the upload window where you can select your files.
Step 4: Select Your Files
Choose the images you want to upload from your computer. You can select multiple files at once. Shutterstock supports batch uploads, which saves time if you have a collection of images.
Step 5: Fill in Metadata
This is a crucial step! For each image, you’ll need to add:
- Title: A clear, descriptive name
- Keywords: Up to 50 relevant keywords that help users find your image
- Description: A brief explanation of what the image depicts
Make your descriptions accurate and natural. Think about what someone searching for this image might type.
Step 6: Choose Categories and Settings
Select the appropriate categories and subcategories. You can also specify if the image contains recognizable people or property, which might require model or property releases.
Step 7: Submit for Review
Once all metadata is filled out, review your information. Then, click “Submit” or “Publish.” Your images will go into Shutterstock’s review queue, which usually takes a few days.
Step 8: Monitor Your Submissions
Check your dashboard for updates. If your images are approved, they’ll go live, and you can start earning royalties. If they’re rejected, Shutterstock typically provides feedback so you can improve and resubmit.
And that’s it! Uploading images is pretty straightforward once you get the hang of it. Just remember to keep your files organized and metadata accurate for the best results.
Tips for Ensuring Your Images Meet Shutterstock Standards
Getting your images accepted on Shutterstock is all about quality, compliance, and presentation. Here are some friendly tips to help you create content that meets their standards and increases your chances of approval.
1. Focus on High Quality and Resolution
Shutterstock favors sharp, clear images. Aim for a resolution of at least 4 MP (megapixels), but higher is better. Avoid images that are blurry, pixelated, or noisy. Use a good camera or smartphone with a high-quality lens to capture crisp details.
2. Mind Composition and Lighting
Think about composition—use the rule of thirds, leading lines, and balanced framing. Good lighting makes a huge difference. Natural light often works best, but professional lighting setups can elevate your images. Avoid harsh shadows or overexposure.
3. Keep the Background Clean and Distraction-Free
Cluttered backgrounds can detract from your main subject. Make sure the background complements your subject and doesn’t distract viewers. If needed, use editing tools to clean up or blur backgrounds for a more professional look.
4. Avoid Over-Editing
While some retouching is okay, avoid overdoing it. Excessive filters, heavy smoothing, or unnatural color shifts can lead to rejection. Aim for natural, true-to-life images unless your style specifically calls for artistic effects.
5. Use Proper Model and Property Releases
If your image features recognizable people or private property, you need the appropriate releases. Without them, Shutterstock may reject your submission. Always obtain signed releases when photographing models or private property.
6. Be Mindful of Content Restrictions
Shutterstock has strict guidelines about certain content, such as:
- No violent or graphic content
- No illegal activities
- No offensive or adult content
- No trademarks or branding without permission
Review their content guidelines regularly to stay compliant.
7. Keep Your Files Organized and Metadata Accurate
Properly named files and detailed, relevant keywords help your images get discovered. Take the time to craft descriptive titles and tags that match what your image depicts.
Following these tips puts you on the right track to getting your images approved and seen by a global audience. Remember, quality and adherence to guidelines are key—so take your time and produce the best work you can!
Common Challenges When Submitting Images and How to Overcome Them
Submitting images to Shutterstock can be a straightforward process, but like anything, it comes with its own set of challenges. Understanding these common hurdles and knowing how to navigate them can save you time and frustration, increasing your chances of getting accepted. Let’s walk through some of the typical issues creators face and practical tips on overcoming them.
1. Image Rejection Due to Technical Issues
Sometimes, your images get rejected because of technical problems like poor image quality, incorrect file formats, or improper sizing. For example, Shutterstock prefers high-resolution images with sharp focus and good exposure. Submitting images in formats other than JPEG or TIFF can also cause issues.
- Solution: Always check Shutterstock’s technical requirements before uploading. Use photo editing software to ensure your images meet the minimum resolution (usually 4 MP or higher), are in sRGB color space, and saved as JPEG or TIFF.
2. Lack of Commercial Appeal
Another common challenge is submitting images that don’t resonate with buyers. Shutterstock’s marketplace favors images that are versatile, high quality, and have commercial potential. Pictures that are overly niche or personal might struggle to get accepted or sell well.
- Solution: Research trending topics and popular categories. Think about what businesses or designers might need—like business concepts, lifestyle shots, or abstract backgrounds—and tailor your submissions accordingly.
3. Model or Property Release Issues
If your images feature recognizable people or private property, Shutterstock requires proper model or property releases. Failing to include these can lead to rejection, especially if the image is accepted but the license becomes restricted later.
- Solution: Always obtain signed releases before submitting. Keep scanned copies organized and ready to upload if needed.
4. Copyright and Model Release Violations
Using copyrighted elements or not having proper releases can cause your images to be rejected or removed. Even small details like logos or branded products need permission.
- Solution: Use original photos or ensure you have the rights to all elements within your image. When in doubt, avoid including recognizable trademarks or copyrighted materials.
5. Inconsistent or Incomplete Metadata
Accurate titles, descriptions, and keywords are crucial for discoverability. Incomplete or misleading metadata can hinder your image’s visibility or lead to rejection if it doesn’t match Shutterstock’s guidelines.
- Solution: Take your time to craft descriptive, keyword-rich titles and tags. Be honest and precise about what’s in your image to ensure it reaches the right audience.
Final Tips to Maximize Your Acceptance Rate on Shutterstock
Getting your images accepted on Shutterstock is a mix of quality, relevance, and following guidelines. Here are some final tips to help you boost your acceptance rate and stand out as a contributor:
1. Follow Shutterstock’s Submission Guidelines Closely
Every marketplace has its rules, and Shutterstock is no exception. Regularly review their technical and content standards to ensure your images are compliant. This includes resolution, format, and content restrictions.
2. Prioritize Quality Over Quantity
While it might be tempting to upload lots of images quickly, focus on submitting only your best work. High-quality, well-composed, and visually appealing images will have a higher chance of acceptance and sales.
3. Use Relevant and Specific Keywords
Effective metadata can make or break your image’s visibility. Think about what keywords potential buyers might use and include both broad and niche terms. Avoid spammy or irrelevant tags.
4. Stay Current with Trends
Keep an eye on trending topics, seasonal themes, and popular styles. Submitting timely content increases your chances of acceptance and sales. Consider using tools like Google Trends or Shutterstock’s own trending sections for inspiration.
5. Engage with the Community
Participate in forums, read contributor tips, and learn from successful creators. Sharing experiences and tips can give you valuable insights into what works best on Shutterstock.
6. Keep Learning and Improving
Photography and content creation are ever-evolving fields. Invest in your skills through courses, tutorials, or workshops. The better your technical and artistic skills, the higher the quality of your submissions.
7. Be Patient and Persistent
It’s normal to face some rejection when starting out. Use feedback constructively, refine your work, and keep submitting. Over time, your acceptance rate will improve as you understand what Shutterstock values.
By staying diligent, attentive to guidelines, and continuously honing your craft, you’ll find that submitting images to Shutterstock becomes less of a hassle and more of an exciting opportunity to share your creativity with the world.
Conclusion and Next Steps for Shutterstock Contributors
Becoming a successful contributor on Shutterstock involves more than just uploading images; it requires understanding the platform’s guidelines, maintaining high-quality standards, and staying consistent. Remember, quality over quantity is key to increasing your chances of sales and gaining approval for your submissions. As you progress, consider exploring the following next steps:
- Refine Your Portfolio: Regularly review your uploaded images and update your portfolio with fresh, high-quality content that aligns with current trends.
- Stay Informed: Keep up-to-date with Shutterstock’s contributor guidelines and licensing policies to ensure your submissions meet all requirements.
- Engage with the Community: Join contributor forums and social media groups to share tips, get feedback, and learn from experienced contributors.
- Optimize Your Metadata: Use relevant keywords and accurate descriptions to improve the discoverability of your images.
- Experiment and Diversify: Explore different styles, themes, and subjects to broaden your appeal and increase your chances of sales.
By following these steps, you can streamline your submission process, enhance the quality of your portfolio, and maximize your earning potential on Shutterstock. Persistence, continuous improvement, and staying informed are your best tools for success in the competitive stock photography market. Keep creating, learning, and adapting—your contributions have the potential to reach a global audience and generate consistent income.