Are you passionate about photography and eager to turn your snapshots into a source of income? Shutterstock is one of the leading platforms where photographers and videographers can license their work to a global audience. But submitting active images—photos that capture lively moments, dynamic scenes, or vibrant subjects—requires more than just clicking the shutter. It’s about understanding what Shutterstock looks for and making sure your images meet their quality standards. In this guide, we’ll walk you through the essentials of submitting active images successfully, so you can boost your chances of licensing success and grow your portfolio.
Understanding Shutterstock’s Image Submission Requirements
Before you hit the upload button, it’s crucial to familiarize yourself with Shutterstock’s specific image submission requirements. This ensures your images aren’t rejected and that they stand out to buyers. Let’s break down the key aspects you need to keep in mind:
- Image Quality: Shutterstock demands high-resolution images with sharp focus, proper exposure, and minimal noise. Typically, they prefer images with a minimum of 4 MP resolution, but higher is always better for versatility and print quality.
- File Format: JPEG is the standard format for submissions. Ensure your images are saved with an sRGB color profile for accurate colors across devices.
- Composition and Content: For active images, dynamic compositions that showcase movement, emotion, or energy work best. Avoid cluttered backgrounds and ensure your subject is clear and engaging.
- Model and Property Releases: If your active image features recognizable people or private property, obtain the necessary releases to avoid licensing issues later.
- Avoid Prohibited Content: Shutterstock has strict guidelines against images containing illegal activities, offensive content, or copyrighted trademarks without permission.
Additionally, pay attention to keywording your images effectively. Use descriptive, relevant keywords that accurately reflect the scene, activity, and mood. Proper keywording helps buyers find your images easily, increasing your chances of licensing success.
Remember, each submission is an opportunity to showcase your talent and attention to detail. By understanding and adhering to these requirements, you set yourself up for a smoother review process and more active licensing opportunities. Happy shooting!
Preparing Your Active Images for Upload
Before you even think about clicking that upload button, it’s essential to get your images ready for submission. Think of it as preparing a delicious dish—you want everything to be in top shape to impress the judges (in this case, Shutterstock’s reviewers). The goal here is to make sure your images meet Shutterstock’s quality standards, are properly organized, and are optimized for licensing success.
First up, quality is king. Your images need to be sharp, well-exposed, and free of any distracting elements like dust spots or noise. Use editing software to enhance colors, straighten horizons, and crop to the right composition. Remember, images that look professional and polished stand a much better chance of getting accepted and selling well.
Next, pay attention to technical specifications:
- Resolution: Shutterstock recommends a minimum of 4 megapixels, but higher resolution images (e.g., 12 MP or more) are better for licensing potential.
- File format: Save your images as JPEG files with an sRGB color profile. This ensures color consistency across different devices and platforms.
- File size: Keep your JPEGs under 50 MB to facilitate smooth uploads.
Another important aspect is to avoid watermarks, logos, or any branding on your images. Shutterstock prefers clean, unbranded images that can be licensed for various uses.
Organize your images into folders with clear, descriptive names. This makes it easier when selecting which images to upload and helps keep your portfolio tidy. For example, instead of generic folder names like “Photos,” try something more specific like “Sunset Beaches” or “Corporate Office Shots.”
Finally, consider adding relevant keywords and descriptions to your images. Think about what potential buyers might search for—use keywords that accurately describe your image content, including location, subject, mood, and any other relevant details. Well-tagged images are more discoverable, increasing your chances of licensing success.
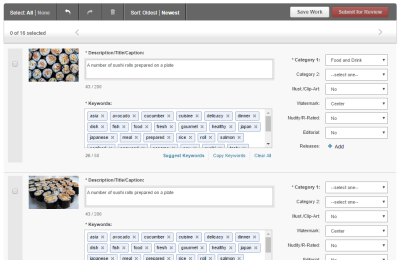
Step-by-Step Guide to Uploading Images to Shutterstock
Now that your images are polished and ready, it’s time to get them uploaded to Shutterstock. Here’s a simple step-by-step guide to walk you through the process:
- Log in to your Shutterstock Contributor account: Head over to the Shutterstock Contributor portal and sign in. If you don’t have an account yet, registering is quick and free.
- Navigate to the upload area: Once logged in, click on the “Upload” button usually found on your dashboard or menu. This takes you to the upload interface.
- Select your images: Click the “Select Files” button or drag and drop your prepared JPEG files into the upload window. You can upload multiple images at once—Shutterstock allows batch uploads.
- Assign categories and keywords: After selecting your images, you’ll be prompted to add descriptive keywords and select relevant categories. Be specific and accurate to help your images get discovered.
- Add titles and descriptions: Write clear, engaging titles and detailed descriptions for each image. This extra info can boost your images’ visibility and appeal.
- Review image details: Check that all technical info (resolution, format, etc.) is correct and that your keywords are properly assigned.
- Submit for review: Once everything looks good, click the “Submit” button. Your images will then enter Shutterstock’s review process, which usually takes a few days.
During the review period, Shutterstock’s team evaluates your images for quality, originality, and compliance with their guidelines. If approved, your images will be added to your portfolio and available for licensing. If not, they’ll provide feedback so you can make necessary adjustments and resubmit.
And that’s it! Uploading images might seem straightforward, but taking the time to prepare your files properly and following these steps can make a big difference in licensing success. Happy uploading!
Tips for Increasing Your Image Approval Chances
Getting your images approved on Shutterstock can sometimes feel like a game of chance, but there are definitely strategies to boost your success rate. The key is to understand what the reviewers are looking for and to make sure your submissions meet those standards. Here are some practical tips to help you increase your approval chances:
Focus on Quality over Quantity
Shutterstock values high-quality images that are well-composed, sharp, and properly exposed. Instead of submitting dozens of average shots, take your time to capture a few stunning images. Use good lighting, pay attention to composition, and ensure your photos are free of noise or distracting elements.
Follow Technical Guidelines
- Resolution: Submit images at least 4 MP (megapixels), but higher is better.
- File Format: JPEG with a minimum of 8-bit color depth.
- Color Mode: RGB is the standard.
- Compression: Save images with minimal compression to avoid quality loss.
Checking Shutterstock’s technical requirements before uploading can save you time and prevent unnecessary rejections.
Be Unique and Original
Stock agencies are always on the lookout for fresh, original content. Avoid overused themes or cliché shots. Instead, aim for unique perspectives or creative concepts that stand out. This could mean capturing an unusual angle, interesting lighting, or a novel subject approach.
Steer Clear of Model and Property Releases (unless applicable)
If your image features recognizable people or private property, make sure you have the appropriate releases. Without them, your images might be rejected for licensing reasons. Take the time to obtain releases when necessary—it’s worth the effort.
Pay Attention to Composition and Editing
Good editing can elevate your photos, but avoid over-processing. Keep your images natural-looking unless a creative effect is intentional. Proper cropping, balanced exposure, and color correction can make a significant difference in approval chances.
Research Accepted Content
Spend some time browsing Shutterstock’s library to see what types of images are popular and accepted. This can give you insight into trends and standards, helping you tailor your submissions accordingly.
Managing Your Shutterstock Contributor Account
Once you start submitting images, managing your contributor account efficiently becomes crucial. A well-organized account not only saves you time but also helps you maximize your earning potential. Here’s how to keep your account in top shape:
Keep Your Portfolio Updated
Regularly upload fresh content to keep your portfolio active and engaging. Shutterstock rewards contributors who consistently submit new images, which can lead to higher visibility and sales.
Organize Your Uploads
Create a system to categorize your images—by themes, styles, or subjects. This makes it easier to find and update your portfolio, and it helps you track what has been accepted or rejected.
Monitor Your Earnings and Performance
Check your dashboard frequently to see how your images are performing. Use this data to identify your best-performing content and focus on creating similar images in the future.
Respond to Feedback and Rejections
If an image is rejected, read the reviewer notes carefully. Sometimes, a simple adjustment can turn a rejection into an acceptance. Don’t be discouraged—use rejections as learning opportunities to improve your future submissions.
Stay Informed About Shutterstock Policies
Platform policies and technical requirements can change. Make it a habit to review Shutterstock’s contributor guidelines periodically to ensure your uploads remain compliant.
Engage with the Contributor Community
Join forums or social media groups where Shutterstock contributors share tips and experiences. Networking can provide valuable insights, inspiration, and support as you grow your portfolio.
Utilize Portfolio Tools and Analytics
Shutterstock offers tools to help you analyze your portfolio’s strengths and weaknesses. Use these insights to refine your content strategy and improve your chances of licensing success.
Managing your Shutterstock contributor account with care and strategic planning can make a real difference in your licensing success. Stay consistent, keep learning, and enjoy the creative journey!
Maximizing Revenue with Your Active Image Submissions
So, you’ve started submitting your active images to Shutterstock—fantastic! But how do you turn those images into a steady stream of income? The key is not just about uploading, but about strategically maximizing your revenue. Let’s explore some tips to help you get the most out of your submissions.
Optimizing Image Titles and Descriptions
Think of your titles and descriptions as the storefront windows for your images. Clear, descriptive, and keyword-rich titles help buyers find your images easily. For example, instead of “Beach Photo,” go for “Sunset Over the Tropical Beach with Palm Trees.” Your descriptions should expand on the title, adding context and relevant keywords that potential buyers might search for.
Use Relevant Keywords Wisely
- Research trending keywords in your niche.
- Include both broad and specific keywords.
- Avoid keyword stuffing—be natural and relevant.
Upload Consistently
Regular uploads keep your portfolio fresh and more likely to be noticed. Shutterstock’s algorithm favors active contributors, so aim to submit new images weekly or biweekly. Over time, this consistency can lead to increased visibility and sales.
Focus on Niche Markets
While broad images are always in demand, niche topics—like specific hobbies, industries, or cultural themes—can attract dedicated buyers willing to pay premium prices. Find your niche, master it, and produce high-quality images that stand out.
Leverage Your Best Work
Review your submissions periodically. Identify which images generate the most downloads and analyze what makes them popular. Use this insight to guide future shoots—whether it’s a particular style, subject, or composition that resonates with buyers.
Engage with the Community
Participate in Shutterstock forums or social media groups. Sharing tips, getting feedback, and staying updated on market trends can give you an edge and inspire new ideas for profitable images.
Remember, maximizing your revenue isn’t just about quantity; it’s about quality, relevance, and strategic presentation. Keep refining your approach, and over time, you’ll see your earnings grow!
Common Mistakes to Avoid When Submitting Images
Submitting images to Shutterstock can be quite rewarding, but it’s easy to make mistakes that can hinder your success or even get your submissions rejected. Let’s go over some common pitfalls so you can steer clear and keep your portfolio on the right track.
1. Ignoring Shutterstock’s Submission Guidelines
Every platform has rules, and Shutterstock is no exception. Failing to follow their technical requirements—like image resolution, file format, or model releases—can lead to rejections. Always review their latest contributor guidelines before uploading.
2. Poor Image Quality
Blurry, pixelated, or poorly lit images won’t sell. Make sure your images are sharp, well-exposed, and free from noise. Use good equipment and editing tools to enhance quality. Remember, high-quality images attract more buyers and earn better royalties.
3. Overusing or Misusing Keywords
- Stuffing keywords can get your images flagged or rejected.
- Use relevant keywords that accurately describe your image.
- Avoid irrelevant tags just to get more views.
4. Lack of Model or Property Releases
If your images include recognizable people, private property, or trademarks, proper releases are mandatory. Uploading images without necessary releases can lead to rejection or licensing issues down the line.
5. Duplicate or Similar Images
Uploading multiple similar images can cannibalize sales. Instead, focus on creating a diverse portfolio with unique shots. Use editing to vary compositions and styles to stand out.
6. Not Researching Market Demand
Uploading images that don’t align with current market trends or buyer needs is a waste of effort. Spend time researching popular themes and keywords to ensure your images have a higher chance of selling.
By avoiding these common mistakes, you increase your chances of getting accepted and earning steady income from your active images. Stay patient, keep learning, and continually improve your skills—your efforts will pay off in the long run!
Conclusion and Final Tips for Successful Image Submission to Shutterstock
Submitting active images to Shutterstock can significantly boost your licensing success when approached correctly. To maximize your chances, ensure your images meet Shutterstock’s quality standards, including high resolution, proper lighting, and sharp focus. Always verify that your images are free of any copyrighted elements or identifiable individuals unless you have proper releases. Pay attention to keywording; use relevant, specific keywords that accurately describe your image to improve discoverability. Organize your portfolio by diversifying your subjects and styles, which can attract a broader audience.
Here are some final tips to keep in mind:
- Review Shutterstock’s submission guidelines regularly for updates and best practices.
- Use descriptive titles and keywords to enhance search visibility.
- Maintain consistency in your submissions to build a recognizable portfolio.
- Stay patient and persistent; success often comes with regular, quality submissions.
Remember, the key to licensing success is quality, relevance, and adherence to Shutterstock’s standards. By following these tips and continuously improving your submissions, you increase your chances of earning royalties and establishing a strong presence on the platform. Keep practicing, stay updated with platform policies, and enjoy the journey of sharing your creative work with a global audience.