When it comes to creating a captivating book cover, the size of your photo plays a crucial role. A well-sized image not only looks professional but also ensures your cover appears crisp and attractive both online and in print. If your image is too small, it might become pixelated or blurry when enlarged, which can turn off potential readers. Conversely, an overly large image can cause unnecessary file size issues and slow down upload times. Proper sizing helps maintain the quality and visual impact of your cover, making it stand out on shelves and digital platforms alike. Remember, your book cover is often the first impression readers get—so getting the size right is key!
Recommended Dimensions and Resolution for Book Cover Images
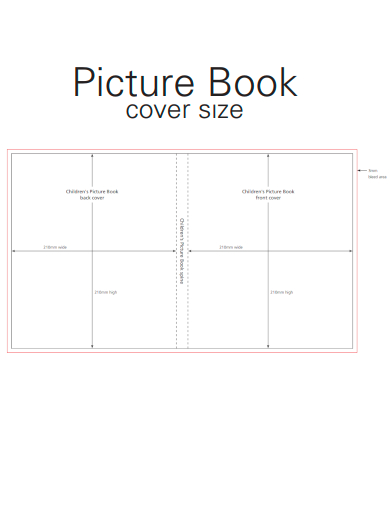
Getting the right dimensions and resolution is essential for a stunning book cover. Generally, Shutterstock recommends using images with a minimum resolution of 300 DPI (dots per inch) for print quality. This ensures your cover looks sharp and professional in print copies. As for dimensions, a common standard for book covers is:
| Type of Book | Recommended Width x Height | Notes |
|---|---|---|
| Standard Paperback | 6″ x 9″ | Design with bleed area included; typically add 0.125″ bleed on all sides |
| Hardcover | 6″ x 9″ or larger, depending on the size | Include spine width in width measurement; check specific publisher requirements |
| eBook Cover | 1600 px x 2560 px or higher | Maintain aspect ratio of 1:1.6 for best results |
For print covers, aim for a resolution of 300 DPI at the final dimensions, which means your image should be at least:
- For a 6″ x 9″ cover: 1800 x 2700 pixels
- For a larger cover or with bleed, increase the pixel dimensions accordingly
Always double-check the specific requirements of your publisher or printing service to ensure compatibility. When creating or choosing your photo, start with a high-resolution image and resize accordingly, avoiding stretching or compressing which can distort quality. Remember, investing in a high-quality, properly sized image will pay off with a professional-looking book cover that attracts readers and stands the test of time.
3. Step-by-Step Guide to Resizing Your Photo for Shutterstock
Ready to get your photo just right for Shutterstock? Don’t worry—resizing might sound complicated, but with a simple step-by-step approach, you’ll be a pro in no time. Here’s how to do it:
- Check Shutterstock’s Requirements: Before you start resizing, visit Shutterstock’s contributor guidelines. They specify the minimum resolution (generally 4 MP or 4000 pixels on the longer side), file format (JPEG or TIFF), and other specifications. Knowing these details upfront saves you from redoing work later.
- Open Your Photo in an Editing Program: Use tools like Adobe Photoshop, GIMP, or even online editors like Pixlr. Open your image file to get started.
- Determine the Desired Dimensions: Decide on the dimensions based on Shutterstock’s guidelines. For example, if they want a minimum of 4000 pixels on the long side, aim for at least that size.
- Resize the Image: Find the resize or image size option in your editor. Usually, it’s under ‘Image’ > ‘Image Size’ or similar. Enter the new width and height, making sure to keep the aspect ratio locked so your photo doesn’t get distorted.
- Maintain Image Quality: When resizing, avoid enlarging small images too much, as this can cause pixelation. If enlarging, do it gradually and check the quality at each step.
- Save Your Resized Photo: Save your image in the appropriate format, preferably JPEG with high quality (around 80-100%). Use a descriptive filename to keep track of your version.
And voilà! Your photo is now resized to meet Shutterstock’s standards. Just a few simple steps, and you’re ready to upload with confidence.
4. Using Editing Tools to Adjust Photo Size and Quality

Sometimes, resizing alone isn’t enough—you might need to tweak the quality, sharpen the details, or fix some imperfections. Luckily, there are plenty of easy-to-use editing tools out there to help you perfect your image.
Popular Editing Tools:
- Adobe Photoshop
- GIMP (free and open-source)
- Pixlr (online editor)
- Canva (for quick adjustments)
Here’s how you can use these tools to enhance your photo before submitting it to Shutterstock:
Adjusting Size and Resolution
- Open your photo in your chosen editor.
- Navigate to the resize or image size option.
- Set the dimensions to meet Shutterstock’s minimum requirements, ensuring the aspect ratio is maintained.
- Check the resolution—aim for 300 DPI if you’re planning to print, but for digital use, 72 DPI is usually fine.
Enhancing Photo Quality
- Sharpen: Slight sharpening can make details pop. Just be cautious—over-sharpening can introduce noise or halos.
- Adjust Brightness & Contrast: Correct lighting issues to make your photo look vibrant and appealing.
- Reduce Noise: Use noise reduction tools if your image is grainy or low-quality.
- Color Correction: Tweak saturation and color balance to make your image more eye-catching.
Final Tips for Optimal Results
- Always keep a copy of the original image before making edits, so you can revert if needed.
- Preview your image at 100% zoom to see how it will look in print or on screen.
- Save your final version in the highest quality possible without exceeding Shutterstock’s file size limits.
By using these editing tools thoughtfully, you can ensure your photo not only meets technical standards but also looks professional and captivating. Remember, a well-sized and high-quality image makes all the difference in getting approved and standing out on Shutterstock!
5. Tips for Ensuring Your Photo Meets Shutterstock Submission Requirements
Uploading a book cover photo to Shutterstock can be an exciting step toward sharing your work with a global audience. But to make sure your image gets approved quickly and looks professional, you need to meet Shutterstock’s submission requirements. Here are some helpful tips to keep in mind:
Understand the Technical Specs
First things first, familiarize yourself with Shutterstock’s technical guidelines. Typically, they require images to be:
- Minimum resolution: 4 MP (megapixels), but higher is better. A common size is 2400 x 1600 pixels or larger.
- File format: JPEG or TIFF with RGB color mode.
- Compression: JPEG images should be saved with high quality (around 80-100%) to prevent compression artifacts.
Ensuring your image matches these specs helps avoid rejection due to technical issues.
Check Image Dimensions and DPI
While DPI (dots per inch) isn’t as critical for online images, Shutterstock recommends 72 DPI for web display. However, when resizing, focus on pixel dimensions rather than DPI to ensure clarity. For print-quality images, 300 DPI is standard, but for online thumbnails, pixel dimensions are more important.
Make sure your book cover image is at least 2400 pixels on the shortest side. For example:
| Minimum Size | Recommended Size | Notes |
|---|---|---|
| 2400 x 1600 pixels | 3000 x 2000 pixels or larger | Higher resolution images look more professional and are more versatile. |
Maintain Proper Aspect Ratio
Most book covers are rectangular, commonly with a 6 x 9 inches aspect ratio, which translates to a 2:3 ratio. When resizing, keep this ratio consistent to avoid distortion. Use your image editing software’s aspect ratio lock feature to maintain proportions.
Use High-Quality Editing Software
Tools like Adobe Photoshop, GIMP, or Lightroom give you control over resizing and quality adjustment. Always start with the highest quality original image possible. When resizing, avoid enlarging small images too much, as this can lead to pixelation.
Preview Your Image
Before submitting, preview your cover at different sizes and devices. Shutterstock also provides a preview function during upload. Make sure the image still looks sharp, clear, and visually appealing in the preview mode.
Double-Check Your Metadata
Ensure your file has accurate and complete metadata, including relevant keywords and descriptions. This helps your image get discovered and increases chances of acceptance.
Following these tips will boost your chances of meeting Shutterstock’s submission standards and getting your book cover approved smoothly. Remember, attention to detail makes a big difference in the digital marketplace!
6. Common Mistakes to Avoid When Resizing Book Cover Photos
Resizing a book cover photo might seem straightforward, but there are some common pitfalls that can trip you up. Avoiding these mistakes can save you time, frustration, and ensure your cover looks professional and appealing:
1. Ignoring Resolution and Size Requirements
One of the biggest errors is not adhering to Shutterstock’s minimum size and resolution guidelines. Uploadting images that are too small or low quality results in rejection. Always double-check your pixel dimensions and ensure they meet or exceed the recommended sizes.
2. Enlarging Small Images Excessively
Upscaling a low-resolution image can cause pixelation and blurriness. Instead, start with a high-resolution original. If you need a larger size, use software with advanced resampling algorithms or consider recreating the cover at a higher resolution.
3. Distorting the Aspect Ratio
Stretching or squishing the image to fit a specific size without maintaining the aspect ratio leads to distorted visuals. Always lock the aspect ratio during resizing. For example, if your original is 6 x 9 inches, avoid changing it to 8 x 9 inches, which distorts the proportions.
4. Over-Compressing or Saving at Low Quality
Saving your JPEG at a low quality setting to reduce file size can introduce compression artifacts, making your cover look unprofessional. Save at the highest quality setting (around 80-100%) before uploading.
5. Not Checking Final Appearance
After resizing, view your image at actual size and in different formats. Sometimes, resizing can introduce artifacts or reduce clarity. Use zoom tools and preview modes to evaluate the final look.
6. Forgetting to Remove Watermarks or Logos
If your image contains watermarks, logos, or other branding elements, remove them unless they are part of your design. Shutterstock may reject images with unauthorized branding.
7. Overloading the Image with Text or Effects
While it’s tempting to add embellishments, excessive text or heavy effects can distract or diminish the professional appearance. Keep the design clean and legible, especially when resized for thumbnail views.
8. Not Saving a Copy of the Original File
Always keep a high-quality, unaltered original. This ensures you can revert or re-edit if needed without quality loss.
By steering clear of these common mistakes, you’ll produce a polished, professional-looking book cover that meets Shutterstock’s standards and helps your book stand out. Remember, taking a little extra time during resizing can make all the difference in how your cover is perceived!
Final Checks Before Uploading Your Book Cover to Shutterstock
Before you submit your book cover to Shutterstock, it’s essential to perform a series of final checks to ensure your image meets all quality and technical standards. These steps can help prevent rejection and ensure your cover looks professional and appealing to potential buyers.
1. Verify Image Dimensions and Resolution: Make sure your cover dimensions align with your target print or digital size. Shutterstock recommends a minimum resolution of 300 DPI for print-quality images. Confirm the width and height are appropriate, especially if your cover will be printed.
2. Check File Format and Size: Shutterstock accepts JPEG files. Ensure your file is saved in RGB color mode rather than CMYK, as digital images require RGB. Keep the file size under their maximum limit, typically 50MB.
3. Review Composition and Visual Quality: Examine your cover for any pixelation, blurriness, or artifacts. Make sure the text is legible, the images are clear, and the overall composition is balanced and eye-catching.
4. Confirm Copyright and Licensing: Ensure all elements in your cover are either your original work or properly licensed. Shutterstock is strict about copyright violations, which can lead to rejection or account issues.
5. Add Metadata and Keywords: Prepare relevant keywords and a compelling title and description to enhance discoverability once uploaded.
Performing these final checks can save time and increase the likelihood of your book cover being accepted on Shutterstock. Take a moment to review every detail carefully—your professional presentation can make all the difference in attracting readers and buyers.