Are you looking to enhance your website’s usability by saving contacts from buttons in Elementor? You’re in the right place! Elementor offers a robust platform for designing your pages without needing to write any code. This guide will walk you through the essential steps to set up buttons that can capture contact details effectively. Let’s dive in!
Understanding Elementor and Its Features

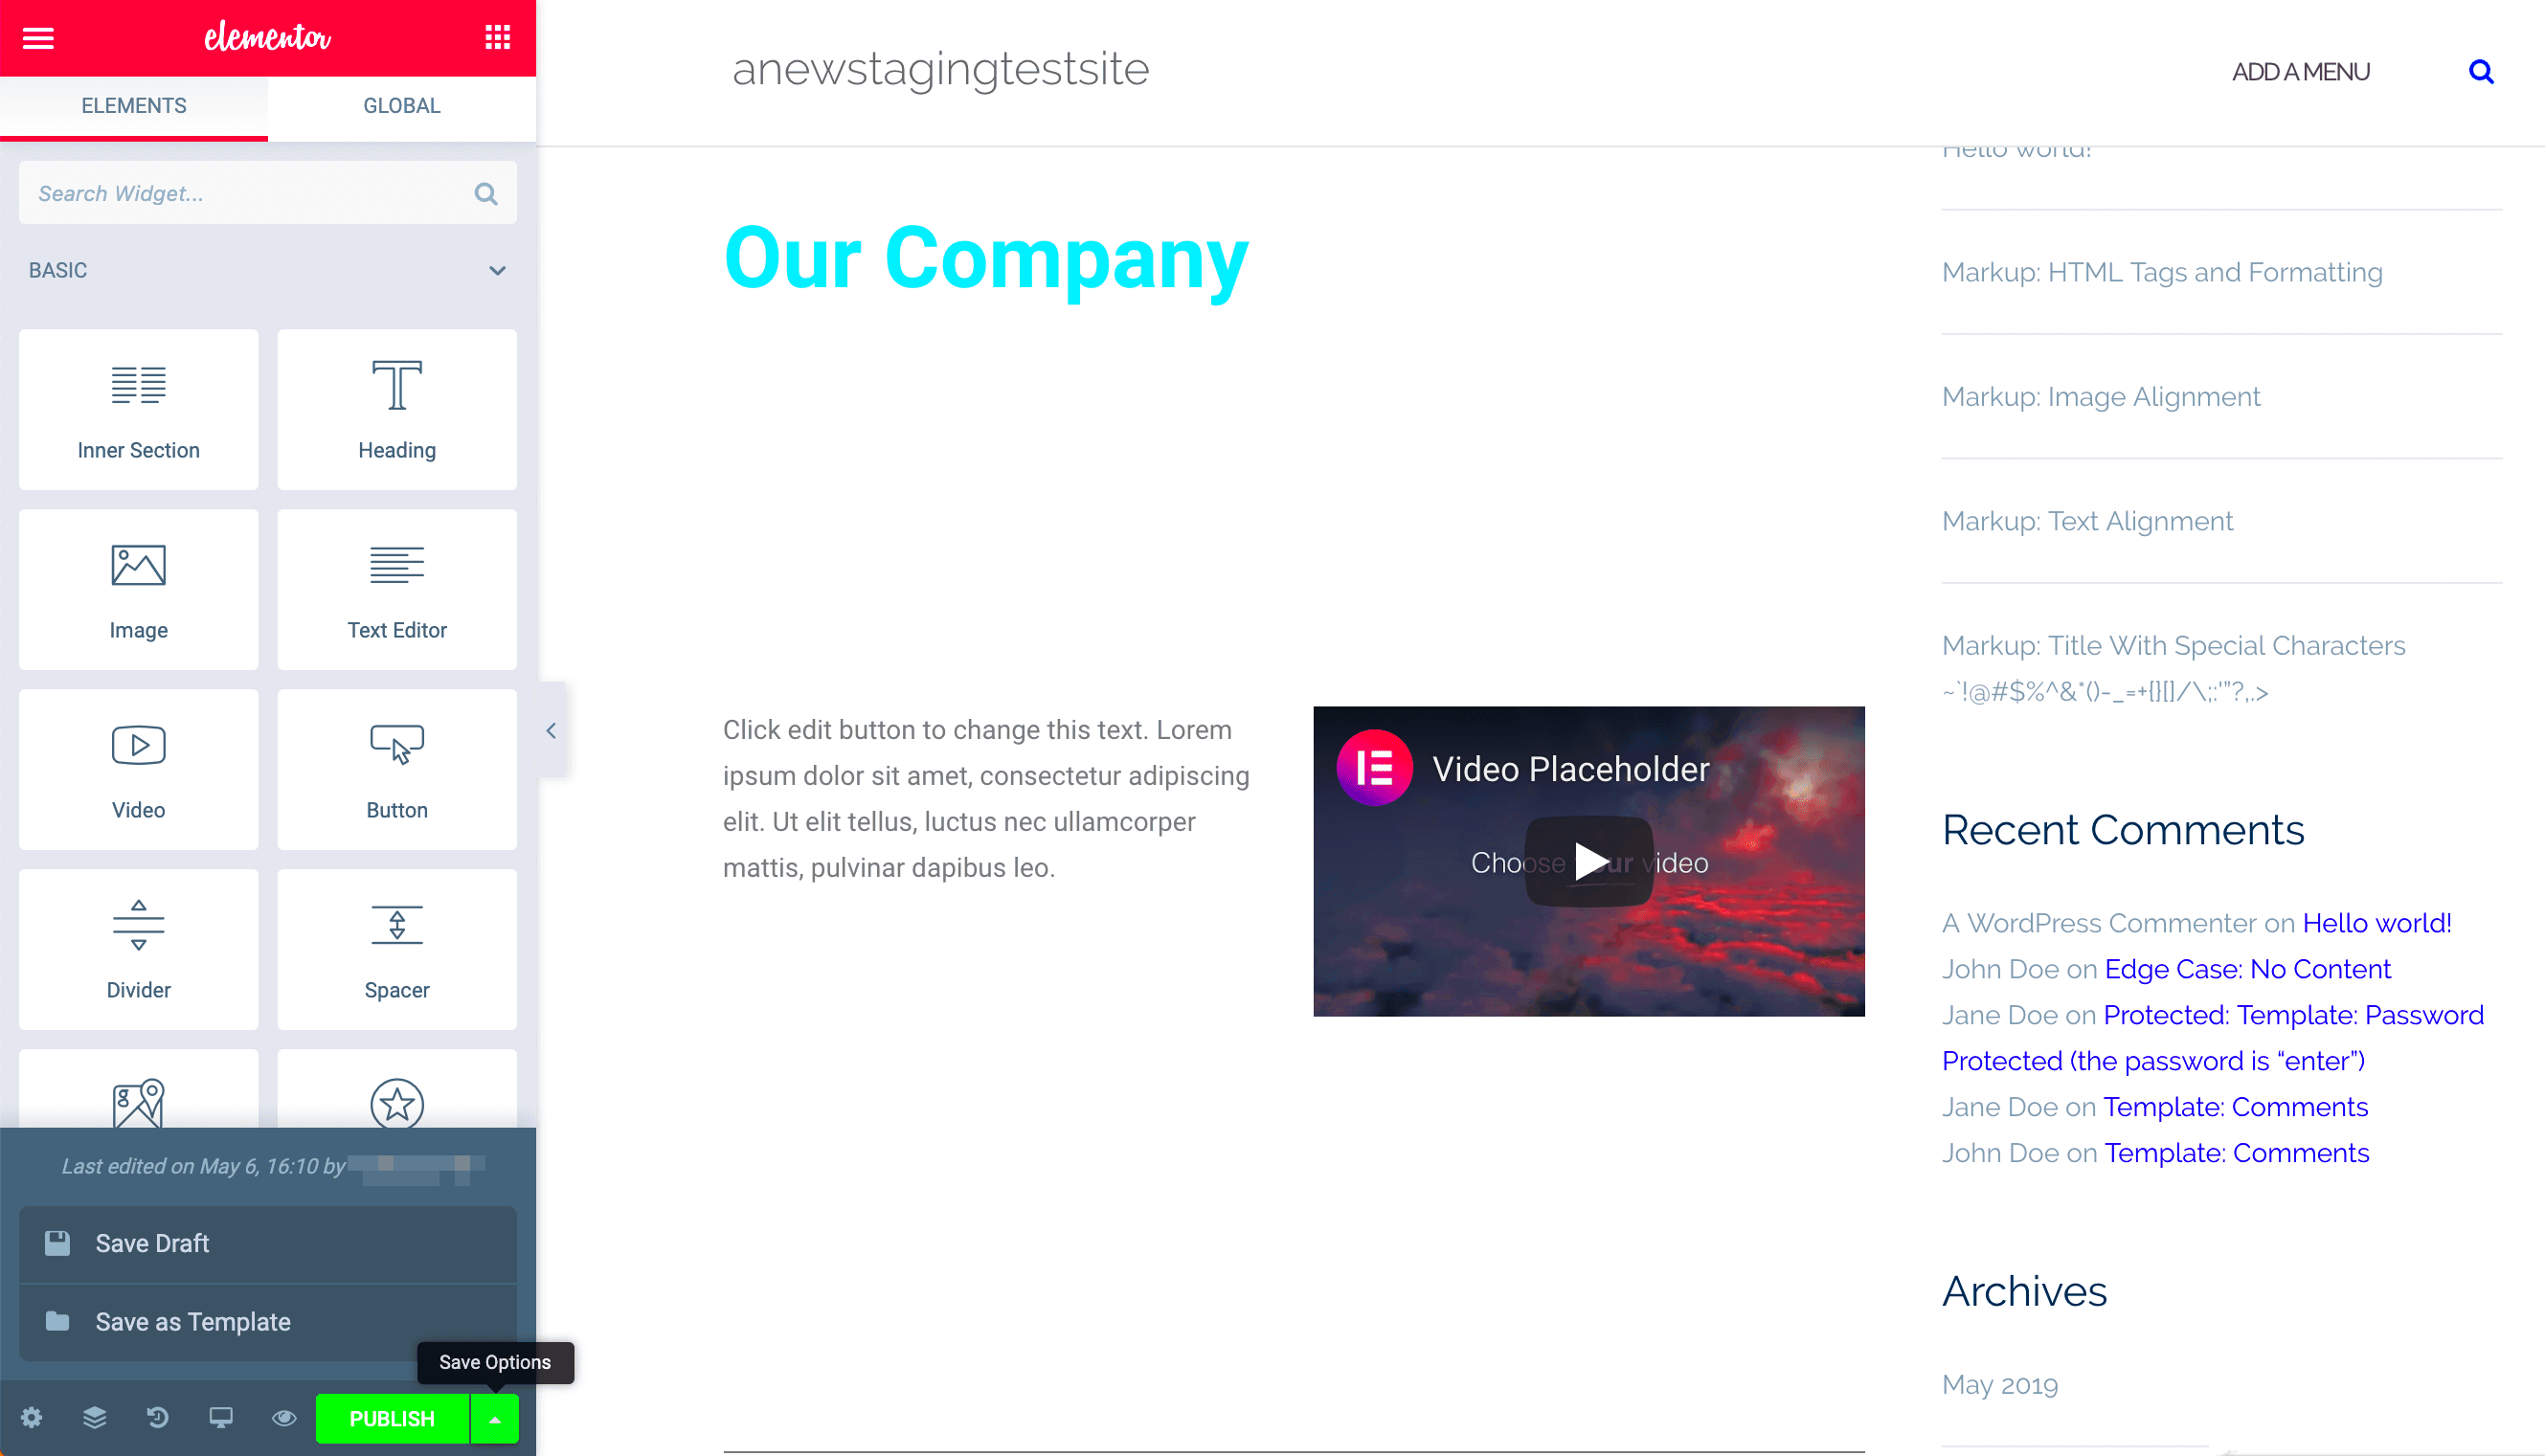
Elementor is a powerful page builder for WordPress that allows you to create stunning webpages with ease. It’s known for its drag-and-drop functionality, making it accessible for beginners and efficient for seasoned developers. Before we jump into saving contacts from buttons, let’s explore some key features that make Elementor stand out:
- Drag-and-Drop Editor: This feature allows you to easily design your layout by dragging elements onto your page. No coding skills required!
- Responsive Design: Ensure your website looks great on every device, whether it’s a desktop, tablet, or mobile phone.
- Templates and Blocks: Choose from a plethora of pre-designed templates and blocks to kickstart your design process.
- Widgets: Elementor comes equipped with various widgets like buttons, forms, and images that you can customize to fit your needs.
- Theme Builder: Design your headers, footers, and other site-wide elements effortlessly.
With Elementor, you can create interactive buttons that can effectively collect user information. How do we set this up? Don’t worry; we’ve got you covered in the upcoming sections! Start by familiarizing yourself with these features, as they’ll be integral to your project.
Setting Up Your Elementor Page
Before diving into creating buttons for contact submission, it’s essential to set up your Elementor page properly. This step will ensure that your design is cohesive and functions seamlessly, making it easier for visitors to interact with your content.
First things first, ensure you have Elementor installed and activated on your WordPress site. If you haven’t done this yet, you can do so by navigating to Plugins in your WordPress dashboard, searching for “Elementor,” and clicking Install Now. Once installed, activate the plugin.
Next, you’ll want to create a new page or edit an existing one. To do this, go to Pages > Add New, and you’ll see a button that says “Edit with Elementor.” Click on that, and you’ll be taken to the Elementor editor, where the magic happens!
Now that you’re in the Elementor editor, the first step is to set up your layout. Consider the following:
- Section Structure: Start by using sections and inner sections to organize your content effectively.
- Column Distribution: Decide how many columns you want based on your design needs. A single-column structure is great for focus, while multiple columns can enhance visual engagement.
Finally, don’t forget to customize your page settings! Click on the gear icon in the bottom left corner to access various options, including Page Layout and Document Settings. Adjust these to fit your desired outcome, such as enabling or disabling the header and footer, which can significantly change the appearance of your page.
Creating Buttons for Contact Submission
Once your Elementor page is set up, it’s time to create those eye-catching buttons that will encourage visitors to submit their contact information. Buttons are crucial for guiding users through your website, so let’s make them stand out!
To add a button in Elementor, follow these simple steps:
- Drag and Drop: In the Elementor editor, locate the Button widget in the elements panel. Simply drag it onto your desired section of the page.
- Customize the Button: Click on the button to open the settings panel. Here you can customize:
| Setting | Description |
|---|---|
| Text | Change the button text to something appealing like “Get In Touch” or “Subscribe Now”. |
| Link | This is where the magic happens. Add a link that leads to your contact form or email address. |
| Style | Modify the button’s colors, typography, and hover effects to align with your branding. |
| Size | Adjust the button size and padding for visual balance and usability. |
In addition, you can enable click tracking to analyze the effectiveness of your buttons. This can be done using plugins or Google Analytics by setting up event tracking.
With captivating buttons created, you’ll be all set to draw in potential leads who are interested in reaching out!
5. Linking Buttons to Contact Forms
Linking buttons to contact forms in Elementor is a fantastic way to increase user engagement and ensure that visitors can easily reach out to you. The process is simple and can have a significant impact on your site’s usability. Let’s dive into the steps to make it happen.
To link a button to a contact form, you’ll first need to have your contact form set up. Elementor allows you to create stunning forms with its built-in widgets. Once you have your form ready, follow these steps:
- Add a Button Widget: Drag and drop the button widget to your desired location on the page.
- Configure the Button Settings: Click on the button to open the edit panel. Here, you can change the text of the button, style it, and adjust its alignment.
- Linking the Button: In the link field, you have a couple of options:
- If your contact form is on the same page, simply input the ID of the section where your form is located. For example, if your form section has an ID of “contact-form,” you could type
#contact-form. - If your contact form is on a different page, just paste the URL of the contact page.
After linking your button, don’t forget to test it! Navigate to the front end of your site, click the button, and ensure it directs users to the contact form seamlessly. That’s it! You’ve just made it super easy for your visitors to get in touch with you.
6. Using Third-Party Plugins for Enhanced Functionality
If you’re looking to supercharge the capabilities of your contact forms in Elementor, third-party plugins can be a game changer. These plugins often come loaded with features that can enhance user experience, streamline submissions, and improve overall design. Let’s explore some popular options and how to integrate them.
Here are a few plugins you might consider:
- Elementor Addons: Plugins like Unlimited Elements or Essential Addons provide extra widgets that can enhance your contact forms.
- Form Plugins: Tools like WPForms or Ninja Forms are excellent options that come with advanced features such as conditional logic, multi-page forms, and email notifications.
- Spam Protection: Utilizing plugins like Akismet can help keep your submissions safe from spam and ensure that you’re only getting genuine leads.
To integrate these plugins:
- Install the Plugin: Go to your WordPress dashboard, navigate to Plugins, and click on “Add New.” Search for your desired plugin and click “Install.”
- Activate the Plugin: After installation, don’t forget to activate the plugin!
- Configure Settings: Each plugin has its own settings. Go through the options to customize how the plugin works and interacts with your forms.
- Add Functionality: Depending on the plugin, you may find additional widgets in Elementor or new features that enhance your existing forms.
Using third-party plugins can greatly improve the functionality of your contact forms, making them more versatile and user-friendly. So don’t hesitate to explore and find the perfect combination that suits your needs!
7. Testing Your Contact Button Setup
Once you’ve integrated your contact buttons in Elementor, it’s essential to test the entire setup to ensure everything works seamlessly. Testing not only confirms functionality but also enhances user experience. Here’s how to effectively test your contact button setup:
- Preview Mode: Start by using Elementor’s preview mode. This will allow you to see the buttons in action as they will appear on the live site, without publishing the changes.
- Check Functionality: Click each button to verify that they redirect to the expected forms, pop-ups, or other destinations. Double-check any linked URLs.
- Test Responsiveness: Use different devices and screen sizes to ensure that the buttons are functional and visually appealing on mobile, tablet, and desktop views.
- Email Verification: If your button leads to an email sign-up, ensure that you receive the verification emails. This step confirms that data is being captured accurately.
- Cross-Browser Compatibility: Test your setup across various browsers like Chrome, Firefox, and Safari to ensure consistent performance.
By systematically checking each aspect above, you can ensure that your contact button setup works efficiently. Remember, a well-functioning setup increases user trust and encourages more people to engage with your website.
8. Best Practices for Collecting Contacts
Collecting contacts through your Elementor site isn’t just about having a button and form in place; it’s about doing it effectively and ethically. Here are some best practices to keep in mind:
- Clear Call-to-Action (CTA): Make sure your buttons have a concise and compelling CTA like “Sign Up Now!” or “Get in Touch!” A strong CTA encourages users to click.
- Minimal Fields: Only ask for essential information, such as name and email. The fewer fields there are, the more likely users are to complete the form.
- Privacy Assurance: Be transparent about how you will use their information. A short note about data privacy helps build trust.
- Confirmation Messages: After submission, provide users with a confirmation message and details about what to expect next. It’s a simple way to enhance user experience.
- Follow-Up: Engage with users who submit their contacts promptly. Send an email thanking them for signing up or providing further information.
By implementing these best practices, you not only enhance the likelyhood of collecting more contacts but also establish a positive relationship with your audience from the get-go.
Conclusion
Saving contacts from buttons in Elementor is a straightforward process that can significantly enhance your user engagement and lead generation capabilities. By following the steps outlined in this guide, you can efficiently collect information from your visitors without the need for complicated coding or third-party plugins.
Here’s a quick recap of the steps to save contacts using buttons in Elementor:
- Select Your Widget: Choose a button widget in Elementor to start creating your contact form.
- Set Up Form Fields: Add necessary fields such as name, email, and message to collect essential contact information.
- Configure Actions After Submit: Go to the ‘Actions After Submit’ section to define what happens after users submit their information.
- Connect to Email or CRM: Integrate your form with email services or CRM platforms to ensure you receive the contacts effectively.
- Customize the Button Action: Ensure your button redirects users to a thank you page or displays a confirmation message.
Benefits of Saving Contacts from Buttons
| Benefit | Description |
|---|---|
| Increased Engagement | Encourages interaction and allows users to express their interest in your services. |
| Lead Generation | Create a database of potential customers for future marketing efforts. |
| Personalization | Collect data to tailor communication and offers to meet user needs. |
By utilizing these methods, you can effectively gather valuable contacts and enhance your business’s outreach capabilities.


