If you’re a WordPress user, you may have noticed that your theme library can quickly become cluttered with unused themes. While it might seem harmless to leave them be, taking the time to remove those unused themes can actually help your site perform better. In this post, we will explore the importance of cleaning up these themes and guide you through the process step by step. Ready to declutter your WordPress site? Let’s dive in!
Why Clean Up Unused Themes?

Cleaning up unused themes from your WordPress site is more important than you might think. Here are some compelling reasons why you should consider doing it:
- Improves Performance: Each unused theme can take up valuable space and resources on your server. By removing them, you can enhance your website’s speed and overall performance.
- Reduces Security Risks: Outdated themes can potentially harbor vulnerabilities. If you’re not using a particular theme, it’s safer to delete it rather than risk an exploit.
- Easier Management: A clutter-free theme library makes it easier for you to manage your WordPress site. You can quickly find the theme you want to work with without sifting through unnecessary options.
- Less Confusion: Multiple themes can lead to confusion when choosing which one to customize or activate. Cleaning out the old ones can clear up any uncertainties!
- Optimizes Backups: Unused themes can bloat your backups, making them larger and slower to restore. A tidy theme folder enhances the efficiency of your backups.
In short, it’s beneficial not only for the site’s speed and security but also for your peace of mind as a site owner. So, let’s get to removing those themes!
Identifying Unused Themes on Your WordPress Site
Identifying unused themes in your WordPress installation is the first crucial step toward a cleaner, more efficient website. Let’s break it down together!
WordPress allows you to install multiple themes, but having too many can clutter your dashboard and even slow down your site. So, how do you identify those themes that are just taking up space?
- Accessing the Themes Panel:
To start, log into your WordPress admin dashboard. From there, head on over to Appearance and then click on Themes. This is where all the themes installed on your site are neatly displayed.
- Checking Active vs. Inactive Themes:
On the themes page, you’ll see your currently active theme marked prominently. Any other theme listed is inactive. Take a moment to review the inactive themes – these are the ones you might consider removing.
- Consider Your Use Case:
Sometimes, themes might be suitable for specific purposes or short-term projects. Think through whether you might need any of your inactive themes in the future. If you can’t foresee needing them, it’s time to say goodbye!
- Getting Feedback from Users:
If you’re unsure about certain themes, reach out to your team or audience and get their thoughts. They may have insight into themes that were used in previous iterations of your site.
Once you’ve identified the themes you no longer need, you’re ready to move on to the next step – backing up your site to keep it safe during the cleanup!
Backing Up Your WordPress Site
Backing up your WordPress site is essential before making any changes, including removing unused themes. Think of it as a safety net—just in case something unexpected happens. Let’s chat about how to effectively back up your site!
There are several methods to create a backup of your WordPress site, and here’s a handy guide to help you through the processes:
- Using a Backup Plugin:
One of the easiest ways to back up your site is by using a WordPress backup plugin. Some popular options include:
- UpdraftPlus – Simple to set up and offers cloud storage options.
- BackupBuddy – A premium plugin that makes backups a breeze.
- Duplicator – Great for moving and backing up your entire site.
- Manual Backup via cPanel:
If you prefer a more hands-on approach, you can manually backup your site through cPanel:
- Log into your hosting account and go to cPanel.
- Find the File Manager and navigate to the public_html folder.
- Select your WordPress directory, typically called public_html.
- Compress the folder into a .zip file and download it to your computer.
- Next, head to phpMyAdmin to export your database by selecting your WordPress database and clicking on Export.
- Cloud Backup Solutions:
If you prefer automated backups without much headache, consider using cloud backup solutions like:
- VaultPress – An excellent choice that integrates well with WordPress.
- BlogVault – Offers robust features and easy restoration.
Whichever method you choose, make sure to store your backups in a secure place. This precaution will give you peace of mind as you proceed to unclutter your themes. Happy backing up!
How to Remove Unused Themes via the WordPress Dashboard
Removing unused themes from your WordPress site is a breeze when you do it directly from the WordPress Dashboard. Not only does it keep your site clutter-free, but it also enhances your website’s security and performance. Let’s dive into the straightforward steps you need to follow!
- Log in to Your WordPress Dashboard: Start by logging into your WordPress admin panel. You can usually do this by visiting
yourwebsite.com/wp-admin. - Navigate to Appearance: Once you’re in, hover over the ‘Appearance’ menu on the left sidebar. From there, click on ‘Themes’. This will take you to the theme management page where you can see all the themes installed on your site.
- Select the Unused Theme: Find the theme you wish to remove. Remember, you can’t delete the theme that you’re currently using, so ensure that you have activated a different theme before proceeding.
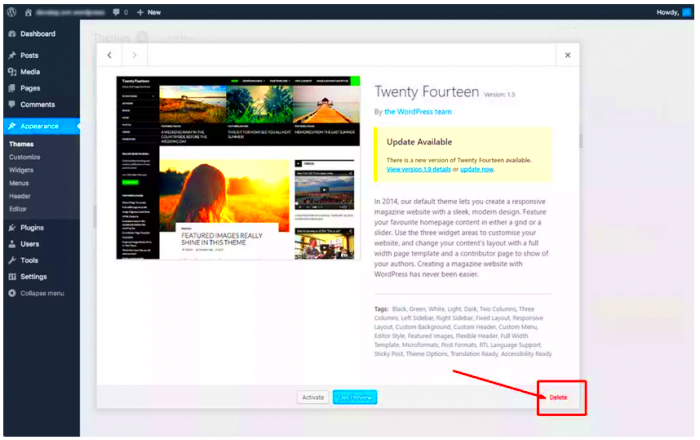
- Click on Theme Details: Hover over the theme you wish to delete and click on the ‘Theme Details’ button that appears.
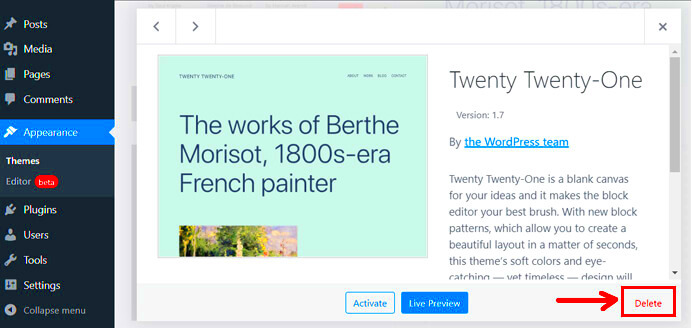
- Delete the Theme: At the bottom right of the pop-up, you should see a ‘Delete’ button. Click on it and confirm your choice when prompted. Voila! The theme is now removed from your site.
That’s all there is to it! Keeping your WordPress site tidy is essential for optimal performance, so make it a habit to review and remove any themes that you no longer use.
Removing Themes via FTP or File Manager
If you ever need to remove themes from your WordPress site and you can’t access the WordPress Dashboard—perhaps due to a persistent error—using FTP or your hosting provider’s file manager is a great alternative. Let’s go through how you can do this!
- Access Your Site via FTP: Use an FTP client such as FileZilla or Cyberduck to connect to your website’s server. Input your FTP credentials to establish a connection.
- Navigate to the Themes Directory: Once connected, head over to
public_html/wp-content/themes. This directory holds all the themes installed on your site. - Select the Unused Theme: Browse through the folders to find the theme you want to delete. It’s a good idea to make a note of which folders contain the themes you’re not using.
- Delete the Theme Folder: Right-click on the folder of the theme you’d like to remove and select ‘Delete’. Confirm any prompts, and the theme will be permanently removed from your server.
- Using File Manager: Alternatively, if your hosting provider offers a file manager, you can navigate similarly to
wp-content/themes, find the theme, and remove the folder directly from there.
Using FTP or a file manager is a reliable way to clean up your WordPress site, especially when you’re facing issues with the dashboard. Just remember to proceed carefully and avoid deleting active themes!
7. Using a Plugin to Manage Themes
Managing themes directly through WordPress can sometimes feel cumbersome, especially if you have multiple themes cluttering your dashboard. Thankfully, there are plugins designed specifically to help you streamline this process. Using a plugin to manage themes can simplify your workflow, ensuring that you only keep what you need and that everything runs smoothly.
One of the most popular plugins for this purpose is WP Theme Manager. This handy tool allows you to sort and organize your themes effortlessly. With just a few clicks, you can activate or deactivate themes, delete unused ones, and even preview them without the need to install them first. Here’s how it works:
- Easy Navigation: Navigate through your existing themes with a user-friendly interface.
- Quick Deactivation: Deactivate themes without deleting them if you want the option to reactivate later.
- Mass Actions: Perform bulk actions, allowing you to delete multiple themes at once.
- Theme Previews: View how themes look before deciding to fully integrate them.
- Regular Updates: Ensure that your plugin stays updated for compatibility with the latest WordPress versions.
Another great option is ThemeZee Maintenance. This plugin offers a clean solution to manage your active and inactive themes while also checking for updates. Using a plugin not only makes the process simpler but also allows you to handle your theme library more effectively, reducing clutter and improving site performance. Remember to always back up your site before proceeding with theme removals, just to be safe!
8. Final Steps After Theme Removal
Once you’ve gone through the process of removing unused themes from your WordPress site, there are still a few final steps to consider. While it might be tempting to just walk away and celebrate your newfound clutter-free dashboard, taking a moment to review and optimize your site is essential.
Here’s a checklist of final steps you should consider:
- Clear Cache: If you’re using a caching plugin, clear your cache after making changes. This ensures that visitors see the most up-to-date version of your site.
- Check for Broken Links: Sometimes, theme removals can affect links or settings. Use a plugin like Broken Link Checker to identify and fix any issues.
- Theme Customizer Review: Revisit the theme customizer settings for your active theme. Ensure that everything is displayed correctly and functioning as intended.
- Optimize Database: Consider using a plugin like WP-Sweep to clean up your database after removing themes. This helps improve site speed and performance.
- Regular Backups: Make it a habit to back up your site regularly, especially after making significant changes, like removing themes.
By diligently following these steps, you’ll ensure your site remains efficient and user-friendly. Regular maintenance not only enhances performance but also keeps your WordPress site secure. You’ve done a great job tidying up, and a little extra care goes a long way in maintaining a top-notch website!
Conclusion
Removing unused themes from your WordPress site is an essential maintenance task that can enhance your website’s performance, reduce security risks, and free up server space. Following the steps outlined in this guide will ensure that your WordPress installation remains clean and efficient.


