
If you’ve ever downloaded a video from Shutterstock and noticed that recognizable logo plastered across it, you might have wondered how to remove it. Logos are often added to protect content creators’ rights, but sometimes you need a clean, professional look for your project. Whether you’re repurposing footage or just want to tidy up your videos, understanding how to effectively remove those logos is key. In this post, we’ll explore some practical methods and insights to help you get rid of Shutterstock logos without compromising video quality.
Understanding Why Logos Appear on Shutterstock Videos
Shutterstock and similar stock video platforms often add logos—also known as watermarks—to their content for a simple reason: copyright protection. When you browse for videos, these watermarks serve as a visual cue, indicating that the footage is copyrighted and not yet purchased or licensed for use without attribution. Think of it as a digital signature that prevents unauthorized use or distribution of the content.
Here’s how it typically works:
- Preview Mode: When browsing, you see watermarked videos to avoid theft or misuse before the purchase is complete.
- Licensed Content: After buying a license, you get access to the original, watermark-free video files.
Understanding this process is crucial because the watermarks are intentionally embedded into the video files to protect the creator’s rights. Removing these logos without proper licensing or authorization might infringe on copyrights and legal restrictions. Therefore, always ensure that you have a legitimate license before attempting to remove watermarks from Shutterstock videos. In cases where you have purchased the rights, the watermark is usually removed automatically, or you are provided with the original version free of any logos. For free samples or unlicensed downloads, removing watermarks can be tricky and might involve ethical and legal considerations, which we’ll discuss further in this post.
Legal Considerations for Removing Shutterstock Logos
Before diving into the how-tos of removing a Shutterstock logo from a video, it’s really important to understand the legal side of things. Logos are more than just images—they’re part of a company’s branding and intellectual property. When you see that Shutterstock logo on a video, it’s there for a reason: to protect the creator’s rights and ensure proper attribution. So, what happens if you remove it?
Removing a logo without permission can lead to serious legal trouble. It might be considered copyright infringement or a violation of licensing agreements. Shutterstock’s licensing terms usually specify how you can use videos, and removing watermarks or logos often breaches those terms. If you do so without proper authorization, you could face:
- Legal action from the content owner or Shutterstock itself
- Financial penalties or fines
- Loss of licensing rights or access to Shutterstock services
- Damage to your reputation if you’re caught removing watermarks illegally
Want to use Shutterstock videos legally? Here’s what you should do:
- Always purchase the appropriate license that allows for your intended use.
- Look for videos labeled as “Royalty-Free” or with licenses that permit modifications, including removing logos—if explicitly allowed.
- Contact Shutterstock or the content creator directly if you’re unsure about what’s permitted.
- Consider using videos that are explicitly provided without logos or watermarks for your project.
Remember, respecting intellectual property rights not only keeps you out of legal trouble but also supports the creators and platforms that produce these resources. If you’re ever in doubt, it’s best to consult with a legal professional or reach out directly to Shutterstock for guidance.
Tools and Software for Removing Logos from Videos
Now that you’re aware of the legal considerations, let’s talk about the practical side: what tools can help you remove logos from videos? Thankfully, there are several options out there, ranging from simple editing apps to advanced video editing and masking software. Depending on your skill level and the complexity of the logo removal, you can choose the right tool for your project.
Here are some of the most popular tools used for removing logos:
1. Adobe After Effects
This professional-grade software is a favorite among video editors. It offers features like the Content-Aware Fill for video, which can intelligently remove objects—including logos—by analyzing surrounding pixels. It’s powerful but requires some learning curve.
| Feature | Pros | Cons |
|---|---|---|
| Content-Aware Fill | Effective for complex backgrounds | Requires some skill to use effectively |
| Advanced masking tools | Precise control over edits | Time-consuming for long videos |
2. HitFilm Express
This free software offers powerful compositing tools that can help hide logos using techniques like cropping, blurring, or overlaying other footage. It’s user-friendly for beginners.
3. Davinci Resolve
Known for color correction, Davinci Resolve also includes advanced editing and masking features. You can use its tracking and masking tools to cover logos seamlessly.
4. Video Eraser and Mobile Apps
If you’re working on a mobile device, apps like Video Eraser or Remove Logo Now can help quickly overlay or blur out logos. These are handy for quick edits but might not produce professional-quality results for complex backgrounds.
Tips for Effective Logo Removal:
- Zoom in to get more precise control around the logo area.
- Use masking and tracking to follow the logo throughout movement.
- Replace the logo with a blurred or solid color overlay if removal isn’t perfect.
- Preview your edits frequently to ensure seamless blending.
Remember, the best approach depends on your specific project and your comfort level with editing software. Practice, patience, and attention to detail are key to making the final result look natural and professional.
Step-by-Step Guide to Removing Shutterstock Logos Using Video Editing Software
Removing the Shutterstock logo from your videos might seem daunting at first, but with the right tools and a bit of patience, it’s definitely doable. Let’s walk through a straightforward step-by-step process to help you clean up your videos effectively.
Step 1: Choose the Right Video Editing Software
First things first, pick a video editing program that offers advanced editing features. Popular options include Adobe After Effects, Adobe Premiere Pro, DaVinci Resolve, or even HitFilm Express. These tools provide the necessary capabilities like masking, cloning, and frame-by-frame editing that are essential for logo removal.
Step 2: Import Your Video
Open your chosen software and import the video file that contains the Shutterstock logo. Always save a copy of the original footage before making any edits, so you can revert if needed.
Step 3: Locate the Logo
Scrub through your timeline to find the exact frame or frames where the logo appears. It’s helpful to zoom in on the timeline for precise editing, especially if the logo moves or appears intermittently.
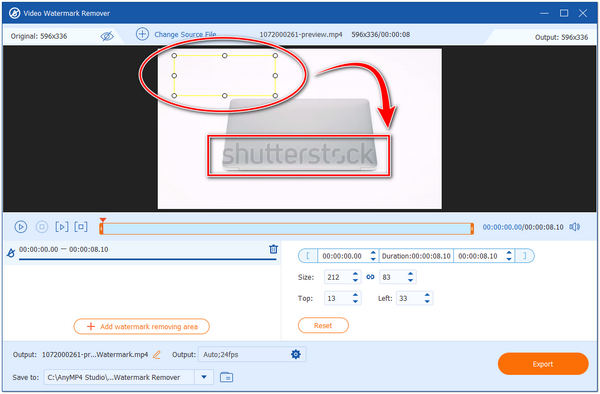
Step 4: Mask the Logo Area
Create a mask around the logo using masking tools in your software. Think of this as drawing a shape around the logo. In programs like After Effects, you can use the pen tool to trace the logo’s outline. This mask will hide or isolate the logo area for further editing.
Step 5: Use Clone Stamp or Content-Aware Fill
Many advanced editors have tools like Clone Stamp (Photoshop-style cloning) or Content-Aware Fill (automatic background filling). These tools help replace the logo with surrounding pixels, making it look seamless. For instance, in After Effects, the Content-Aware Fill feature can automatically fill in the masked area based on neighboring pixels.
Step 6: Fine-Tune the Edits
Once the initial removal is done, review the frames closely. You might see flickering or mismatched backgrounds. Use tools like feathering the mask edges, adjusting the cloned area, or manually painting over imperfections to make the edit look natural.
Step 7: Render and Export
After you’re satisfied with the edits, render the video. Choose your preferred output settings, making sure to maintain high quality. Export the final version, and voilà — the Shutterstock logo should be gone!
Pro Tip:
Removing logos from videos that feature movement or complex backgrounds can be tricky. Patience and multiple attempts may be necessary. Don’t rush the process, and always review your work on different devices or screens to ensure the removal looks natural across the board.
Tips for Maintaining Video Quality After Logo Removal
Removing a logo is great, but it’s equally important to preserve your video’s quality afterward. Here are some handy tips to keep your videos looking sharp and professional:
1. Work with High-Resolution Files
If possible, always start with the highest resolution version of your video. Higher resolution footage gives you more flexibility during editing and helps prevent quality loss after removal.
2. Use Non-Destructive Editing Techniques
Whenever you can, use layers, masks, and adjustment clips instead of destructive edits. This way, you retain the original footage and can tweak your edits without degrading quality.
3. Maintain Proper Compression Settings
When exporting your final video, choose settings that preserve quality. Avoid overly aggressive compression. For most purposes, use a high bitrate and formats like MP4 with H.264 or H.265 codecs for a good balance between quality and file size.
4. Avoid Repeated Re-Encoding
Each time you re-encode your video, some quality loss can occur. Try to do all your edits in one session and export only once. If you need to make further adjustments, keep a master copy and only re-export after final tweaks.
5. Apply Sharpening Carefully
If your video looks a bit soft after removal, a subtle sharpening filter can help restore clarity. But be cautious — too much sharpening can introduce noise or artifacts.
6. Use Noise Reduction if Needed
If removing the logo introduces artifacts or makes the background look noisy, consider applying gentle noise reduction filters to smooth out imperfections without sacrificing detail.
7. Preview on Multiple Devices
Check your final video on different screens — monitors, smartphones, tablets — to ensure the quality and seamlessness of your edits hold up across devices.
By following these tips, you can effectively remove logos from your videos without sacrificing quality, resulting in a polished, professional-looking final product that’s ready for sharing or presentation.
Alternative Solutions and Licensing Options to Use Shutterstock Videos Without Logos
If you’re working with Shutterstock videos and want to avoid the hassle of removing logos, the best approach is to consider licensing options that give you access to videos without watermarks right from the start. Shutterstock offers a variety of plans that include the licensing of high-quality, watermark-free videos, which can save you a lot of time and effort in post-production.
Here are some options to explore:
- Standard Licensing: This plan allows you to download videos without any logos or watermarks once you’ve purchased the license. It’s ideal for most commercial and personal projects.
- Enhanced Licensing: If you need higher resolution or extended usage rights, this option provides access to premium content without any watermarks, along with broader distribution rights.
- Subscription Plans: Shutterstock offers subscription options that give you access to a certain number of videos per month, all watermark-free. These are perfect if you frequently need high-quality videos for your projects.
If you already have a watermark-laden video and want to replace it with a clean version, consider:
- Buying a license for the same clip without the watermark
- Contacting Shutterstock support for options if the video is part of a specific package
Another handy tip: always double-check the licensing terms to ensure your intended use aligns with what’s permitted. This way, you avoid legal issues and ensure your project stays on the right side of copyright rules.
If licensing isn’t an option or the budget is tight, you might consider using stock footage from free or alternative paid sources that offer videos without watermarks. Just make sure to verify the licensing agreements to avoid copyright infringement.
Conclusion and Best Practices for Logo Removal in Videos
Removing a logo from Shutterstock videos can be a tricky process, especially if you want a professional and seamless look. While there are methods like cropping, blurring, or using specialized editing tools, these aren’t always perfect and can sometimes compromise the quality of your final product.
To achieve the best results—and stay within legal boundaries—consider these best practices:
- Always opt for licensed, watermark-free content: This is the simplest way to avoid the need for removal altogether and ensures you’re legally covered.
- Use professional editing tools: Software like Adobe Premiere Pro, Final Cut Pro, or DaVinci Resolve offers advanced features for logo removal, such as masking and content-aware fill.
- Be patient and precise: Rushing your edits can lead to noticeable flaws. Take your time to carefully mask or blur logos for a natural look.
- Test multiple approaches: Sometimes, combining techniques—like blurring with cropping—yields the best results.
- Respect copyright and licensing agreements: Always ensure you have the legal right to modify and use the videos, especially if you plan to distribute or monetize your content.
In summary, the best practice is to prevent watermark issues by licensing high-quality, logo-free videos from the start. If that’s not possible, careful editing using professional tools can help you produce polished videos. Remember, quality results come from patience, attention to detail, and respecting copyright laws. Happy editing!
