If you’ve ever found yourself scratching your head over why your website isn’t ranking high on search engines, noindex tags might be the culprit. Noindex tags are like little stop signs for search engines, telling them not to include specific pages or sites in their search results. In this post, we’ll discuss how to remove those pesky noindex tags in WordPress and help your site shine in search engine results. So let’s jump in and get your website the visibility it deserves!
Understanding Noindex Tags
Noindex tags are a useful tool in the world of SEO, but if you’re not careful, they can lead to your content being hidden from search engines. So, what exactly is a noindex tag?
- Noindex Tag Definition: A noindex tag is a piece of code added to a webpage that instructs search engines not to index that page. Essentially, it says, “Hey Google, don’t show this page in search results!”
- Where You’ll Find Them: You can find noindex tags in the HTML source code of a page, looking something like this:
<meta name="robots" content="noindex"> - Why Are They Used?: Webmasters often use them for various reasons, such as:
- Preventing search engines from indexing duplicate content.
- Keeping low-quality or outdated pages out of search results.
- Ensuring that search engines focus on your most valuable content.
While noindex tags can be beneficial, having them on pages you want to rank can hinder your site’s performance. Understanding their purpose is vital for managing your website’s SEO effectively. So, let’s move forward and explore how to remove these tags when they’re no longer needed!
Identifying Noindex Tags in Your WordPress Site
Before diving into the removal process, it’s crucial to first identify where those pesky noindex tags are lurking on your WordPress site. These tags can be a roadblock for search engines, preventing your content from being indexed properly. Here’s how you can find them:
- View Page Source: One way to spot noindex tags is by going to the specific page or post you want to check, right-clicking, and selecting “View Page Source.” Use the search function (CTRL + F or CMD + F) and type in noindex. If you find a line that looks like
<meta name="robots" content="noindex">, that’s a noindex tag! - Using SEO Plugins: If you have plugins like Yoast SEO or All in One SEO, they often provide a clear indication of the index status. In Yoast, for instance, you can easily check the indexability settings under the “Advanced” tab while editing a post or page.
- Site Audit Tools: Consider using SEO audit tools like Screaming Frog or SEMrush. These tools will crawl your site and give you a comprehensive report on various SEO elements, including any noindex tags present.
- Google Search Console: Lastly, if you have your site connected to Google Search Console, you can find indexing issues and see if any pages are blocked from indexing via the Noindex directive.
Identifying these tags is key to boosting your site’s visibility, so take your time with this step!
Removing Noindex Tags Manually
Once you’ve identified the noindex tags on your WordPress site, it’s time to roll up your sleeves and remove them. Luckily, this process isn’t as daunting as it sounds. Here’s how you can do it manually:
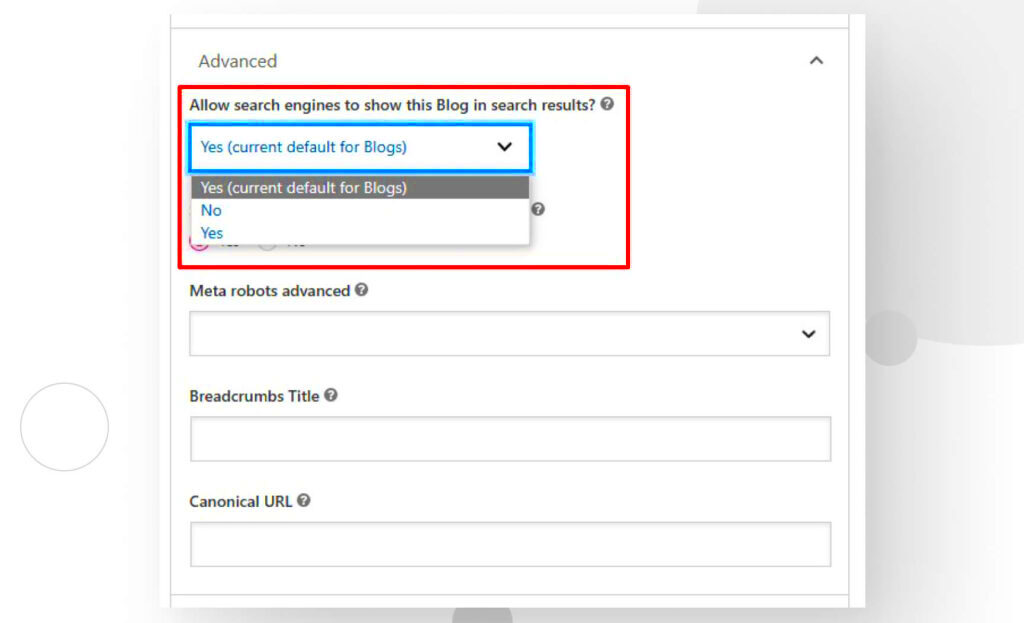
- Edit Individual Posts/Pages: Go to the post or page you want to modify. At the bottom of the editor (if using Yoast SEO), locate the “Yoast SEO” settings box. Click on the “Advanced” tab and check the “Allow search engines to show this Post in search results?” setting. Make sure it’s set to yes.
- Check Your Theme’s Header: If noindex tags are hard-coded in your theme, you may need to access your theme files. Go to Appearance > Theme Editor. Look for the
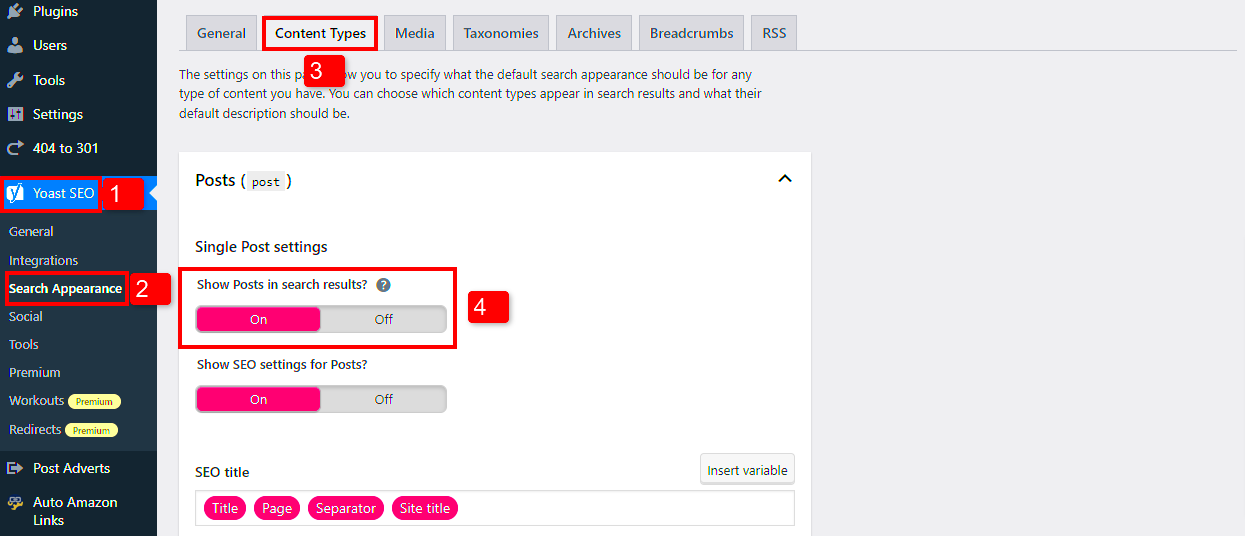
header.phpfile and check for any lines of code containing<meta name="robots" content="noindex">. If you find one, simply delete it or alter it to includeindexinstead. - Review Your SEO Plugin Settings: Sometimes, SEO plugins have global settings that apply noindex tags to certain types of content. Again, check your plugin settings under SEO > Search Appearance (for Yoast) and adjust any settings that might be causing noindex tags to apply broadly.
- Update Your Robots.txt File: In some cases, the robots.txt file might be blocking indexing. Access it via your site’s root directory. Ensure you’re not disallowing any critical pages that you want indexed. Adjust accordingly and save your changes.
After following these steps, it’s a good idea to clear your site cache and check back with Google Search Console to see if the changes have taken effect. Happy optimizing!
Using SEO Plugins to Remove Noindex Tags
If you’re looking to remove noindex tags from your WordPress site, using SEO plugins can be a real game-changer. These plugins not only streamline the process but also give you more control over your site’s indexing and visibility on search engines. Here’s how you can leverage them:
- Install an SEO Plugin: First things first, you’ll need to have an SEO plugin installed. Popular options include Yoast SEO, All in One SEO, and Rank Math. If you haven’t installed one yet, simply head over to your WordPress dashboard, navigate to “Plugins,” click on “Add New,” and search for your desired SEO plugin. Click “Install” and then “Activate.”
- Navigate to Settings: After activation, locate the plugin in your dashboard. Each plugin has its own interface, but generally, you can find the settings under the “SEO” menu.
- Review the Meta Tag Settings: Go to the section dealing with indexing settings. In Yoast SEO, for example, you can find these settings within the “Search Appearance” tab. Look for options related to meta tags or indexing.
- Remove the Noindex Tags: Here’s the magic part—once in the right section, switch off any noindex options for the necessary content types, be it posts, pages, categories, or custom post types. Ensure that your settings reflect “index” rather than “noindex.”
- Save Changes: Don’t forget to save your settings! A quick click on that button can make all the difference.
By utilizing these SEO plugins efficiently, you can easily manage your noindex tags without digging into the code, making it an accessible solution for everyone.
Verifying the Changes
After you’ve removed noindex tags, you’ll want to verify that everything is working as intended. It’s an essential step that ensures your content is ready to be crawled and indexed by search engines. Here’s how to do it:
- Use Google Search Console: This is one of the best tools to monitor your site’s health. Go to your Google Search Console account and navigate to the “Coverage” report. This section can provide insights into indexing issues, including any remaining noindex tags.
- Check the Source Code: The easiest way to verify if the noindex tag has been removed is by examining the page’s source code. Right-click on the page and select “View Page Source” or “Inspect.” Use “Ctrl + F” (Windows) or “Command + F” (Mac) to search for “noindex”. If you don’t find it, congratulations!
- Use External SEO Tools: Tools like Screaming Frog SEO Spider or Sitebulb can crawl through your site and highlight any remaining noindex directives. These tools provide an extensive report of your site’s SEO status, so it’s worth investing some time.
- Monitor Search Traffic: Lastly, keep an eye on your search traffic and rankings over the next few weeks. If you’ve successfully removed the noindex tags, you should start to notice an uptick in organic traffic.
Verifying changes helps ensure that your efforts to improve your site’s visibility don’t go in vain. So, roll up your sleeves and keep those checks in place—your site will thank you!
Common Issues and Troubleshooting
Removing noindex tags in WordPress is often straightforward, but it can come with its own set of challenges. Here are some common issues you might encounter and how to troubleshoot them:
- No Changes After Removal: If you remove the noindex tag but see no changes in search engine results, it might take some time for the search engine to re-crawl your page. Be patient—give it a couple of weeks. If the problem persists, check for multiple noindex directives in your site.
- Plugin Conflicts: Sometimes, SEO plugins can conflict with one another, leading to unexpected behavior. If you’re using multiple plugins that manage index settings, try disabling them one at a time to see if that resolves the issue.
- Validation Errors: After making changes, it’s good to validate them. Use tools like Google Search Console to verify that the noindex tag has been removed. Look for the URL Inspection tool to see the latest version of your page.
- Inaccessible Pages: If you’re trying to remove noindex tags from pages that visitors can’t access (for example, if restricted by password), remember that search engines can’t index these pages. Ensure that the pages in question are publicly accessible.
By being aware of these common issues, you can troubleshoot effectively and ensure that your content is indexed properly.
Best Practices for Indexing Your Site
To maximize your site’s visibility and ensure that search engines index your content efficiently, it’s essential to follow best practices. Here are some tips to help you get the most out of your indexing efforts:
- Use Unique and Descriptive Titles: Each page on your site should have a unique, descriptive title. This helps search engines understand what the page is about and improves click-through rates.
- Create a Clear Sitemap: Ensure you have an XML sitemap that clearly outlines your site’s structure. Submitting this to Google Search Console is crucial, as it helps search engines discover all your valuable content.
- Improve Page Load Speed: Slow pages deter visitors and can negatively impact indexing. Use tools like Google PageSpeed Insights to identify and fix performance issues.
- Optimize Content with Keywords: Use relevant keywords naturally throughout your content, including headers and alt text for images. This not only helps with indexing but also improves your rankings.
- Regularly Update Content: Fresh content signals to search engines that your site is active. Regularly update your posts and remove outdated or irrelevant information.
By following these best practices, you create a conducive environment for search engines to crawl and index your site more effectively, enhancing your online visibility.
Conclusion
Removing Noindex tags in WordPress is essential for ensuring that your web pages are indexed by search engines, thereby improving your site’s visibility and SEO performance. By following the steps outlined in this guide, you can effectively eliminate these tags and optimize your website for better search engine ranking. Here’s a quick summary of the main points:
- Understand Noindex Tags: Familiarize yourself with what Noindex tags are and why they might have been applied to your pages.
- Check WordPress Settings: Ensure that the Noindex setting is disabled in your WordPress dashboard under the “Reading” settings section.
- Edit Individual Pages or Posts: Access the edit screen of your content and check for Noindex options in your SEO plugin or at the bottom of the editor.
- Adjust SEO Plugin Settings: Modify the settings in your SEO plugin (like Yoast or All in One SEO) to remove Noindex tags for specific pages or categories.
- Update Robots.txt: Ensure that your robots.txt file is not restricting crawlers from indexing your site by removing any Noindex directives.
Once you have implemented these changes, it’s advisable to monitor your site using Google Search Console to track any improvements in indexing. Regularly auditing your Noindex tags will also help maintain optimal SEO practices and ensure your site remains fully accessible to search engines.

