If you’ve ever needed to make your images look more polished or want to create stunning visuals without the hassle of complicated software, Shutterstock Editor is here to help. It’s a user-friendly online tool designed to simplify editing tasks, and one of its standout features is the ability to remove backgrounds quickly and easily. Whether you’re a graphic designer, a social media enthusiast, or just someone looking to spice up a photo, this feature can save you time and elevate your creative projects. No more struggling with tricky software—Shutterstock Editor makes background removal accessible to everyone.
Step-by-Step Instructions on Removing Backgrounds Using Shutterstock Editor
Getting rid of backgrounds in Shutterstock Editor is straightforward—just follow these simple steps, and you’ll have a clean, professional-looking image in no time:
- Open Shutterstock Editor: Log in to your Shutterstock account and navigate to the Shutterstock Editor from your dashboard or the main menu.
- Upload Your Image: Click on the Upload button to add the image you want to edit. You can upload from your computer or select from your Shutterstock library if you have one.
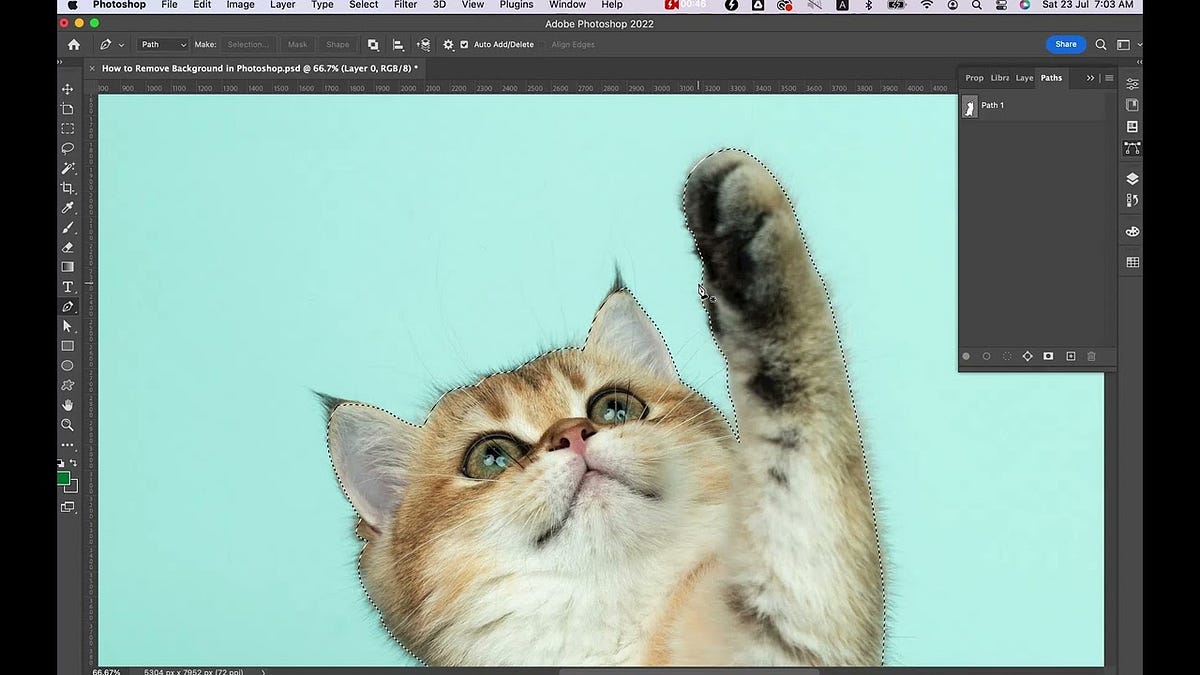
- Select the Image: Once uploaded, click on the image to open it in the editor workspace.
- Access the Background Removal Tool: In the toolbar on the left side, find and click on the Background Remover icon. It usually looks like a magic wand or a scissors icon.
- Automatic Background Removal: The editor will analyze your image and automatically remove the background. You’ll see the subject highlighted with a transparent background.
- Refine the Edges: If needed, use the Erase or Restore brushes to fine-tune the edges. This step helps ensure that no unwanted background remains and that the subject’s outline looks natural.
- Preview and Adjust: Take a moment to preview your image. If everything looks good, proceed to the next step. If not, make further refinements.
- Download Your Image: Once satisfied, click the Download button. Choose the preferred format (PNG with transparency is recommended for backgrounds removal) and save your image.
And that’s it! Removing backgrounds with Shutterstock Editor is designed to be quick, intuitive, and accessible, even for beginners. Now you can easily create collage images, product photos, or social media content that stands out—no complicated software required.
Tips for Achieving Professional Results with Background Removal
Removing backgrounds can seem straightforward at first, but if you’re aiming for a polished, professional look, a few insider tips can make all the difference. Whether you’re creating product images, social media graphics, or marketing materials, these tips will help you get the most out of Shutterstock Editor’s background removal tools.
1. Start with a high-quality image. The better the quality of your original photo, the easier it is to remove the background cleanly. Look for images with good lighting, sharp focus, and clear subject edges. Blurry or low-resolution images can result in rough edges after removal.
2. Use zoom for precision. When you’re working on tricky areas like hair, fur, or detailed edges, zoom in! This allows you to see the fine details and make more accurate selections or refinements. Shutterstock Editor’s zoom feature is a lifesaver for tackling those small, complex parts.
3. Utilize the refine tools. After the initial background removal, use the refine brush or edge tool to clean up any leftover bits or jagged edges. Taking a little extra time here ensures your subject looks natural and seamless against the new background.
4. Keep backgrounds simple during removal. If possible, choose images with contrasting backgrounds—that makes it easier for the editor to distinguish between the subject and the backdrop. If the background is complex, be patient and spend more time refining the edges.
5. Experiment with different background options. Shutterstock Editor offers various backgrounds you can add back in or replace. Don’t hesitate to try different colors, gradients, or textures to see what makes your subject pop the best.
6. Save multiple versions. As you work, save different iterations of your image. This way, if one version doesn’t meet your standards, you can easily revert or compare to see which looks best.
7. Practice makes perfect. The more you use the tool, the better you’ll get at identifying tricky edges and applying the right refinements. Keep practicing, and soon background removal will feel like second nature!
Common Issues and Troubleshooting During Background Removal
Even with the best tools, you might run into some common hiccups when removing backgrounds. Don’t worry—most issues are easy to fix once you recognize what’s causing them. Here’s a rundown of typical problems and how to troubleshoot them effectively.
Problem 1: Jagged or Rough Edges
This often happens when the initial removal isn’t precise enough, especially around detailed areas like hair or fur.
- Solution: Use the refine edges or brush tools to smooth out rough spots. Zoom in for better control, and carefully trace around tricky areas.
Problem 2: Parts of the Background Still Visible
Sometimes, remnants of the original background remain, especially in complex scenes.
- Solution: Increase the sensitivity or tolerance level during removal, or manually erase leftover bits with the eraser tool. Double-check edges and refine as needed.
Problem 3: Loss of Fine Details (like hair or feathers)
Removing fine details can be tricky, and they often get lost or appear jagged after removal.
- Solution: Use the dedicated hair or fine detail brushes if available. Adjust the edge feathering to soften transitions, and refine carefully around these areas.
Problem 4: Over-Removal, Losing Parts of the Subject
Sometimes, the tool might mistakenly remove parts of your subject, especially with similar colors or complex backgrounds.
- Solution: Switch to manual correction mode, and carefully add back missing areas using the restore brush. Patience is key here—zoom in and work slowly.
Problem 5: Color Spill or Halo Effect
This is when a faint outline or halo appears around your subject after removal, often due to inconsistent background removal.
- Solution: Use the edge refinement tools to soften or eliminate halos. Sometimes, adjusting the background color or adding a slight shadow can help blend the subject more naturally.
Remember, troubleshooting is part of the process. Take your time, experiment with the tools, and don’t be afraid to undo and redo steps until you achieve the desired professional look. With practice, these common issues will become easier to manage, and your background removal skills will improve significantly!
Additional Features in Shutterstock Editor to Enhance Your Images and
Once you’ve got the hang of removing backgrounds, you’ll find that Shutterstock Editor offers a suite of additional tools to really make your images stand out. These features are designed to give your visuals that extra pop, whether you’re creating marketing materials, social media posts, or personal projects.
First up, let’s talk about filters and effects. Want to give your image a vintage look or make it appear more vibrant? Shutterstock Editor has a variety of filters that you can apply with just a click. From black-and-white to sepia tones, these effects can dramatically change the mood of your image.
Next, there’s the text tool. Adding text is straightforward, and you can customize fonts, sizes, colors, and positioning. It’s perfect for creating promotional graphics or adding labels to your images. Plus, you can layer text over transparent backgrounds or images with backgrounds removed for professional-looking designs.
The sticker and element library is another handy feature. Need to add icons, decorative elements, or fun stickers? Shutterstock Editor provides a wide range of graphics that you can drag and drop onto your canvas. This is especially useful for social media posts, invitations, or presentations.
Additionally, the adjustment tools allow you to fine-tune your images. You can tweak brightness, contrast, saturation, and sharpness. This helps in making your images more visually appealing or better suited to your overall design aesthetic.
| Feature | What It Does | Best For |
|---|---|---|
| Filters & Effects | Apply artistic styles or color adjustments | Creating mood and style variations |
| Text Tool | Add and customize text overlays | Creating promotional graphics and labels |
| Stickers & Elements | Insert icons, decorations, or fun graphics | Enhancing visual appeal and engagement |
| Adjustment Tools | Tweak brightness, contrast, saturation, sharpness | Refining image quality and consistency |
These features, combined with background removal, make Shutterstock Editor a comprehensive tool for creating polished images without needing advanced design skills. Play around with these options to discover what works best for your project!
Conclusion and Final Tips for Using Shutterstock Editor Effectively
Congratulations! You’re now equipped with the knowledge to remove backgrounds and enhance your images using Shutterstock Editor. As you start experimenting more, here are some final tips to help you use the tool effectively and efficiently.
Tip 1: Start with a high-quality image. The better the original, the cleaner the background removal will be. Look for images with clear subject boundaries and good lighting.
Tip 2: Use the zoom feature. When removing complex or detailed backgrounds, zoom in for more precise control. Small brush sizes help you get sharper edges around intricate details like hair or jewelry.
Tip 3: Save your work frequently. Shutterstock Editor often autosaves, but it’s a good practice to manually save your progress. This way, you won’t lose any edits if you need to step away or encounter any issues.
Tip 4: Experiment with additional features. Don’t hesitate to try filters, text, and overlays. These can turn a simple image into a professional-looking graphic in minutes.
Tip 5: Use layers wisely. Keep your original images intact and work on duplicates when making edits. This way, you can always revert to the original if needed.
Tip 6: Keep your projects organized. Name your files and keep track of versions, especially if you’re working on multiple images. This will save you time and confusion later on.
Finally, practice makes perfect. The more you explore Shutterstock Editor’s features, the more intuitive and faster your editing process will become. Whether you’re creating social media posts, marketing materials, or just fun projects, these tips will help you produce stunning images with ease. Happy editing!