WordPress Gutenberg Carousel Plugins are nifty tools that enhance the way images, videos, or content are displayed on your website. Using a carousel allows you to showcase multiple pieces of media without cluttering your page, providing a streamlined experience for your visitors. If you’ve ever admired a site with a rotating gallery, that’s often thanks to these plugins. While they can add visual appeal, you might eventually decide to remove or replace one. Let’s dive into understanding these plugins and how to keep your WordPress site running smoothly.
Identifying the Carousel Plugin to Remove

Before you can remove a carousel plugin from your WordPress site, you’ll need to identify exactly which one you’re using. It’s not uncommon to have multiple plugins installed, so let’s go through some simple steps to help you pinpoint the one you want to remove.
- Check Your Installed Plugins:
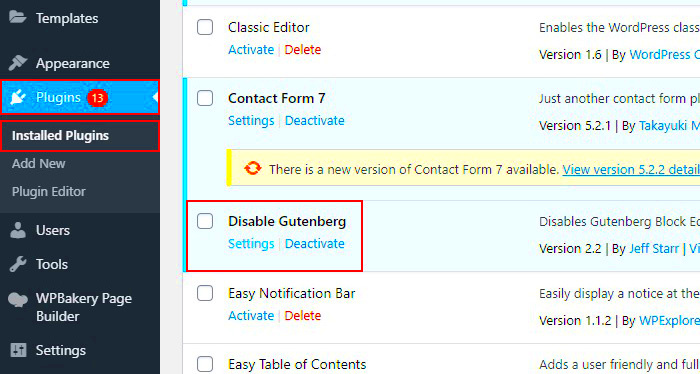
Navigate to your WordPress dashboard and click on Plugins > Installed Plugins. Here, you’ll see a list of all the plugins you have on your site. Look for any plugins that specifically mention carousel or gallery.
- Review the Plugin Settings:
Some plugins add their own settings under the Settings menu or within the page/post editing interface. Open the relevant page or post that uses the carousel and see if there’s an option related to the carousel plugin.
- Check for Active Shortcodes:
If you see any shortcodes in your content that resemble something like
[carousel]or - Inspect the Frontend:
On the public side of your site, you can right-click and select Inspect in your browser. This will open developer tools, where you can see which scripts are loaded, often revealing the plugin name.
Once you’ve identified the carousel plugin, you’ll be ready to proceed with its removal. Keeping your site uncluttered and efficient is crucial, so let’s get to it!
Backing Up Your WordPress Site
Before making any significant changes to your WordPress site, it’s essential to back up your data. This step ensures that you have a safety net in case something goes wrong during the process of removing the Gutenberg carousel plugin. Don’t worry; it’s a straightforward process!
Here’s a simple checklist to help you back up your site:
- Choose a Backup Method: You can use a plugin, your hosting provider’s built-in backup feature, or even manually back up your files and database.
- Use a Backup Plugin: Popular options include UpdraftPlus, BackWPup, and Duplicator. Each of these plugins allows you to easily create backups with just a few clicks.
- Hosting Provider Backups: Many hosting services, like Bluehost or SiteGround, automatically back up your site. Just check your hosting dashboard for instructions on how to access these backups.
- Manual Backup: If you prefer to do it yourself, ensure you download all files using FTP and export your database using phpMyAdmin.
Don’t forget to store your backup in a secure location, like Google Drive or Dropbox, where it can’t be lost or accidentally deleted. Once you have a safe backup in place, you can proceed with removing the carousel plugin with peace of mind!
Uninstalling the Carousel Plugin via the WordPress Dashboard
Now that you have backed up your site, you’re ready to uninstall the carousel plugin through the WordPress Dashboard. This is often the easiest method, and I’ll walk you through the steps, so let’s get started!
Follow these simple steps:
- Log into Your WordPress Admin: Open your browser, navigate to your WordPress site, and enter your login credentials.
- Go to Plugins: On the left-hand sidebar, click on ‘Plugins’ to expand the menu. You’ll see a list of all plugins currently installed on your site.
- Find the Carousel Plugin: Scroll through the list or use the search function to find the carousel plugin you want to uninstall.
- Deactivate the Plugin: Once located, click the ‘Deactivate’ link associated with the plugin. It’s a crucial step, as you can’t delete a plugin that’s still active.
- Delete the Plugin: After deactivation, the option to ‘Delete’ will appear. Click on that, and confirm the action when prompted.
And just like that, you’re done! The carousel plugin will be removed from your WordPress site. If you encounter any issues during this process, don’t hesitate to refer to the plugin’s documentation or reach out to the support team. Remember, it’s entirely normal to run into hiccups when managing your site!
5. Removing Carousel Plugin Files Manually (if necessary)
Sometimes, removing a WordPress plugin using the dashboard isn’t enough, especially if you suspect that the plugin has left behind some residual files or if it didn’t uninstall properly. In such cases, manually deleting the carousel plugin files can be essential for a clean removal. Let’s walk through the steps!
Step 1: Access Your WordPress Directory
You’ll need to connect to your WordPress site via FTP or use the file manager provided by your hosting service. If you’re using an FTP client, you can use FileZilla or Cyberduck. Just enter your FTP credentials to log in.
Step 2: Locate the Plugin Folder
Navigate to the following directory in your WordPress files:
/wp-content/plugins/
Here, you’ll see all the plugins installed on your site. Look for the folder related to the carousel plugin you want to remove.
Step 3: Delete the Plugin Folder
Once you locate the plugin folder, simply right-click it and select ‘Delete.’ This action will remove all the files associated with the plugin from your server.
Step 4: Check for Additional Files
Some plugins store additional files in other directories, such as:
- /wp-content/uploads/
- /wp-content/cache/
- /wp-content/themes/Your-Current-Theme/
Be sure to look around in these places for any leftover files, especially images or settings files that the carousel plugin may have created.
Step 5: Double-Check Your Site
After removing the plugin files, clear your browser cache and revisit your website to ensure nothing related to the carousel is still present.
6. Clearing Cache and Temporary Files
After removing the carousel plugin from your WordPress site, it’s a good idea to clear your cache and temporary files. This helps ensure that any old data or remnants are removed, preventing possible conflicts or display issues.
Why Clear Cache?
When you uninstall a plugin, your site may still serve cached files, which leads to outdated content showing up on your site. Clearing the cache helps to refresh your site and display the current version without residual elements from the previously installed carousel plugin.
Step 1: Clear Browser Cache
Most browsers save a cache of the web pages you visit. To clear your browser’s cache:
- Google Chrome: Go to the menu > More tools > Clear browsing data, then choose ‘Cached images and files.’
- Firefox: Menu > Options > Privacy & Security > Cookies and Site Data > Clear Data.
- Safari: Preferences > Privacy > Manage Website Data > Remove All.
Step 2: Clear WordPress Cache
If you’re using a caching plugin like W3 Total Cache or WP Super Cache, follow these steps:
- Navigate to the caching plugin settings in your WordPress dashboard.
- Look for a ‘Clear Cache’ or ‘Purge Cache’ button.
- Click the button to ensure the latest version of your site is being served.
Step 3: Server Caching
If your hosting provider uses server-level caching, like Cloudflare or Varnish, check their documentation on how to clear the cache:
- Log in to your hosting account.
- Locate your server caching settings and find the option to clear cache.
In doing this, you’ll help ensure your site runs smoothly and that old carousel features aren’t lingering around to confuse visitors.
7. Testing Your Site After Removal
Once you’ve successfully removed the Gutenberg carousel plugin from your WordPress site, it’s essential to conduct thorough testing to ensure everything is working smoothly. Here’s a step-by-step guide to help you check that your website is functioning as expected:
- Clear your Cache: If you’re using a caching plugin, clear your cache to ensure that the most recent version of your website is being displayed.
- Examine the Frontend: Visit the homepage and navigate through different pages to check for any noticeable changes or issues. Pay attention to images, sliders, or galleries that may have been affected by the removal.
- Check Responsive Design: Don’t forget to check how your site looks on mobile and tablet devices. Use browser developer tools or just resize your browser window to see how everything aligns.
- Inspect Console for Errors: Open the browser’s developer console (usually F12) and check for any JavaScript errors that might have arisen due to the plugin removal.
- Test Functionality: If you had any custom settings related to the carousel, verify that the remaining features on your site are still functioning properly. This includes checking for broken links, missing images, or any odd formatting.
- Review Page Speed: Using tools like Google PageSpeed Insights can help you determine if the removal of the plugin has had an impact on your site speed.
The goal here is to ensure a seamless transition there should be no disruptions to the user experience. If you experience any issues, don’t hesitate to consult documentation, seek support, or even consider reinstalling a different plugin tailored to your needs. Remember, a well-functioning site means a better experience for your visitors!
8. Conclusion
Removing a Gutenberg carousel plugin from your WordPress site can seem daunting at first, but by following the steps outlined in this guide, you can ensure a smooth process. Whether you’re switching to a different carousel plugin or just cleaning up your site’s functionalities, knowing how to effectively remove it is crucial.
Here are a few key takeaways:
- Backup Your Site: Always back up your site before making any significant changes. This step protects you from potential data loss.
- Monitor Site Performance: Post-removal testing is essential to ensure everything functions as it should. Engage with your site like a user to spot any discrepancies.
- Explore Alternatives: If you need a carousel feature, take the time to research and find a plugin that better suits your requirements.
By being diligent and proactive, you can enhance your WordPress site’s performance and ensure your visitors enjoy their experience. If you encounter difficulties or have any lingering questions, the WordPress community is a fantastic resource. Happy blogging!


