Are you looking to refresh your online presence by remaking a custom post type in WordPress? You’re in the right place! Custom post types are powerful tools that allow you to create tailored content to meet your needs, whether it’s for portfolios, testimonials, or events. In this blog post, we’ll explore why you might want to switch to a different plugin and walk you through the steps to achieve this seamlessly. Ready to dive in? Let’s go!
Understanding Custom Post Types in WordPress

Before we jump into the nitty-gritty of remaking a custom post type, let’s clarify what a custom post type actually is. In WordPress, you have default post types like posts and pages, but custom post types take your content management to a new level. Here’s a closer look:
- Definition: A custom post type is a content type that you can create to suit your needs. Basically, it allows you to manage different types of content separately.
- Purpose: By categorizing your content, you make it easier for both you and your visitors to find and manage information. Imagine having a dedicated section for products, events, or team members!
- Examples: Common custom post types include:
- Portfolio
- Testimonials
- Events
- Products (in eCommerce sites)
Here’s the cool part; custom post types can have their own unique features and attributes through settings like custom fields, taxonomy, and more. This flexibility allows for a more organized and specialized website.
In the next sections, we’ll discuss the reasons for remaking a custom post type, choosing a different plugin, and how to go about it effectively. So stay tuned!
Why Use Different Plugins for Custom Post Types?
When it comes to building a website with WordPress, choosing the right plugin for Custom Post Types (CPTs) can make a world of difference. There are several reasons why you might opt for different plugins to manage CPTs.
Diversity in Features: Each plugin offers unique functionalities that can cater to specific needs. For instance, some plugins allow for advanced custom fields, while others might provide better integration for SEO purposes. By using different plugins, you can mix and match their strengths to create a more tailored setup.
User Experience: Not all plugins have the same user interface or user experience. You might find one plugin easier to navigate than another. If your team finds a new plugin easier to use, it can lead to a more efficient workflow and a better overall experience when managing your content.
Performance: Some plugins are lightweight and optimized for speed, which can greatly improve your website’s performance. If you’ve noticed that your current CPT plugin is slowing down your site, switching to a different one that’s known for its efficiency can make a significant impact.
Specific Use Cases: Depending on your website’s niche, you might need specific functionalities that a particular plugin provides. For example, if you’re managing a portfolio site, a plugin designed for galleries or media can help you showcase your work more effectively.
In short, exploring different plugins for Custom Post Types can enhance your website’s functionality, improve user experience, and cater to specific needs that may arise over time.
Preparing to Remake Your Custom Post Type
So, you’ve decided to switch it up and remake your Custom Post Type. That’s a great move! But before diving in, there are a few essential steps you should take to prepare. This preparation ensures a smooth transition and minimizes any potential headaches.
1. Backup Your Website: Before making any changes, always create a complete backup of your website. This includes your database and files. If anything goes wrong during the process, you’ll have the option to restore everything to its previous state. Use reliable backup plugins like UpdraftPlus or BackupBuddy.
2. Document Current Settings: Take note of the settings and functionalities of your existing Custom Post Type. This will help you mimic essential features in the new plugin. Consider creating a simple table with the following:
| Feature | Current Plugin | Desired Plugin |
|---|---|---|
| Custom Fields | Plugin A | Plugin B |
| Post Type Support | Plugin A | Plugin B |
| Taxonomies | Plugin A | Plugin B |
3. Assess Compatibility: Ensure the new plugin is compatible with your existing WordPress theme and other plugins. Check forums or the plugin’s documentation for any known conflicts.
4. Plan Your Content Migration: If you have content associated with the old CPT, think about how you’ll migrate it. Will you do it manually, or will the new plugin assist with that? Having a migration plan can save you time.
By taking these preparation steps, you set yourself up for a successful transition and can enjoy the benefits of your new Custom Post Type without unexpected hiccups!
Step 1: Deactivate the Current Plugin
Before making any changes to your WordPress custom post type, the first thing you need to do is deactivate the current plugin that is handling your custom post types. This process may sound simple, but it’s crucial for avoiding conflicts and ensuring your content remains intact. So, let’s walk through the steps together!
Here’s how to do it:
- Log in to your WordPress admin dashboard.
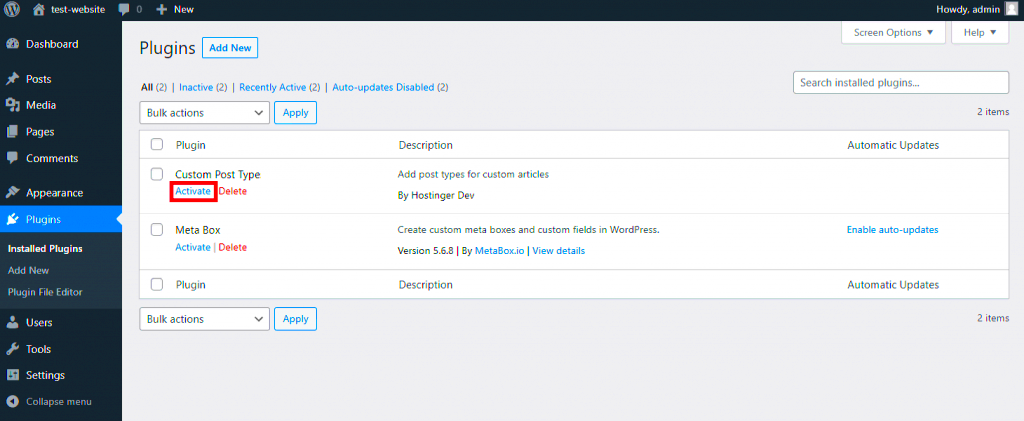
- In the left sidebar, navigate to Plugins > Installed Plugins.
- Find the plugin that currently manages your custom post types. It may have a name that indicates its function.
- Click on the Deactivate link located beneath the plugin’s name.
Once you’ve done this, the plugin will no longer be active on your site. However, remember that deactivation doesn’t delete your data; it merely pauses the plugin’s functionality. Your custom post types will still be present, but they may not display correctly until you activate the new plugin.
After deactivating, it’s a good practice to check your website to confirm that everything is still functioning as expected. Navigate through your pages and posts, especially those that utilize the custom post types, to ensure they still display correctly without any formatting errors. If anything seems off, don’t worry! This is a part of the transition process.
Step 2: Backup Your Content
Now that you’ve deactivated your current plugin, the next step is to backup your content. This is critical to ensure that your hard work isn’t lost in the shuffle while switching plugins. A proper backup will save you plenty of headaches later on.
Here’s how to effectively back up your content:
- Use a Backup Plugin: There are several plugins available that can handle backups for you, such as UpdraftPlus and BackupBuddy. Just install one, configure it, and create a backup.
- Export Content: WordPress has a built-in export feature. Go to Tools > Export, and select “All content”. This will give you an XML file containing your posts, pages, and custom post types.
- Database Backup: For those comfortable with SQL, you can also back up your database directly via phpMyAdmin. Make sure you understand the implications before doing this, as it’s more technical.
Regardless of the method you choose, ensure you save your backups safely, perhaps in multiple locations—like local storage and cloud services. That way, you can rest easy knowing your content is protected.
Once your content is backed up, you are all set to move on to installing the new plugin and starting your custom post type makeover!
Step 3: Choose the Right Plugin
Now that you’ve decided to remake your custom post type, it’s vital to choose the right plugin. With so many options available, it can feel a bit overwhelming, but don’t worry, I’ll break it down for you.
First, think about your specific needs. What features do you want your custom post type to have? Here are some key considerations:
- Functionality: Look for plugins that offer the features you want. Do you need custom fields, taxonomies, or perhaps unique display options?
- User-friendliness: Choose a plugin that has an intuitive interface. You don’t want to spend hours figuring out how to use it!
- Compatibility: Ensure the plugin works well with your current theme and other plugins. Incompatibilities can cause headaches later on.
- Support and Updates: Opt for plugins that are actively maintained and offer decent support. This way, you’ll have a safety net if something goes awry.
- Reviews and Ratings: Check the plugin’s reviews and see what other users are saying. A plugin with a good reputation is usually a safe bet.
After you’ve done your research and narrowed down your options, make a list of the plugins that fit your criteria. Compare the pros and cons of each one, and you’ll soon find the perfect match for your needs!
Step 4: Install and Activate the New Plugin
Once you’ve decided on the right plugin, it’s time to roll up your sleeves and get to work! Installing and activating a new plugin in WordPress is a pretty straightforward process, so let’s walk through it together.
Here’s how to do it:
- Login to Your WordPress Dashboard: Start by signing into your WordPress admin area.
- Navigate to Plugins: On the left sidebar, click on “Plugins,” then select “Add New.”
- Search for Your Plugin: Use the search bar to find the plugin you want to install. You can search by the plugin name or use keywords that describe its functionality.
- Install the Plugin: Once you’ve found it, click the “Install Now” button. This may take a moment.
- Activate the Plugin: After installation, the button will change to “Activate.” Click on it to enable your plugin.
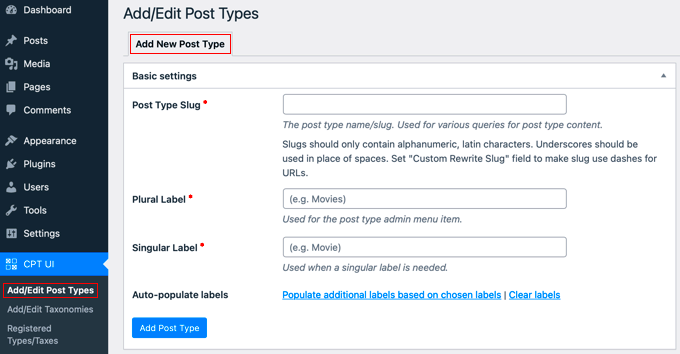
Once activated, you should see a new menu item associated with the plugin in your dashboard. Go ahead and click on it to configure the settings based on your preferences and start creating your custom post type!
And there you have it—your new plugin is all set up and ready for action! Time to let your creativity flow and make that custom post type shine just the way you imagined it.
Step 5: Configure the New Custom Post Type
Now that you’ve created your new custom post type using the plugin of your choice, it’s time to configure it to meet your specific needs. This step is where you’ll refine your settings to make sure everything functions just right.
Start by navigating to the settings area of your custom post type within the plugin. Here are some essential configurations you might consider:
- Labels: Customize the labels displayed on the WordPress dashboard. This helps in making the interface user-friendly and tailored to your audience. For instance, instead of “Posts,” you might want to use “Articles” or “News.”
- Supports: Select what features your custom post type should support. Typical options include title, editor, thumbnail, and custom fields. Choose the ones that are most relevant to your content.
- Public Visibility: Determine whether your post type should be public or hidden. If you’re creating something meant for internal use, you can restrict visibility.
- Menu Position: Decide where your custom post type will appear in the admin menu. This can help with organization and ease of access.
Always remember to save your changes once you’re satisfied with the configuration. After this, you can move on to testing everything to ensure it works as intended. A well-configured custom post type can make a huge difference in content management efficiency!
Step 6: Migrate Existing Data
The next important step is to migrate any existing data from your old custom post type to this new setup. This can initially sound a bit complex, but if you take it step by step, it can be quite manageable.
Here’s how you can approach the migration:
- Backup Your Database: Always start with a backup. Use a plugin like UpdraftPlus to ensure that you have a copy of your site’s data before moving anything around.
- Identify Data Structure: Take a close look at your old custom post type’s data structure. Understand the fields, taxonomies, and how the content is organized. You can find this under the database tables directly if you’re comfortable.
- Export Data: If your old plugin has a built-in export tool, use that to export the existing data. You can generally export this as a CSV or XML file, which is a standard way of moving data.
- Import Into New Custom Post Type: Use the import functionality of your new custom post type plugin. Make sure to map the fields correctly — this is crucial to ensure the data goes where it’s supposed to.
- Test Thoroughly: Once the migration is complete, go through the data carefully. Check several entries to confirm that everything transferred correctly, ensuring nothing is lost or incorrectly formatted.
Congratulations! You’ve successfully migrated your existing data into your newly configured custom post type. This step completes the transition, making your WordPress setup more efficient and tailored to your needs.
Step 7: Test the New Setup
Now that you’ve remade your custom post type using a different plugin, it’s time to put your new setup to the test! This step is crucial since it verifies that everything works seamlessly in your WordPress environment. Here’s how to methodically test your setup:
1. Review Your Custom Post Type: Navigate to your WordPress dashboard and locate your newly created custom post type. Check to see if it displays correctly. Is the name and URL structure as you wanted it? Make adjustments if necessary.
2. Add New Posts: Try adding a new post within your custom post type. Fill in the fields you set up, and make sure that all the settings like categories, tags, and featured images function properly. If there’s any hiccup here, that could indicate a setup issue.
3. Review Frontend Display: After creating a few posts, head to the front end of your site. What do your custom posts look like? Do they display as intended? Pay attention to formatting and layout. If something doesn’t look right, you might need to tweak your theme or plugin settings.
4. Check Compatibility with Other Plugins: Test your custom post type with other plugins active. Ensure that your new setup does not conflict with existing functionalities. A good test here is to also preview your posts while different plugins are turned on or off.
5. User Experience: Finally, consider getting feedback from users. Ask friends or colleagues to interact with your custom posts and gather their thoughts on usability and appearance. This can offer invaluable insights.
Conclusion
And there you have it! Remaking a custom post type in WordPress using a different plugin might seem like a daunting task, but breaking it down into steps makes it manageable and even enjoyable. You now have a powerful tool in your arsenal to customize your WordPress site to better suit your needs.
Always remember, plugins can offer diverse functionalities, and sometimes switching can lead to better performance, easier management, and enhanced user experience. Each plugin has its unique strengths, so feel free to experiment with different ones until you find the perfect fit for your goals.
Before wrapping up, here are a few key takeaways> to keep in mind:
- Set clear objectives for what you want your custom post type to achieve.
- Make sure to backup your site before making significant changes.
- Test thoroughly to ensure everything functions as expected.
- Stay updated on plugin compatibility and WordPress updates.
With the insights you’ve gained, you’re now equipped to create a custom post type that can transform how you showcase content. So, dive in, test your newfound setup, and let your creativity flow!
Frequently Asked Questions
Remaking a Custom Post Type (CPT) in WordPress can seem daunting, especially when switching to a different plugin. Below are some common questions that users typically ask when attempting this process:
- What is a Custom Post Type?
A Custom Post Type is a content type that allows you to create different types of content in WordPress, beyond the default types like posts and pages. Examples include portfolios, testimonials, or products.
- Why would I want to change a Custom Post Type plugin?
Changes may be necessary for various reasons, such as improved functionality, better user experience, ease of use, or if the original plugin is no longer maintained.
- Will I lose my existing data when changing the plugin?
Data loss can occur if the new plugin does not support the same structure as the old one. It’s essential to back up your database and files before proceeding.
- Can I customize my new Custom Post Type?
Absolutely! Most plugins allow extensive customization options, including custom fields, taxonomies, and templates.
- How can I safely test the new plugin?
It’s recommended to use a staging environment where you can test changes without affecting your live site. Popular options include WP Staging and Local by Flywheel.
Changing a Custom Post Type plugin in WordPress can bring about improved functionality and user experience. By understanding the common questions and considerations, you can navigate the process safely and effectively.


