Creating content in WordPress often involves multiple steps, and one key step is working with draft pages. Draft pages allow you to write and edit your content without making it public immediately. This feature is perfect for those who like to develop their ideas over time or need to collaborate with others before finalizing. In this section, we’ll explore what draft pages are and how they fit into the WordPress ecosystem.
Understanding the Importance of Draft Pages
Draft pages are more than just a placeholder for unfinished content; they serve several vital functions that can enhance your blogging experience. Here are some reasons why draft pages are important:
- Flexibility in Content Creation: Draft pages give you the freedom to write at your own pace. You don’t have to publish your thoughts immediately, allowing room for revision and improvement.
- Collaboration Opportunity: If you’re working with a team, draft pages enable you to share content with others for feedback before going live. It’s an excellent way to foster teamwork and gather different perspectives.
- Time Management: Drafts allow you to manage your content schedule effectively. You can work ahead and have several posts queued up for future publication, reducing last-minute stress.
- Experimentation: Trying out new formats or ideas? Use draft pages to experiment without worrying about how it will be received publicly. You can play around with your layout, images, and overall presentation.
In short, draft pages serve as a sandbox for your creative process, ensuring that when you finally hit “publish,” you’re confident in the quality and effectiveness of your content. Understanding their importance can transform the way you approach blogging in WordPress.
How to Create a Draft Page in WordPress
Creating a draft page in WordPress is a breeze, even if you’re a total newbie. Draft pages allow you to work on your content without making it public until you’re ready to share it with the world. Just follow these simple steps:
- Log In to Your WordPress Dashboard
Start by logging into your WordPress account. Once you’re in, you’ll be greeted by the dashboard, which is your control center. - Navigate to Pages
On the left-hand menu, look for the Pages section and click on it. You’ll see a list of all your existing pages. Don’t worry if you don’t have any yet—this is where the magic begins! - Add New Page
Once you’re in the Pages section, click on the Add New button at the top. This will take you to the page editor. It’s like opening a blank canvas just waiting for your content! - Enter Your Content
Now comes the fun part! Here, you can add your title and contents—play around with text formatting, images, or any other media you want to include. WordPress has a sleek block editor that makes it easy to design your page the way you envision it. - Save as Draft
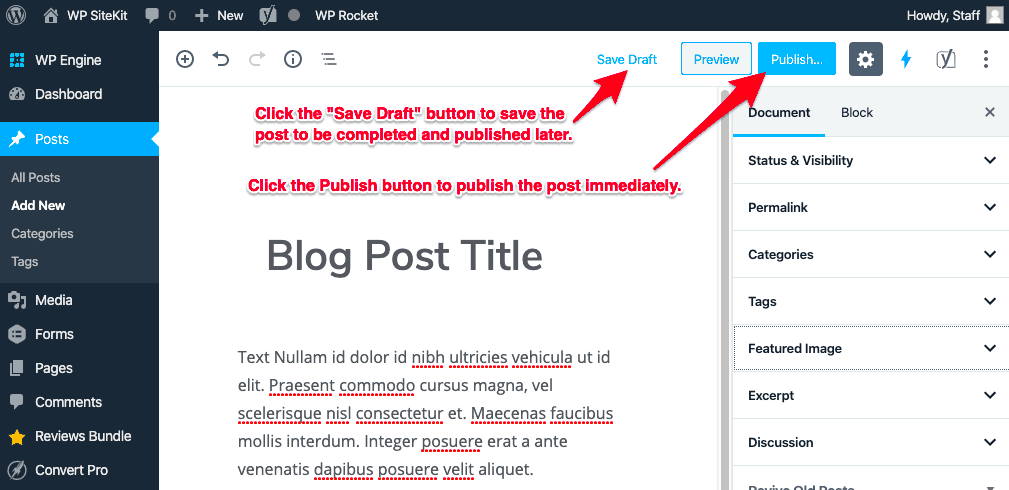
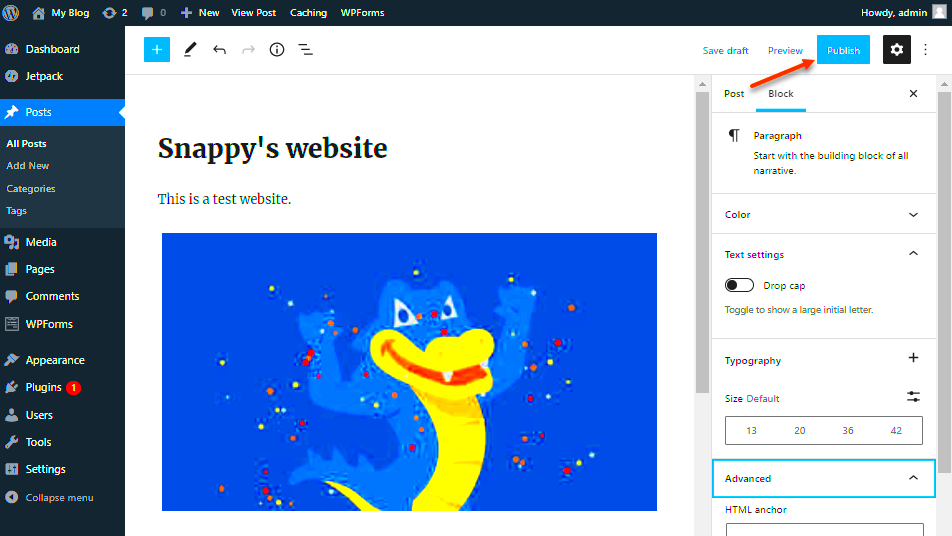
Before you get too excited and hit Publish, click on the Save Draft button located on the right side of the editor. This way, your page won’t be live, but you’ll have it saved to work on later!
And there you go! You now have a draft page set up and ready for you to customize further. Don’t rush the process; take your time and make it just right before hitting the big publish button!
Reviewing Your Draft Page
So you’ve created a draft page in WordPress—fantastic! But how do you ensure that it’s ready for prime time? Reviewing your draft page is essential to make sure everything looks good, functions properly, and conveys the message you intend. Let’s explore the steps to do this effectively:
- Access Your Drafts
Head back to your WordPress dashboard. Click on Pages again, and then look for the Drafts section. This is where all your unpublished pages hang out, waiting for you to check them out! - Open Your Draft
Find the draft page you want to review, and click on the title or the Edit link under it. This takes you back to the page editor where you can view your work. - Preview the Page
Before making any changes, it’s wise to use the Preview option located in the right-hand corner to see how your draft looks to visitors. This will give you a feel for spacing, layout, and design. - Proofread the Content
As you review, make sure to read through the text to catch any typos, grammatical errors, or awkward phrasings. Consider using tools like Grammarly to help with this step. - Check Links and Images
If you have included any hyperlinks or images, click through them to confirm they work as intended. Broken links can turn off your visitors, and no one wants a misplaced image! - Make Necessary Edits
Based on what you’ve reviewed, go ahead and make any necessary changes. Whether it’s tweaking the content, adjusting formatting, or changing images, now’s your time to shine!
After you’re satisfied with the review, you can decide whether to save more changes or hit that Publish button. Remember—taking the time to review can make a world of difference in how your audience perceives your page!
Steps to Publish a Draft Page
Publishing a draft page in WordPress is a straightforward process and can be done in just a few clicks. Whether you’re working on a blog post or a product page, it’s essential to follow these simple steps to ensure your content is live for your audience to see:
- Log into Your WordPress Dashboard: Start by entering your login credentials at your WordPress website. Once you’re inside, you’ll be greeted by the dashboard.
- Navigate to Pages: On the left-hand menu, locate the “Pages” option. Click on this to view all your pages, including drafts.
- Find Your Draft: Look for the draft page you want to publish. Drafts are usually marked clearly. You can use the “All Pages” option to filter or search for your draft directly.
- Edit the Draft (if necessary): Before publishing, you can click “Edit” to make any final changes. This is a great time to proofread your content and ensure everything looks just right.
- Check Settings: Review the settings on the right sidebar. You can add categories, tags, or a featured image to enhance your page.
- Hit the Publish Button: Once you’re satisfied, hit the “Publish” button. A message will pop up asking you to confirm the action.
- View Your Page: After publishing, it’s always good practice to click “View Page” to see how it looks to your audience.
And there you go! Your draft page is now live for the world to see. If you follow these steps, you’ll be on your way to sharing your content easily and efficiently.
Common Issues When Publishing Draft Pages
Even though WordPress is user-friendly, you might encounter some hiccups when publishing draft pages. Let’s explore some common issues and their solutions so you can smoothly publish your content:
- Page Not Saving: Sometimes, you might find that your edits aren’t saving. This can be due to a poor internet connection. Always ensure you’re connected to a stable network before and during the editing process.
- Missing Publish Button: If you can’t find the “Publish” button, it could be due to user role restrictions. Make sure you’re logged in with sufficient permissions, like an Administrator or Editor role.
- Content Not Displaying Properly: After publishing, if your content doesn’t appear as expected, it might be a caching issue. Try clearing your browser cache or using incognito mode to check.
- Plugins Causing Conflicts: Sometimes, plugins can interfere with the publishing process. If you suspect this, try temporarily deactivating your plugins to see if that resolves the problem.
- Connection Timeouts: If you experience server timeouts, it may be related to your hosting service. Contact your hosting provider for assistance if this issue persists.
By being aware of these common issues, you’ll be better prepared to tackle any bumps in the road when publishing your draft pages. Remember, every challenge is an opportunity to learn and improve your WordPress skills!
7. Tips for Managing Your Draft Pages Effectively
Managing your draft pages in WordPress doesn’t have to be a daunting task. With just a few strategic tips, you can keep everything organized and efficient. Here’s how you can manage those drafts like a pro:
- Regularly Review Your Drafts: Set a recurring schedule, maybe weekly or monthly, to go through your draft pages. This way, you’ll avoid clutter and can decide which drafts to update, publish, or delete.
- Use Categories and Tags: Just like your published posts, you can categorize your drafts as well. Using categories and tags can help you quickly locate drafts related to particular topics, making the writing process smoother.
- Set Goals and Deadlines: Sometimes, drafts linger because we haven’t set a publication date. Consider creating SMART goals – Specific, Measurable, Achievable, Relevant, Time-bound – for your draft pages.
- Utilize the Revision History: WordPress keeps track of all your changes, which is incredibly useful. If you’re not happy with changes you’ve made to a draft, you can easily revert to a previous version.
- Utilize Plugins: There are numerous plugins available that assist in managing drafts. For example, “Drafts” helps you organize, track, and even remind you to publish drafts that have been sitting idle.
- Mark Priority Drafts: Not all drafts are created equal! Mark your priority drafts with a star or label so you can easily identify which ones should be addressed first.
- Communicate with Your Team: If you’re working with a team, keep the communication lines open. Discuss what drafts are in the pipeline, who’s responsible for what, and make sure you’re all on the same page.
By incorporating these tips into your WordPress workflow, you’ll find that managing draft pages becomes much less of a chore and more of an organized, productive process!
Conclusion: Best Practices for Publishing in WordPress
Publishing your content on WordPress doesn’t have to feel like a stressful race against the clock. Instead, think of it as a well-planned process that requires attention to detail. Here are some best practices to consider when you’re ready to hit that publish button:
- Proofread Before Publishing: Always give your content a thorough read. Spelling and grammar mistakes can undermine your credibility. Use tools like Grammarly to double-check your work.
- Optimize for SEO: Ensure that your content is optimized for search engines before publishing. Use relevant keywords, meta descriptions, and alt texts for images to improve visibility.
- Preview Your Post: Always use the preview option in WordPress to see how your post will look once it goes live. This helps you catch any formatting errors or layout issues.
- Add Internal and External Links: Including links to other posts on your site helps with SEO and keeps readers on your site longer. Plus, linking to reputable external sources adds value to your content.
- Schedule Posts Wisely: Timing can make a difference in how your post performs. Consider scheduling your posts for optimal days and times when your audience is most active.
- Promote Your Content: Don’t just hit publish and walk away! Share your posts across social media platforms, email newsletters, and any other channels you use. Promotion increases visibility and engagement.
- Monitor Performance: After publishing, keep an eye on how your content is performing using analytics tools. Understanding viewer behavior can inform your future writing strategy.
By following these best practices, you can not only ensure your drafts become polished posts but also that they reach the audience they deserve. Happy publishing!

