If you run an online store with WooCommerce, you know how important it is to enhance customer experience and boost sales. One effective strategy is to offer free shipping after a certain spending threshold. This not only encourages customers to purchase more but also enhances loyalty. In this post, we’re going to explore how to easily set up free shipping in WooCommerce, helping you make the most of this customer-friendly strategy!
Understanding Free Shipping in WooCommerce

Free shipping in WooCommerce is a powerful tool that can significantly influence buying behavior. But before diving into how to implement it, let’s break down some key concepts.
First off, what is free shipping? It’s simply when you waive the shipping fees for your customers. But here’s the catch: you can set specific conditions under which this applies, such as a minimum order amount.
Why is free shipping important? Here are a few reasons:
- Increased Sales: Customers are more likely to add extra items to their cart to meet the free shipping threshold.
- Reduced Cart Abandonment: Free shipping can be the incentive that keeps customers from abandoning their carts at checkout.
- Competitive Edge: Many online stores offer free shipping; it can be a deciding factor for customers when choosing where to shop.
Now, let’s look at how to set this up:
| Step | Description |
|---|---|
| Step 1 | Open your WooCommerce settings. |
| Step 2 | Navigate to the ‘Shipping’ tab. |
| Step 3 | Select ‘Shipping zones’ and then ‘Add shipping method.’ |
| Step 4 | Choose ‘Free shipping’ and configure the minimum order amount. |
In the next sections, we will dive deeper into configuring these settings to optimize your online store for success!
Step 1: Accessing Your WooCommerce Settings

Accessing your WooCommerce settings is the first step towards setting up free shipping incentives for your customers. Let’s break it down so you know exactly what to do!
To get started, you’ll want to log in to your WordPress dashboard. This is where all the magic happens. Once you’re in, look for the “WooCommerce” option on the left sidebar. Here’s how you can navigate:
- Click on WooCommerce from the menu.
- Select Settings from the dropdown.
This will take you to the WooCommerce settings page, where you can control everything from payments to shipping. To set free shipping based on a minimum order requirement, focus on the shipping tab.
Now, simply click on the Shipping tab. This is the control center for all your shipping configurations. Once here, you’ll see options like “Shipping Zones,” “Shipping Methods,” and more. Each of these elements plays a vital role in setting up your free shipping.
In this section, you might also want to familiarize yourself with your existing shipping methods. Do you already have flat rates, local pickup, or other methods? It’s important to know so that your free shipping can work seamlessly alongside them. Once you’re comfortable with this area, you’re ready for the next exciting step!
Step 2: Configuring Shipping Zones

Alright! Now that you’ve accessed your WooCommerce settings, let’s dive into configuring shipping zones. This step is crucial because it determines how and where you’ll provide free shipping.
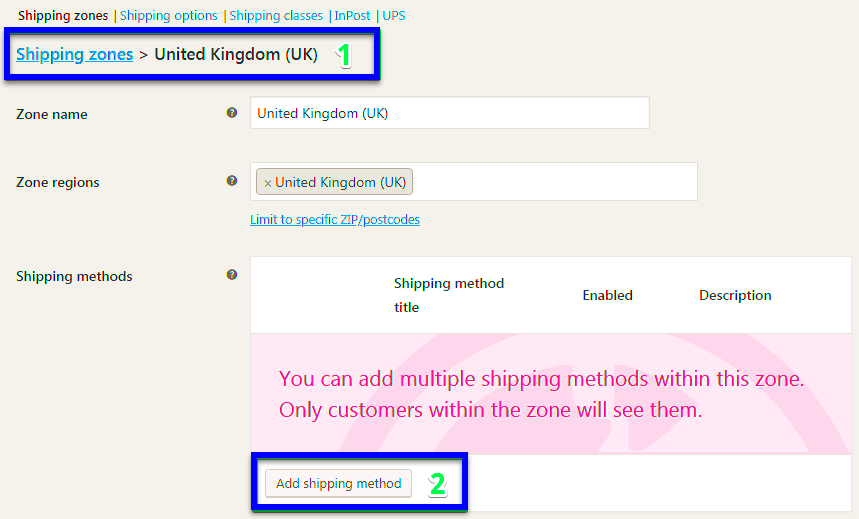
Shipping zones are specific regions where you can set up particular shipping methods. For example, you might create separate zones for local customers and international ones. Here’s how to configure these zones:
- Within the Shipping tab, locate Shipping Zones and click on it.
- You’ll see a list of zones, or perhaps none if you haven’t set any up yet.
- To add a new zone, click Add Shipping Zone.
Now, it’s time to fill in some details:
- Zone Name: Give it a name you’ll recognize, like “United States” or “Local Delivery.”
- Region(s): Use the dropdown to select the locations that fall under this zone.
After you’ve established your zones, the next step is adding shipping methods. Click on “Add Shipping Method.” You’ll see options like Flat Rate, Free Shipping, or Local Pickup. Select Free Shipping to kick off the enticing offers!
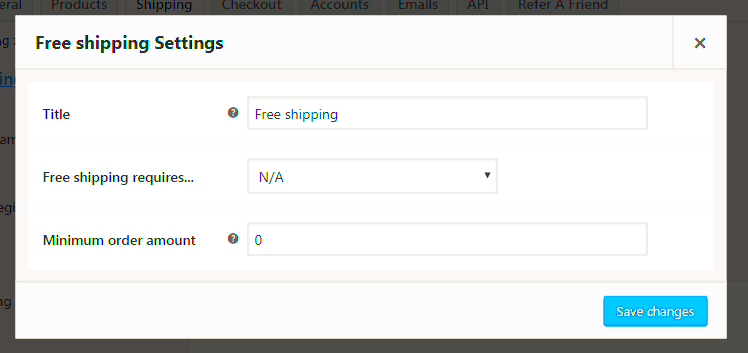
Once you’ve added Free Shipping, you can edit it by clicking on the key options. Here, you’ll be able to specify that free shipping only kicks in after a set minimum amount. Isn’t that great? This allows you to encourage larger purchases while giving customers a bit of a shopping thrill!
Voila! You’re all set to offer free shipping after a certain purchase amount. Your customers will love it, and you’ll likely see an increase in your average order value. Happy configuring!
Step 3: Adding Free Shipping Method
Now that you have WooCommerce all set up and are eager to provide your customers with free shipping once they hit that magical spending threshold, let’s roll up our sleeves and get to adding the free shipping method! It’s simpler than it sounds, and I promise you can do it without pulling your hair out.
First things first, log into your WordPress dashboard and navigate to the WooCommerce settings. Here’s how you can do it:
- Hover over the WooCommerce tab on the left side of the dashboard.
- Click on Settings.
- Now, head over to the Shipping tab at the top of the settings page.
Once you’re in the Shipping section, you’ll notice an option to add shipping zones. If you haven’t created any yet, now’s the time! Click the Add shipping zone button, and you can name your zone according to the geographical area you wish to cover, like “United States” or “International.” This is where you can specify which locations you’re willing to ship to.
After setting up your shipping zone(s), click on Add shipping method and select Free shipping from the dropdown menu. Don’t forget to click Add shipping method to make sure it’s added to your zone. You should now see the Free Shipping option under your selected zone. Ta-da! 🎉
Step 4: Setting the Free Shipping Conditions
Alright, let’s make sure that all that hard work pays off. In this step, we’ll set the conditions that must be met for your customers to enjoy free shipping. This part is critical because you want to keep that threshold just right!
After adding the Free Shipping method, click on Edit next to it to dive into the settings. You’ll see a box labeled Free shipping requires… where you can choose the trigger for free shipping. Depending on your business model, you might have a few options:
- A minimum order amount: This option requires customers to spend a specific amount to qualify.
- A coupon: If you want more control, choosing this option allows free shipping only with specific promotional codes.
- A combination of both: You can really customize the shopping experience by setting a minimum order amount while allowing coupon use.
To set a minimum order amount, simply enter that amount in the designated field. For instance, if you want free shipping on orders over $50, type in “50”. Don’t forget to save your changes! Now, whenever a customer reaches that amount at checkout, they’ll see the option for free shipping appear.
And there you have it! With just a few clicks, you’ve not only added a free shipping method but also set conditions that encourage customers to spend just a little more to save those shipping fees. It’s a win-win for both parties!
Step 5: Testing Your Free Shipping Setup
Once you’ve configured your free shipping settings in WooCommerce, the next crucial step is to test it out. This ensures that everything works smoothly before your customers start placing orders. Here’s how you can effectively test your setup:
- Create a Test Product: If you have a product you can use, that’s great! Otherwise, consider setting up a temporary test product with a price that’s below and above your specified free shipping threshold.
- Add to Cart: Begin by adding one product that is below the free shipping threshold to your cart. Proceed to the checkout page, and verify that the shipping cost is applied.
- Exceed the Threshold: Now, add enough items to your cart to exceed the free shipping minimum you’ve set. Upon checking out, make sure that the shipping cost is now marked as “Free Shipping.”
- Different Locations: If possible, conduct tests from various locations to ensure that your shipping rules apply consistently. This is crucial if you have zones set up for different regions.
- Checkout Process: Follow through the entire checkout process to see if there are any unexpected issues. Make sure payment and confirmation emails reflect the free shipping offer correctly.
Don’t forget to check the WooCommerce order management section afterward to confirm that it registers the correct shipping methods. Testing might seem tedious, but it’s incredibly important for providing a seamless shopping experience!
Tips for Promoting Your Free Shipping Offer
Once your free shipping setup is tested and confirmed to be working flawlessly, it’s time to spread the word! Here are some effective tips for promoting your enticing offer:
- Website Banners: Create eye-catching banners on your homepage or product pages that clearly state your free shipping threshold. Make sure the banner includes the minimum purchase amount required to unlock the offer.
- Social Media Announcements: Use your social media platforms to inform your followers about the exciting free shipping offer. Create posts, stories, or even launch a campaign targeting your audience effectively.
- Email Marketing: You can create an email newsletter that highlights your free shipping offer. Make it personalized by including recommendations based on past purchases.
- Coupon Codes: If you are running any promotions, consider including a coupon for free shipping as part of the deal. This encourages more people to shop.
- Incentives on Checkout: On your checkout page, remind users that they can save on shipping if they just add a little more to their cart. This can nudge them to make additional purchases!
By effectively marketing your free shipping offer, you create an inviting shopping atmosphere that encourages customers to spend more. Remember, the goal is to make your offer easy to understand and hard to resist!
Common Issues and Troubleshooting
Setting up free shipping in WooCommerce can be a game-changer for your online store, but sometimes things don’t go as smoothly as expected. Let’s explore some common issues you might encounter and how to troubleshoot them effectively.
1. Free Shipping Not Appearing at Checkout:
- Make sure you have set the correct thresholds. Go to WooCommerce > Settings > Shipping, then check your shipping zones and the free shipping method.
- Ensure that the products in the cart meet the minimum order amount. Sometimes, customers may not add enough items.
- Check for conflicting plugins that might affect shipping rates. Try disabling them one by one to identify any problems.
2. Free Shipping Calculating Incorrectly:
- Examine your tax settings. Sometimes, taxes can skew the total amount. Go to WooCommerce > Settings > Tax to review the configurations.
- Verify the settings for any discounted products. Discounts can play a vital role in the order total calculation.
3. Confusion Over Other Shipping Methods:
- In some cases, users may mistakenly choose other shipping options. Make sure to provide clear communication on your site about how free shipping works.
- Consider adding a note at checkout that highlights the free shipping option for orders over a certain amount.
By addressing these common issues proactively, you can ensure a smooth experience for your customers and keep them coming back for more!
Conclusion
Providing free shipping after a certain purchase amount in WooCommerce can significantly boost your sales and improve customer satisfaction. It’s not just about eliminating shipping costs; it’s about enhancing the overall shopping experience. But remember, the key lies in the setup.
Start with a clear strategy: define the free shipping threshold based on the average order value in your store, and tailor it to your target audience. Don’t forget to keep an eye on your shipping settings and continuously monitor your store’s performance after implementing this feature.
Here’s a quick recap of what we discussed:
- How to set up free shipping based on cart total.
- Important settings and conditions to consider.
- Common issues faced and troubleshooting tips.
In conclusion, this method not only simplifies the purchasing process but also encourages customers to spend a bit more to qualify for free shipping – a win-win situation! So don’t hesitate to implement it and watch your conversions soar!


