Hey there! If you’re diving into the world of digital images and need to make quick edits, Shutterstock Editor is a fantastic tool to have in your arsenal. It’s user-friendly, packed with powerful features, and perfect for both beginners and pros alike. Whether you want to crop, add text, adjust colors, or flip images, Shutterstock Editor makes it simple and intuitive. Today, we’re focusing on how to mirror-flip an image—a handy trick to create unique visuals or correct orientations. So, if you’re curious about what you can do with
Accessing the Shutterstock Editor Platform
Getting started with Shutterstock Editor is a breeze. First, you’ll need to head over to the Shutterstock website. If you already have an account, just log in—you can use your existing credentials. If not, creating an account is straightforward and free, and it gives you access to a variety of editing tools.
Once you’re logged in, follow these simple steps:
- Navigate to the top menu and click on “Edit” or find the “Shutterstock Editor” link, which is usually located under the “Tools” section.
- Clicking this will open the Shutterstock Editor platform in a new tab or window.
- If you have an image you’d like to upload, look for the “Upload” button—it’s often prominently displayed on the dashboard.
- Select your image from your device, and it will appear within the editor interface.
From there, you’re ready to explore the editing features. The platform is designed to be intuitive, with a clean layout that makes finding tools like cropping, rotating, flipping, and adding effects straightforward. Now that you’re in, let’s move on to how to mirror-flip your images step-by-step!
Uploading Your Image to Shutterstock Editor
Great! You’ve got your image ready to go, and now it’s time to upload it into the Shutterstock Editor to start the editing process. Uploading an image is pretty straightforward, but making sure everything runs smoothly can save you a lot of time and frustration.
First off, log into your Shutterstock contributor account. If you don’t have one yet, you’ll need to create an account—it’s quick and free! Once you’re logged in, navigate to the Shutterstock Editor by clicking on the “Editor” tab or link found in your dashboard menu.
Now, to upload your image:
- Click on the “Upload Image” button. This is usually prominently displayed on the editor’s interface, often with a camera or plus icon.
- Choose your image file from your computer. Supported formats typically include JPEG, PNG, TIFF, and sometimes PSD files—double-check Shutterstock’s current guidelines if unsure.
- Once you’ve selected your file, click “Open”. The upload process will begin automatically. You might see a progress bar indicating how much of the image has been uploaded.
After the upload completes, your image will appear in the Shutterstock Editor workspace. Take a moment to review it to ensure it uploaded correctly—look for any compression artifacts or quality issues. If everything looks good, you’re all set to start editing!
Remember, if you’re uploading multiple images, most editors allow batch uploads, which can save you a lot of time. Just select all your images at once, and they’ll upload sequentially. Once uploaded, you can select which image you want to work on next.
Uploading your image is the first big step, so make sure your file is high-quality and properly formatted. Now that your image is in the editor, it’s time to find those handy tools to flip or mirror it as needed. Let’s move on to locating the flip and mirror options in Shutterstock Editor!
Locating the Flip and Mirror Tools in Shutterstock Editor
Now that your image is uploaded and sitting comfortably in the Shutterstock Editor workspace, it’s time to find the tools that will allow you to flip or mirror your image. These features are super useful if you want to create symmetry, correct orientation, or just get creative with your design.
First, look at the toolbar or menu options—these are usually located on the right or top side of the editor interface. Shutterstock has a user-friendly layout, so finding the flip and mirror tools shouldn’t be a challenge.
Here’s a quick rundown of where to find them:
- Click on the “Edit” or “Adjust” button if available. Sometimes, flip/mirror options are nested within these menus.
- Look for icons that resemble arrows pointing left and right or a double-headed arrow. These often indicate flip or mirror functions.
- If you see options labeled “Flip Horizontal” and “Flip Vertical,” you’ve found exactly what you need.
In some versions of Shutterstock Editor, these tools are grouped under a dedicated “Transform” or “Rotate & Flip” menu. Clicking on this menu will reveal options to flip your image horizontally or vertically.
To perform a mirror flip:
- Select your image by clicking on it.
- Click on the “Flip Horizontal” button to create a mirror image along the vertical axis.
- If you want to flip vertically, choose “Flip Vertical.”
Once you’ve flipped or mirrored your image, you can preview the result immediately. If it looks good, you’re all set to save or continue editing. If not, you can easily undo the flip by clicking the undo button or reversing the action.
Knowing exactly where these tools are located and how to use them makes the entire process much smoother. Play around with the flip options to see how they affect your image—sometimes, a simple mirror flip can dramatically change the look and feel of your design.
That’s it for locating and using the flip and mirror tools in Shutterstock Editor! Next, we’ll walk through some tips to make your flipped images look perfect and how to save your edits seamlessly. Stay tuned!
How to Mirror-Flip an Image in Shutterstock Editor
Alright, you’ve got your image loaded into Shutterstock Editor, and now you want to give it that perfect mirror flip. Whether it’s for a creative project, a social media post, or just to see yourself from a new perspective, flipping an image is pretty straightforward once you know the steps. Let’s walk through it together!
First things first, make sure your image is selected. You’ll see it highlighted or outlined on your workspace. Now, look for the toolbar on the side or at the top of the editor — depending on your layout, the options might vary slightly.
Step-by-step to mirror-flip your image:
- Select the Image: Click on your image to activate editing options.
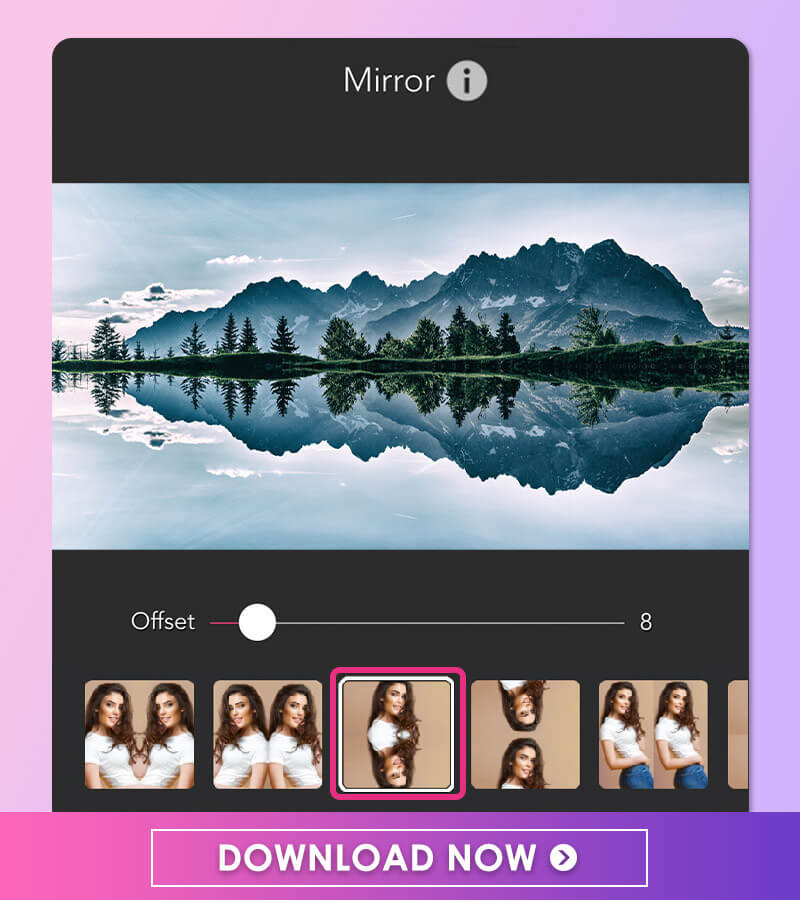
- Find the Flip Tool: Look for a button or icon that resembles a flip or rotate symbol. It might be labeled as “Flip,” “Mirror,” or you might see two options: “Flip Horizontal” and “Flip Vertical.”
- Choose the Flip Direction:
- Flip Horizontal: Mirrors the image from left to right. Imagine flipping a photo across a vertical axis — your left side becomes right, and vice versa.
- Flip Vertical: Flips the image upside down, like turning it over along a horizontal line.
- Apply the Flip: Click on the desired flip option. You should see the image instantly mirror-flip, giving you that perfect reflection effect.
And that’s it! Sometimes, the flip options are embedded under more advanced editing menus, so if you don’t see them immediately, check under “Transform” or “Adjust” sections. Don’t worry — the process is quick, and the preview helps you decide if it looks just right.
Pro Tip:
If you want to flip multiple images or elements at once, select all of them before applying the flip. This saves time and keeps your layout consistent.
Remember, flipping your image can dramatically change its appearance and impact. Experiment with both horizontal and vertical flips to see which one complements your design or project best.
Saving and Exporting Your Edited Image
Once you’re happy with your mirror-flipped image, the next step is to save and export it so you can use it wherever you need. Shutterstock Editor makes this super simple, but it’s good to know the options available so you can choose the best format and quality for your project.
How to Save Your Work
- Automatic Save: Many online editors, including Shutterstock, automatically save your progress as you work. Still, it’s a good habit to double-check before exporting.
- Manual Save: Look for a “Save” button, often located at the top right corner. Clicking it will save your project within the editor, allowing you to return later if needed.
Export Options
When you’re ready to export, follow these steps:
- Click on the “Download” or “Export” Button: Usually found at the top right of the interface.
- Select Your Format: Shutterstock Editor typically offers several options:
- JPEG: Great for most web uses, social media, and general purposes.
- PNG: Ideal if you need transparency or higher quality.
- PDF: Suitable for printing or sharing in document format.
Additional Tips for Exporting
- Rename the File: Save it with a clear name so you can identify it easily later.
- Check the File Size: Make sure it’s not too large for your intended use, especially for web uploads.
- Keep the Original: Save a copy of your original image before flipping, just in case you want to go back or make different edits later.
And there you have it! Saving and exporting your mirror-flipped image is simple once you know the steps. Now you’re ready to use your edited image across your projects, confident that it looks exactly how you want it.
Tips for Achieving Perfect Mirror-Flip Results
Flipping an image to create a mirror effect might sound straightforward, but getting that perfect, seamless look takes a little finesse. Here are some handy tips to help you achieve flawless mirror-flip results in Shutterstock Editor:
Pay Attention to the Composition
Before flipping, consider the composition of your image. Certain elements, like text or specific objects, might look odd or confusing when mirrored. To avoid this, crop or adjust your image so that after flipping, the key elements look natural and balanced.
Use Guides and Gridlines
Many editing tools, including Shutterstock Editor, offer guides or gridlines. Enable these features to align your flipped image perfectly with other design elements or to ensure symmetry. This helps in creating a professional and clean look.
Check the Lighting and Shadows
Sometimes, flipping an image can mess up the lighting and shadow direction, making it look unnatural. After flipping, take a moment to review the lighting. If needed, adjust shadows or brightness to maintain consistency and realism.
Consider the Background
If your image has a complex background, flipping might reveal issues like asymmetrical patterns or distracting elements. Use cropping or background editing tools to clean up or simplify the background for a more polished mirror effect.
Experiment with Multiple Flips
Don’t be afraid to experiment! Flipping an image back and forth can help you decide which orientation looks best. Sometimes, a slight rotation or additional edits can enhance the mirror effect and make your final image stand out.
Preview Before Finalizing
Always preview your flipped image in the context of your overall design. This helps catch any oddities or mismatched elements early on, saving you time and ensuring a professional finish.
Frequently Asked Questions About Image Editing in Shutterstock Editor
Getting started with image editing can raise a lot of questions. Here are some of the most common ones about mirror-flipping and general editing in Shutterstock Editor:
Q: Can I undo a mirror-flip once I’ve applied it?
A: Absolutely! Shutterstock Editor provides an undo feature. Just click the undo button or press Ctrl + Z (Windows) or Cmd + Z (Mac) to revert the flip. If you want to compare the original and flipped images, it’s a good idea to duplicate your image before flipping.
Q: Will flipping an image affect its quality?
A: No, flipping an image in Shutterstock Editor doesn’t reduce its quality. The flip is a simple transformation that doesn’t alter the image resolution or sharpness. However, always work with high-resolution images to ensure the best results.
Q: Can I combine flipping with other edits like cropping or resizing?
A: Definitely! You can flip, crop, resize, add filters, and do all sorts of edits in Shutterstock Editor. Just remember, some edits might affect how your flipped image looks, so it’s often best to finalize your flip before applying other transformations.
Q: Is there a way to flip only part of the image?
A: Shutterstock Editor primarily applies flips to the entire image. If you need to flip only a specific section, consider cropping that part first or using more advanced editing software that supports layer-based editing.
Q: How do I save my flipped image?
A: Once you’re happy with your mirror-flip, click the Download button. You can choose your preferred file format and resolution before saving. Make sure to save a copy of your project if you want to keep the original editable version for future tweaks.
Q: Are there any limitations to flipping images in Shutterstock Editor?
A: Flipping is a basic transformation, so it’s generally straightforward. However, complex images with intricate backgrounds or specific orientations might require additional editing for the best results. Also, some free accounts might have restrictions on certain features, so check your plan’s capabilities.
Conclusion and Final Tips for Using Shutterstock Editor Effectively
Mastering the Shutterstock Editor can significantly enhance your image editing workflow, allowing you to create polished visuals with ease. As you become more comfortable with mirror-flipping and other features, keep in mind some key tips to maximize your efficiency and results:
- Experiment with different flip options: Don’t limit yourself to just horizontal or vertical flips—try combining them for unique effects.
- Use grid and snapping tools: These features help align your images precisely, especially when working on complex compositions.
- Take advantage of filters and adjustments: Enhance your flipped images with brightness, contrast, and color adjustments to make them stand out.
- Save custom templates: If you frequently use specific layouts or edits, saving templates saves time in future projects.
- Keep an organized workspace: Managing your assets and layers efficiently ensures a smoother editing process.
Remember, practice makes perfect. Spend some time exploring the various tools and features of Shutterstock Editor to develop your skills. Whether you’re creating social media graphics, marketing materials, or personal projects, these tips will help you achieve professional-looking results with confidence. With a little experimentation and attention to detail, you’ll be able to produce eye-catching images that truly stand out.