Migrating a WordPress domain to Bandzoogle can seem like a daunting task, but it doesn’t have to be! This migration is a fantastic opportunity for artists, musicians, and creative entrepreneurs to elevate their online presence. Bandzoogle offers tailored tools specifically designed for artists, making it easier than ever to showcase your work, engage with fans, and sell merchandise without a hassle. Let’s take a moment to explore what makes Bandzoogle an excellent choice for your website and how you can start your migration journey smoothly.
Understanding the Benefits of Bandzoogle

Bandzoogle is more than just a website builder; it’s a platform built with the creative community in mind. Here are some standout benefits you can enjoy when migrating your WordPress domain to Bandzoogle:
- User-Friendly Interface: Navigating Bandzoogle is a breeze! You don’t have to be tech-savvy to create a stunning website. Their drag-and-drop builder allows you to customize your site easily.
- Music-Focused Features: Bandzoogle offers integrated features like music players, tour date listings, and storefronts, which are invaluable for artists wanting to connect with their fanbase.
- Built-in Marketing Tools: With Bandzoogle, you get marketing tools such as mailing lists, promo codes, and social media integration to help you reach your audience effectively.
- Unlimited Bandwidth and Storage: Say goodbye to common WordPress hosting limitations. Bandzoogle provides unlimited bandwidth and storage, allowing you to grow without worries.
- Easy Domain Transfer: Migrating your domain is straightforward. Bandzoogle offers step-by-step assistance to help ensure that your transition is seamless.
In short, Bandzoogle is designed to make your life easier as a creative entrepreneur, allowing you to focus on what you do best—creating and sharing your art with the world!
Preparing for the Migration

Before you dive into the actual migration process from WordPress to Bandzoogle, it’s crucial to get everything prepped and ready. A well-planned migration is the key to ensuring that your website runs smoothly on its new home. Here’s how to set yourself up for success:
- Assess Your Current Website: Take a good look at your current WordPress site. Identify which features, plugins, and pages are essential and will need to be transferred to Bandzoogle. Make notes of anything that needs special attention.
- Check Bandzoogle’s Features: Familiarize yourself with Bandzoogle’s offerings. They provide various tools and functionalities that might differ from WordPress. Understanding these will help you make informed decisions about what to keep or discard.
- Domain Preparation: If you’re keeping your current domain, ensure that you have access to your domain registrar account. If you plan on purchasing a new domain through Bandzoogle, that’s something to consider as well.
- Inform Your Audience: If your website has a regular audience, consider giving them a heads-up about the upcoming changes. A short blog post or social media update can keep them in the loop!
- Setting Up Bandzoogle Account: Before migrating, sign up for a Bandzoogle account and set up the basic structure of your new website. This step will make it easier to transfer content later on.
With these preparations in place, you’ll be much more organized and ready to tackle the migration smoothly.
Backing Up Your WordPress Site
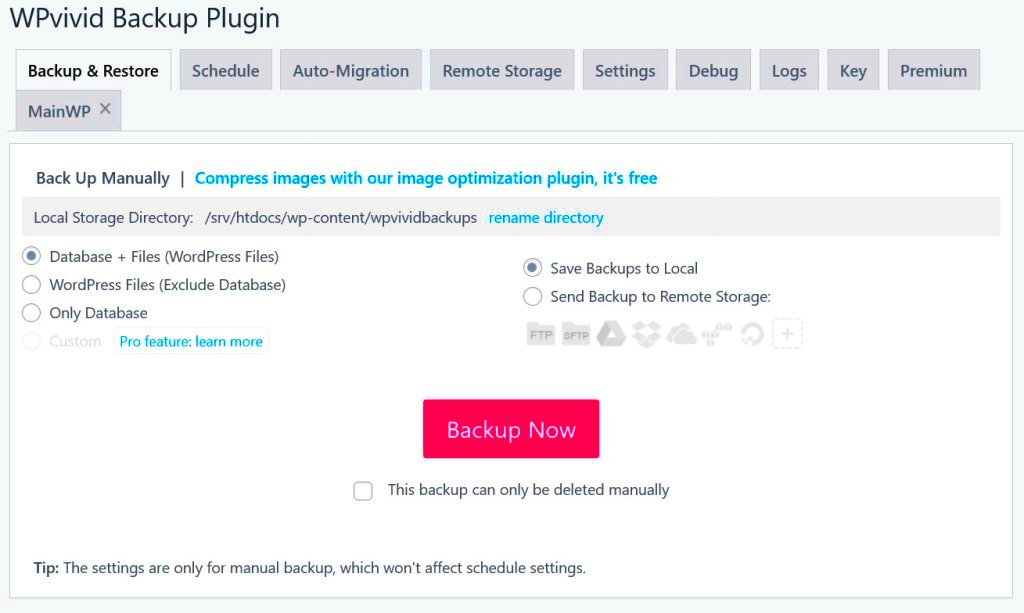
Backing up your WordPress site may sound tedious, but trust me, it’s a step you absolutely shouldn’t skip! Think of it as your safety net—just in case something goes awry during the migration process. Here’s how you can do it effectively:
- Use a Backup Plugin: One of the easiest ways to back up your WordPress site is to use a plugin. Some popular options are:
- UpdraftPlus
- BackupBuddy
- WP All Backup
| Task | Description |
|---|---|
| Export Database | Access phpMyAdmin, select your database, and click on the Export tab. |
| Download Files | Use FTP to connect to your hosting server and download your WordPress files. |
| Backup wp-content Folder | Don’t forget to back up your theme, plugins, and uploads! |
Once your WordPress site is backed up securely, you’ll feel a lot more confident about moving to Bandzoogle. You’ll have peace of mind knowing you can always revert back if needed!
Setting Up Your Bandzoogle Account
Setting up your Bandzoogle account is the first crucial step in migrating your WordPress domain. Bandzoogle is a user-friendly platform designed for musicians, artists, and creatives to build beautiful, custom websites with little to no technical knowledge. Here’s how to get started:
- Visit the Bandzoogle Website: Head over to bandzoogle.com and click on “Start My Free Trial.” You’ll be prompted to enter your email address and create a password. Bandzoogle offers a 30-day free trial, so there’s no risk in starting your journey.
- Choose a Template: After creating your account, Bandzoogle will take you through a series of templates. They offer a variety of styles catering to different genres and personal preferences. Take your time to choose one that resonates with your brand.
- Customize Your Site: Once you select a template, dive into customization. You can adjust the layout, colors, fonts, and even add pages. Bandzoogle’s drag-and-drop editor makes it super easy. Just click and start customizing!
- Add Essential Features: Don’t forget to incorporate features like music players, galleries, and event calendars that are important for artists. Explore the settings to integrate social media links and mailing lists to engage your audience.
- Preview and Publish: Bandzoogle offers a live preview option. Check how your site looks on various devices (like phones and tablets). Once you’re satisfied, hit the “Publish” button, and voilà, you’re live!
Setting up your Bandzoogle account is a breeze and can be done in a matter of minutes. It’s designed with creativity in mind, so let your imagination flow!
Transferring Your Domain Name
Transferring your domain name from WordPress to Bandzoogle doesn’t have to be a daunting task. It’s a straightforward process if you follow the steps outlined below:
- Check Domain Eligibility: First, ensure that your domain is eligible for transfer. Domains generally have to be registered for at least 60 days before they can be moved. You can check this on your current domain registrar’s dashboard.
- Unlock Your Domain: Log into your WordPress account and locate the domain management section. Here, you need to unlock your domain. There’s usually a toggle option to make it available for transfer.
- Obtain your Authorization Code: This is a critical step! You’ll need an EPP or authorization code to initiate the transfer. Look for this option in your domain settings and copy it. You’ll need it later!
- Initiate Transfer on Bandzoogle: Now, head over to your Bandzoogle account. Under “Domains,” select the option to transfer a domain. Paste in your domain name and the authorization code, then follow the prompts to finalize the transfer.
- Verify Your Email: After initiating the transfer, Bandzoogle will send you verification emails. Check your inbox (and your spam folder) and click on the confirmation link to approve the transfer. It usually takes 5-7 days for the transfer to process.
And that’s it! Transferring your domain to Bandzoogle can be seamless when you follow these clear steps. Soon, you’ll have your beautiful new site fully functional!
7. Moving Content from WordPress to Bandzoogle
So, you’ve made the decision to migrate from WordPress to Bandzoogle—great choice! Now comes the task of moving your content. Don’t worry; it’s easier than you might think. The key here is to ensure that all your hard-earned content makes the transition smoothly. Let’s break this down into simple steps:
- Export Content from WordPress: Start by logging into your WordPress dashboard. Navigate to Tools > Export. You can choose to export all content or specific pieces (posts, pages, media, etc.). Save the generated XML file, as you’ll need this soon.
- Prepare your Bandzoogle Site: Before importing, ensure your Bandzoogle account is all set up. Choose a template you like, but remember, you can always tweak this later.
- Import Content to Bandzoogle: Bandzoogle provides an easy import feature. Go to your Bandzoogle dashboard, select Content > Import. Upload the XML file you exported from WordPress. Bandzoogle will process it and import your content.
- Double-Check Everything: Once the import is complete, take a moment to browse through your new site. Check for any formatting issues, broken links, or missing images. You want your site to look as good as it did on WordPress.
And there you have it! With these straightforward steps, you’ll have your content migrated from WordPress to Bandzoogle in no time!
8. Designing Your New Site on Bandzoogle
Now that you’ve successfully moved your content, it’s time to flex your creative muscles and design your new site on Bandzoogle! This platform is fantastic for customizing your website, whether you’re an artist, musician, or any creative professional. Here’s how to get started:
- Choose a Template: Bandzoogle offers a variety of responsive templates tailored for different types of creators. Take some time to browse through them. Think about your brand and which template reflects your style best.
- Customize Your Layout: Once you’ve selected a template, you can personalize it by changing colors, fonts, and layouts. Bandzoogle uses a user-friendly drag-and-drop interface, making it super easy to create the look you want.
- Add Essential Pages: Don’t forget that your site needs more than just a homepage. Make sure to include essential pages like About, Contact, Store, and Blog if applicable. Bandzoogle makes adding new pages a breeze!
- Integrate Multimedia: A standout feature of Bandzoogle is the ability to easily integrate audio and video. Whether it’s your latest music track, podcast, or video trailers, showcasing your work visually can attract more fans.
- Test and Preview: Before launching your site, be sure to preview it on different devices. With so many people browsing on their phones, your site should look stunning everywhere!
And voilà! Designing your site on Bandzoogle can be an enjoyable process, allowing you to showcase your work in the best light. So go ahead, get creative, and make your new site truly yours!
9. Testing Your New Bandzoogle Site
Once you’ve completed the migration of your WordPress domain to Bandzoogle, it’s time to test your new site. This is a crucial step to ensure everything is functioning as expected. Testing helps you catch any issues before your visitors experience them.
Here’s a simple checklist to follow when testing your new Bandzoogle site:
- Verify Design: Make sure all elements, such as images, fonts, and layouts, appear as they should. Check across different devices and screen sizes for a responsive design.
- Content Check: Review all text to confirm that no parts of your content are missing or distorted. This includes checking blog posts, pages, and menus for accuracy.
- Links Functionality: Click on every link to ensure they route correctly. This includes internal links within your site and external links to social media or other resources.
- Contact Forms: Test any forms on your site to confirm that inquiries are going through and you receive notifications as expected.
- SEO Settings: Utilize tools like Google Search Console to check if your site is indexed correctly and that any metadata is intact.
Lastly, consider asking a friend or colleague to navigate the site. Fresh eyes can catch things you might have overlooked. If everything looks good, you’re ready for the next step!
10. Updating DNS Settings
Updating your DNS settings is a critical part of making your new Bandzoogle site accessible to visitors. This process connects your domain name to your new hosting platform, ensuring that when someone types in your URL, they land on your Bandzoogle site.
Here’s how you can update your DNS settings:
- Log into Your Domain Registrar: Go to the website where you registered your domain and sign in to your account.
- Locate DNS Management: In your account dashboard, look for options such as “DNS Settings,” “Domain Management,” or “Name Servers.”
- Update Name Servers: Bandzoogle typically provides custom nameservers. Replace your existing nameservers with the ones provided by Bandzoogle. Here’s how you can fill in the information:
Current Nameserver New Bandzoogle Nameserver ns1.youroldprovider.com ns1.bandzoogle.com ns2.youroldprovider.com ns2.bandzoogle.com - Save Changes: After entering the new nameservers, make sure to save the changes.
- Propagation Time: Be aware that DNS changes can take anywhere from a few hours to up to 48 hours to propagate throughout the internet.
Once the propagation is complete, your site will fully be online at your domain! Check back in a day or so to ensure everything is working perfectly.
Finalizing the Migration
Congratulations! You’ve made it through the bulk of your domain migration from WordPress to Bandzoogle. But there’s a bit more to do before you can kick back and enjoy your new site. Finalizing the migration is like putting the cherry on top of your digital sundae. Here’s what you need to focus on:
- Double-check DNS Settings: Ensure that your domain’s DNS settings point to Bandzoogle’s servers. You may need to wait a few hours to 48 hours for the changes to propagate fully.
- Test Your Website: Once the DNS changes are complete, visit your new site. Check all pages for broken links, missing images, and functionality issues.
- Inspect SEO Elements: Ensure that essential SEO elements like meta tags, alt tags, and URLs are preserved. Use tools like Google Search Console to monitor your site’s indexing status.
- Redirects: Set up 301 redirects from your old WordPress URLs to your new Bandzoogle URLs. This step is crucial for maintaining your search engine rankings and keeping your visitors happy.
- Analytics Setup: Don’t forget to integrate your website with analytics tools like Google Analytics. This will help you track traffic and understand user behavior on your new site.
- Backup: Before making any permanent changes, backup your new site’s content and settings. You never know when you might need to revert to a previous version.
By double-checking these aspects, you’ll ensure that your transition to Bandzoogle is smooth and successful. The minor tweaks and checks might feel tedious, but they’re critical for the overall health of your website.
Conclusion
And there you have it! You’ve successfully navigated the journey of migrating your WordPress domain to Bandzoogle. Transitioning to a new platform can feel overwhelming at times, but breaking it down into manageable steps makes it much easier to tackle. You’ve learned how to back up your data, set up your new site on Bandzoogle, and finalize the migration with all the essential checks.
Remember, switching platforms not only enhances your site’s functionality but can also significantly elevate your web presence. Bandzoogle offers robust features tailored for creatives, which can give your website that extra polish it needs.
As you take these new steps, keep in mind:
- Patience is key: It might take a while for everything to settle in after migration.
- Engagement is essential: Keep creating amazing content and engaging with your audience.
- Support is available: Don’t hesitate to reach out to Bandzoogle’s customer support if you hit any bumps in the road.
In the end, every challenge faced during the migration is a stepping stone toward creating an engaging online experience for your visitors. You’re all set to unveil your new site and attract a whole new wave of visitors. Happy building!


