Hey there! If you’re diving into the world of WordPress, understanding DNS (Domain Name System) is key to getting your site up and running smoothly. Think of DNS as the phonebook of the internet, translating user-friendly domain names like www.yourwebsite.com into IP addresses that computers can understand. This process is crucial for connecting visitors to your site.
Without a properly configured DNS, users might struggle to find your website, leading to missed traffic and potential profit. Plus, if you plan to make changes like switching hosting providers or adding new services, you’ll often need to manually edit your DNS zone settings. So, let’s dig into this important topic!
Understanding DNS Zone Files

Alright, now that we’ve set the stage, let’s unravel the concept of DNS zone files. A DNS zone file is essentially a text file that contains mappings between domain names and their corresponding IP addresses. These mappings allow the DNS to direct online traffic effectively.
Here’s a breakdown of the key components often found in a DNS zone file:
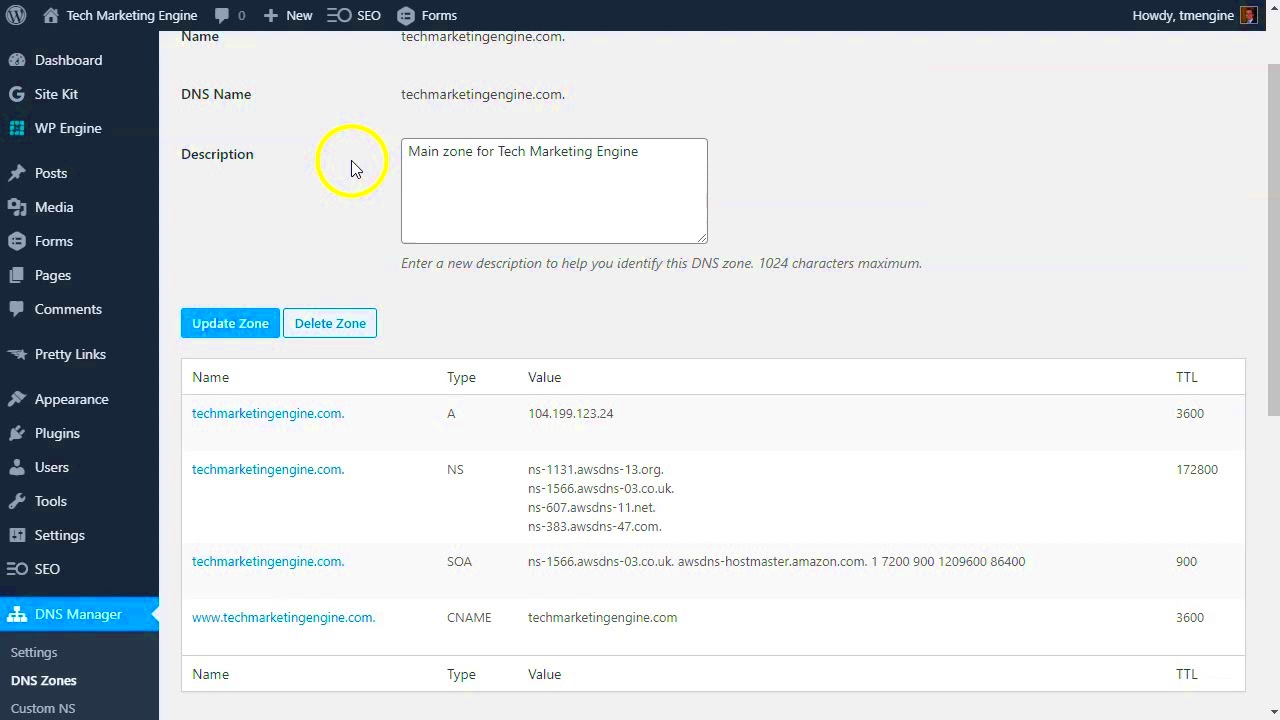
- SOA (Start of Authority) Record: This indicates the beginning of the DNS zone and contains essential information like the primary name server, the email address of the domain administrator, and timers related to refreshing the zone.
- NS (Name Server) Records: These indicate the servers that are authoritative for the zone. They basically tell the internet where to look for information about your domain.
- A (Address) Records: These map a domain to an IP address, directing users to your website’s server.
- CNAME (Canonical Name) Records: These are used to create aliases for domain names, making it easy to direct multiple domains to a single IP address.
- MX (Mail Exchange) Records: These records specify the servers responsible for receiving email on behalf of your domain.
This is just a snapshot of what’s in a DNS zone file. Ultimately, these files are critical in managing your domain’s DNS settings, ensuring that users can reliably locate your WordPress site. Ready to dive deeper? Let’s explore how to edit these zone files manually!
Accessing Your Hosting Control Panel
When it comes to managing your WordPress site, the hosting control panel is your gateway to a multitude of settings and options. Before we dive into DNS zone editing, let’s chat about how you can access this crucial area. Each web hosting provider has its own control panel, but most will be somewhat similar in layout and functionality.
To access your hosting control panel, follow these simple steps:
- Log into Your Hosting Account: Start by going to your hosting provider’s website. You’ll typically find a “Login” button on the homepage. Enter your credentials—usually your email and password.
- Navigate to the Control Panel: Once logged in, look for a section that mentions “Control Panel,” “Dashboard,” or “CPanel.” This is where all the magic happens.
- Familiarize Yourself with the Dashboard: Take a moment to familiarize yourself with the layout. You’ll notice sections for managing files, databases, emails, and of course, DNS settings.
Always remember to keep your login details safe! Avoid using public Wi-Fi networks when accessing your account, as this can pose a security risk. Once you’ve successfully entered your control panel, you’re now ready to locate the DNS settings and make the necessary modifications.
Locating the DNS Zone Editor
Now that you’re in your hosting control panel, the next step is to find the DNS Zone Editor. This might sound a bit intimidating, but trust me—it’s simpler than it sounds. The DNS Zone Editor is essentially the hub where all your domain settings reside, allowing you to modify things like A records, CNAME records, and other settings that help direct traffic to your website.
Here’s how to locate the DNS Zone Editor in most hosting panels:
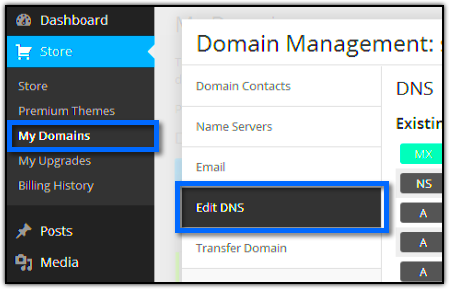
- Look for Domain Management: In your control panel, find a section typically labeled “Domains,” “Domain Management,” or “Domain Settings.” This is where you’ll usually start your search.
- Find the DNS Settings: Within the Domain Management section, look for options like “DNS Settings,” “DNS Zone Editor,” or simply “DNS.” Click on that link to dive in.
- Select Your Domain: If you have multiple domains under your account, select the domain for which you wish to edit the DNS settings. There might be a dropdown menu or a list to pick from.
Once you’re in the DNS Zone Editor, you’ll see a table listing various DNS records. This includes records like:
| Record Type | Host | Value | TTL |
|---|---|---|---|
| A | example.com | 192.0.2.1 | 3600 |
| CNAME | www | example.com | 3600 |
With the DNS Zone Editor open, you’re all set to make those all-important changes. Just remember to double-check everything—you wouldn’t want to misplace your online home, right?
Editing DNS Records: A Step-by-Step Guide
Editing DNS records might sound a bit daunting, but I promise you, it’s not as complicated as it seems. Let’s break it down into simple steps. Here’s how you can manually edit the DNS zone in WordPress:
- Log in to Your Domain Registrar: Start by logging into your domain registrar account. This is usually where you purchased your domain, like GoDaddy, Namecheap, or another provider.
- Navigate to DNS Management: Once logged in, find the DNS management or DNS settings section. This might be under domains or a similar tab.
- Select Your Domain: If you have multiple domains, select the one you want to edit. You’ll find a list of DNS records related to your selected domain here.
- Identify the Record to Edit: Look through the existing DNS records such as A records, CNAME, MX records, etc. Decide which one you need to change.
- Edit the Record: Click on the record you want to change. You can usually edit fields like hostname, type, and value. Make the necessary adjustments.
- Save Changes: After editing, be sure to save your changes. Most registrars will prompt you to confirm the updates.
- Check for Propagation: DNS changes can take anywhere from a few minutes to 48 hours to propagate. You can use online tools to check if the changes have taken effect.
And that’s it! Editing DNS records can become a quick part of your routine once you do it a couple of times. Just remember to double-check that you’re changing the right records to avoid disruptions.
Common DNS Records You May Need to Edit
When you’re working with DNS records, understanding the types of records you might need to edit is essential. Here are the common DNS records that you may encounter:
| DNS Record Type | Description | Common Use Cases |
|---|---|---|
| A Record | Points your domain to a specific IP address. | Connecting your domain to your web host. |
| CNAME Record | Redirects one domain to another domain name. | Using a subdomain to point to another domain. |
| MX Record | Specifies mail servers for your domain to receive emails. | Configuring your email service provider. |
| TXT Record | Allows domain owners to associate text with their domain. | Verifying domain ownership, SPF records for email authenticity. |
| NS Record | Indicates which name servers are authoritative for the domain. | Changing your domain’s DNS hosting provider. |
Each of these records serves a specific purpose. Knowing them can help you make the right adjustments when necessary. Don’t hesitate to reach out to your hosting provider’s support if you’re unsure about what to change—it’s better to ask than to risk disruptions!
7. Saving and Verifying Your Changes
Once you’ve made the necessary edits to your DNS zone in WordPress, the next step is to save those changes and ensure they’re properly reflected in your DNS settings. It’s crucial because even a minor oversight can affect your site’s accessibility. So, let’s break this down step-by-step.
First, after editing your DNS records—be it adding a new A record, changing a CNAME, or adjusting MX records—look for the ‘Save’ or ‘Update’ button. Here’s a quick checklist to follow:
- Double-check entries: Before clicking save, confirm that all entries are correct. A simple typo can lead to major issues.
- Monitor the save process: After clicking save, watch for any confirmation messages that indicate the update was successful.
- Refresh your page: Once saved, refresh your DNS management page to ensure that your changes are currently displayed.
Now that you’ve saved your changes, it’s time to verify that everything is functioning as expected. You can do this using tools like:
- DNS Lookup Tools: Websites such as MXToolbox, DNSChecker, or WhatsMyDNS can help you lookup your DNS records.
- Command-line Tools: If you’re comfortable with it, you can use command line tools like `nslookup` or `dig` to check your DNS entries directly.
By diligently saving and verifying your changes, you can ensure that your WordPress site remains accessible and operates smoothly. It’s well worth taking the time to do it right!
8. Troubleshooting Common Issues with DNS Changes
DNS changes can be a bit tricky, and it’s not uncommon to encounter some bumps along the way. Whether it’s propagation delays or misconfiguration, here’s a friendly guide to help you troubleshoot common issues.
First off, let’s address *propagation delays*. After changing your DNS settings, it can take anywhere from a few minutes to 48 hours for those changes to take effect globally. Here’s what you can do:
| Issue | Solution |
|---|---|
| Propagation delays | Be patient! You can check using a DNS propagation checker tool to see if your changes have spread. |
| Wrong DNS entries | Go back to your DNS management and double-check your entries. Look for typos or incorrect record types. |
| No changes reflected | Clear your browser cache or use an incognito window to rule out caching issues. |
| Domain not pointing correctly | Ensure that the nameservers are set correctly at your domain registrar if you’re using custom nameservers. |
If you find yourself stuck, don’t hesitate to reach out to customer support from your hosting provider or DNS provider. They can offer additional insights and guidance tailored to your specific situation.
Remember, troubleshooting DNS issues can feel like a puzzle at times, but with a little patience and perseverance, you’ll be able to solve it and get back on track!
Best Practices for Managing DNS Records in WordPress
Managing DNS records might seem daunting at first, but with a little knowledge and the right approach, you can handle it like a pro! Here are some best practices that’ll help you keep your WordPress site running smoothly:
- Regular Backups: Always back up your DNS settings regularly. You can either export the settings from your DNS management tool or keep a manual record. This will save you from potential headaches in case of accidental changes.
- Keep Records Organized: Use a clear naming convention for your records. This makes it easier to remember what each record does and ensures that anyone else managing the domain can easily follow along.
- Limit Changes: Try to make as few changes as possible to your DNS zone files. Each update carries the risk of introducing new errors. If changes are necessary, document why and when they were made.
- Monitor TTL Settings: Understand your Time to Live (TTL) values. A low TTL means that DNS records propagate quickly, perfect for temporary changes. However, it can also lead to faster staleness, so adjust accordingly.
- Use Subdomains Wisely: Leverage subdomains for different aspects of your website. For example, if you want to set up a blog or a store, using a subdomain like blog.yourdomain.com keeps things organized and can improve site performance.
- Test Changes: Always test your DNS changes before going live. Use tools like dig or nslookup to ensure your records are functioning as expected.
- Stay Informed: DNS management can change. Stay updated with best practices and guidelines from your DNS provider. This ensures you’re using the latest techniques for security and efficiency.
Conclusion: Keeping Your DNS Zone Updated
In the world of WordPress management, keeping your DNS zone updated is crucial. Think of your DNS records as the traffic signs for your website—if they’re not accurate or up-to-date, visitors won’t know where to go!
Here are some key takeaways to help you keep your DNS zone in tip-top shape:
- Regular Reviews: Schedule regular reviews of your DNS records. This helps catch outdated or unnecessary entries that could complicate your setup.
- Security Audits: Ensure that your DNS settings are secure. Check for any vulnerabilities and consider implementing security measures like DNSSEC.
- Stay Updated: Changes in your web hosting or email provider can affect your DNS records. Keep updated on any changes in services and adjust your records accordingly.
- Document Everything: Keep documentation of all changes made. This could be useful for future reference or even for new team members.
- Communicate with Providers: Establish good communication with your DNS hosting provider. If you encounter issues, they can often provide support to resolve them quickly.
By following these practices, you’ll not only maintain a healthy DNS zone but also enhance the overall performance of your WordPress site. So, take the time to review and update regularly—it’s an investment in your site’s reliability and success!


