Making shipping free after a certain cart total is a fantastic way to boost sales and enhance customer satisfaction in your WooCommerce store. It encourages customers to add more items to their cart, ultimately increasing your average order value. This guide will walk you through the ins and outs of setting up free shipping in WooCommerce, ensuring you can implement this feature smoothly. Let’s dive in and make your shipping costs more appealing!
Understanding WooCommerce Shipping Settings

Before you can offer free shipping after an amount is added to the cart, it’s crucial to familiarize yourself with the WooCommerce shipping settings. Here’s a simple breakdown of how shipping works in WooCommerce:
- Shipping Zones: These are geographic areas where you ship products. You can define multiple zones based on regions, ensuring customers see the right rates for their location.
- Shipping Methods: Within each zone, you can assign shipping methods like flat rate, free shipping, or local pickup. This is where free shipping options come into play!
- Shipping Classes: If you offer different types of products (like heavy or bulky items), you can set up shipping classes to apply specific rates or shipping rules to each class.
To set up free shipping, you’ll have to navigate to:
WooCommerce > Settings > Shipping > Shipping Zones
Here, you can add a new shipping method. But let’s talk about the critical aspect: setting that free shipping threshold. Once you’ve defined your zones and methods, you can easily customize these options to fit your business model.
In the next steps, we’ll explore how to actually implement this free shipping after a specified amount has been reached in the cart! Stay tuned!
Setting Up Free Shipping in WooCommerce

Setting up free shipping in WooCommerce can be a game-changer for your online store. It not only incentivizes potential customers to make a purchase, but it can also boost your average order value significantly. Let’s walk through the simple steps to get free shipping up and running.
First, you need to access your WooCommerce settings:
- Log in to your WordPress admin dashboard.
- Navigate to WooCommerce and click on Settings.
- From the settings menu, select the Shipping tab.
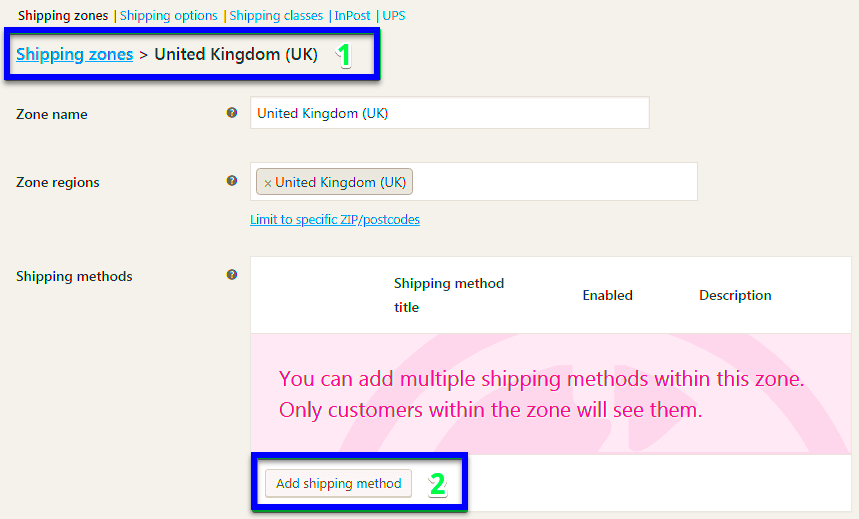
Now, you might need to add a new shipping zone if you haven’t already set up one. A shipping zone is essentially a geographical area where you can offer specific shipping options:
- Click on Add Shipping Zone.
- Give your shipping zone a name, like “Free Shipping Zone”.
- Specify the regions where you’ll apply free shipping.
Once the shipping zone is created, you can add the free shipping method:
- Select the new zone you’ve created.
- Click on Add Shipping Method.
- Choose Free Shipping from the dropdown menu and click Add Shipping Method.
Now that free shipping is set up, you can easily manage its conditions and communication with customers. WooCommerce provides customizable options to help clarify when customers can benefit from free shipping, enhancing their shopping experience!
Configuring Free Shipping Based on Minimum Order Amount

Now that you have free shipping set up, let’s dive deeper into configuring it based on a minimum order amount. This tactic encourages customers to spend more while enjoying the perks of free shipping!
To set this up, follow these steps:
- Navigate back to the Shipping Methods under the shipping zone you created earlier.
- Click on the Edit link next to the Free Shipping method you just added.
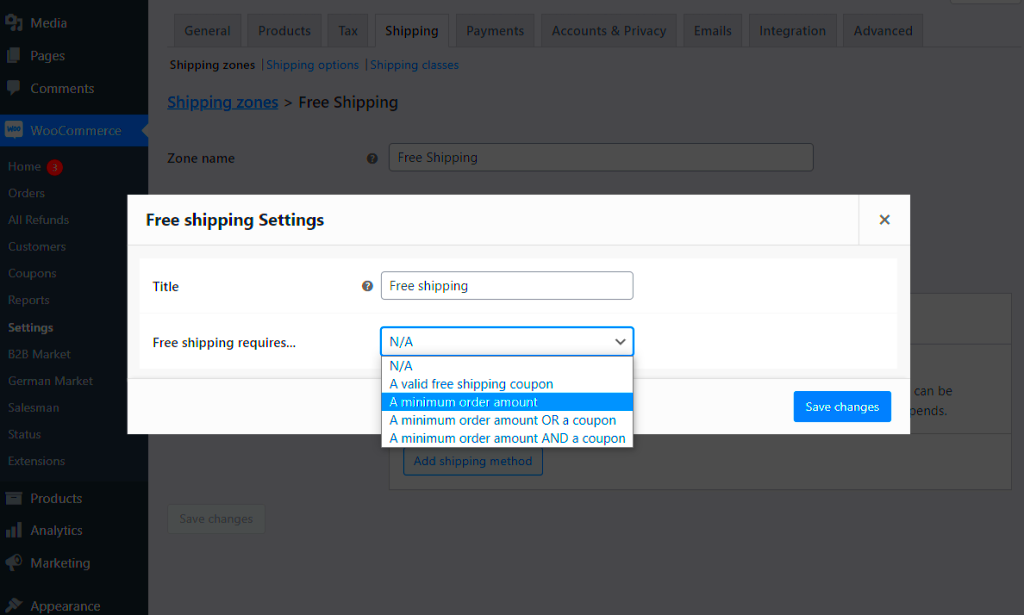
Here, you’ll see a field labeled Free Shipping Requires…. Choose A minimum order amount from the options provided. This is where you’ll set the threshold that customers must meet to unlock free shipping.
Afterwards, you will see a box where you can input your desired minimum amount:
| Criteria | Input Field |
|---|---|
| Minimum Order Amount | $50 |
Once you’ve entered the amount, don’t forget to click Save Changes. Now, customers who add products totaling $50 or more will automatically qualify for free shipping, making it a wonderful incentive for them to shop more!
Using free shipping based on minimum order value not only promotes larger purchases but also enhances customer satisfaction, as they feel they are getting a great deal. Happy configuring!
Using Shipping Classes for Enhanced Control
In the world of e-commerce, flexibility is key. When it comes to WooCommerce, one of the most effective ways to finely tune your shipping options is by leveraging shipping classes. Shipping classes allow you to categorize products based on different shipping rates or methods. This can be especially handy when you’re trying to implement free shipping after a specific amount is added to the cart.
Here’s how you can take advantage of shipping classes:
- Create Shipping Classes: Navigate to WooCommerce > Settings > Shipping > Shipping Classes. Here, you can create different shipping classes for your products, such as ‘Free Shipping’, ‘Standard Shipping’, or ‘Express Shipping’.
- Assign Products to Shipping Classes: While editing a product, scroll down to the ‘Shipping’ section and select the appropriate shipping class from the dropdown menu. This will categorize your product and define its shipping rules.
- Set Up Shipping Zones: After defining your classes, go to Shipping Zones. Here, you can specify free shipping rules based on shipping classes. For instance, you might offer free shipping for orders over $50 that include products from the ‘Free Shipping’ class.
This method of using shipping classes provides enhanced control over your shipping strategies. You can tailor shipping rates not just by cart totals, but also by individual products. This approach can boost your sales by enticing customers to add more items from certain categories to their cart, just to unlock free shipping.
Testing Your Free Shipping Setup
Once you’ve set up your free shipping options, it’s crucial to test them to ensure they’re functioning as expected. You don’t want to leave your customers scratching their heads or facing unexpected charges at checkout. Here’s how you can effectively test your setup:
- Add Test Products to Cart: Start by adding products that you know should trigger free shipping when a specific threshold is reached. Ensure that you have a mix of products from different shipping classes to see how that impacts your totals.
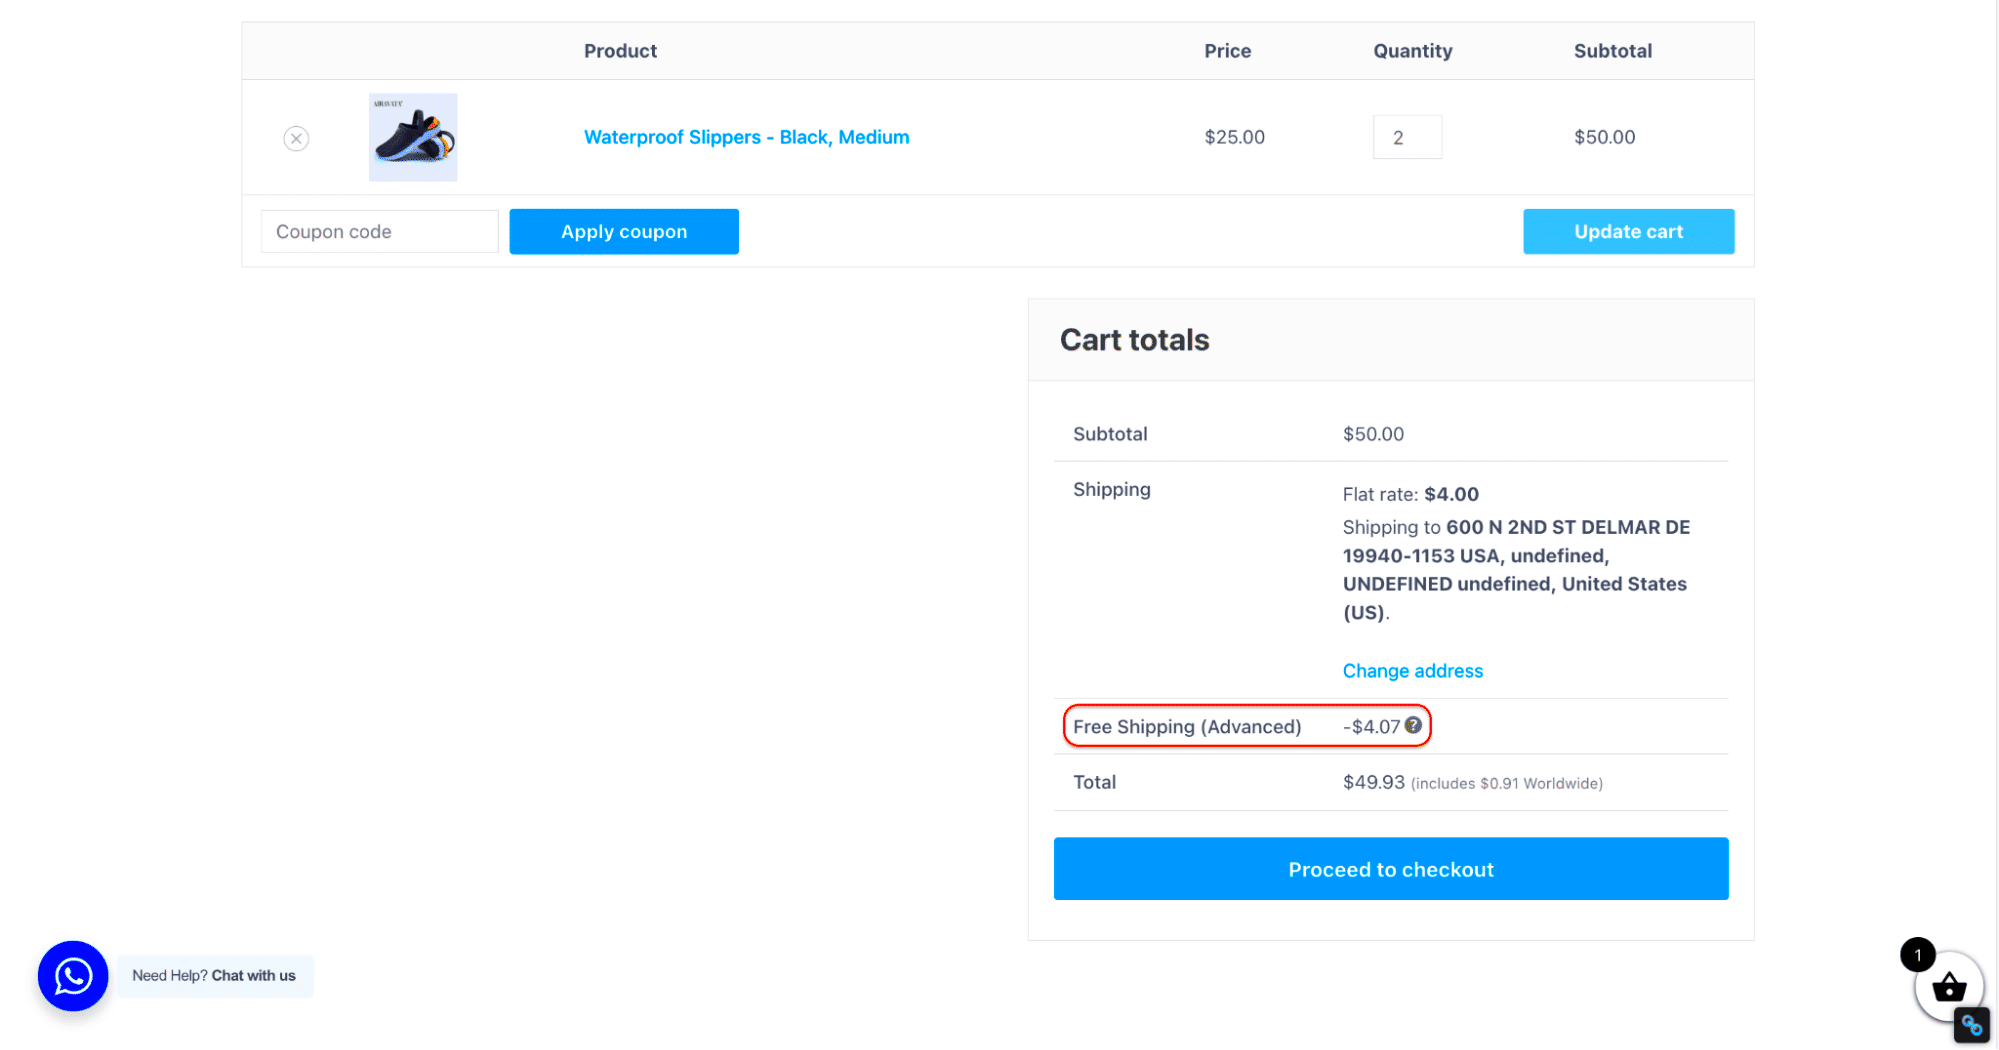
- Check the Cart Shipping Calculator: Once you’ve added your products, head to the cart page. Many themes display a shipping calculator here. Check if your free shipping option appears as expected when the cart amount qualifies.
- Proceed to Checkout: Go all the way to the checkout page. Here, make sure your customers see the correct shipping options. Free shipping should be clearly presented if they meet the requirements.
- Adjust as Necessary: If things aren’t working as you anticipated, go back to your shipping settings. Double-check your shipping classes and zones, ensuring everything is configured correctly.
Consider running a few full transactions with different scenarios—like applying discounts or combining items from various shipping classes. This can uncover any potential hiccups in your setup. Remember, a smooth shipping experience can significantly impact customer satisfaction and repeat purchases!
Common Issues and Troubleshooting
Implementing free shipping after a certain amount has been added to the cart in WooCommerce can be a game-changer for your eCommerce business. However, like any other feature, you might encounter a few bumps along the way. Don’t worry! Here are some common issues you might face and how to troubleshoot them effectively.
- Free Shipping Not Showing: This is a frequent problem. First, double-check your shipping zones under WooCommerce settings. Make sure you have configured the right conditions for free shipping, such as a minimum cart total. Sometimes, clearing your store’s cache can also help update the changes.
- Incorrect Minimum Amount: If customers are receiving free shipping when they shouldn’t, ensure the minimum required amount is correctly set. Head over to the shipping settings and verify that there are no typos or errors.
- Payment Method Compatibility: Some payment gateways may not support certain shipping methods. Verify that the free shipping option is compatible with the payment methods you offer. You might need to test this by going through the checkout process yourself.
- Conflicting Plugins: Occasionally, other plugins can interfere with shipping settings. If you suspect this may be the case, try disabling other plugins one at a time to pinpoint which one is causing trouble.
By being aware of these common issues and utilizing the solutions provided, you can ensure a smoother experience for your customers and keep your shipping operations running efficiently!
Conclusion
Setting up free shipping after a specific cart amount in WooCommerce is not just a smart tactic for increasing your average order value; it also enhances your customer’s shopping experience. By providing incentives for customers to spend more, you’re not only boosting your sales but also fostering customer loyalty.
In summary, here’s what we’ve covered:
- How to configure free shipping in your WooCommerce settings.
- Understanding the importance of clear communication about free shipping offers to buyers.
- Being mindful of common issues and troubleshooting them to ensure a smooth experience.
Always test your settings after making changes, and don’t hesitate to reach out to WooCommerce support or forums if you hit a snag. As with any aspect of your online shop, the key is to keep your customers’ convenience at the forefront of your strategy. So, go ahead and implement those changes to make your shop even more appealing to potential buyers!


