Elementor Pro is a powerful page builder plugin for WordPress that gives you the tools to create stunning, professional-looking websites without the need for coding skills. This plugin is renowned for its user-friendly drag-and-drop interface, making web design accessible for everyone—from beginners to seasoned developers.
With Elementor Pro, you unlock a plethora of features including advanced forms, templates, and responsive design settings that allow for customization down to the smallest detail. Whether you’re building a blog, an e-commerce site, or a portfolio, Elementor Pro enables you to bring your vision to life. Plus, there’s an extensive library of widgets and templates that you can use to save time and effort while still achieving a unique look for your site. So, are you ready to take your website to the next level? Let’s dive into the prerequisites you need before installing this amazing tool!
Prerequisites for Installing Elementor Pro
Before you get started with installing Elementor Pro, there are a few essentials you should have in place to ensure a smooth installation process. Let’s break these down:
- WordPress Installation: You need to have a WordPress website set up. Elementor Pro is a plugin, so it requires WordPress to function.
- Theme Compatibility: While Elementor works with most themes, it’s best to use a theme that’s compatible. Themes like Hello Elementor or Astra are highly recommended for optimal performance.
- PHP Version: Ensure your hosting server runs PHP version 7.0 or higher. This is crucial for performance and security.
- SSL Certificate: Although not mandatory, having an SSL (Secure Socket Layer) certificate is a good practice for security and can improve SEO rankings.
- License Key: Purchase a license for Elementor Pro to unlock the premium features and updates. Keep this key handy for the installation process.
- Backup Your Website: It’s always wise to back up your website before making any major changes or installations to avoid losing any data.
Once you’ve checked off these prerequisites, you’ll be ready to dive into the installation process of Elementor Pro. Let’s get started!
Step-by-Step Guide to Download Elementor Pro
Downloading Elementor Pro is straightforward, but you want to ensure you don’t miss any essential steps. Here’s how to do it, laid out in a simple manner:
- Visit the Elementor Website:
Start by heading over to the Elementor website. You’ll find various options for different plans. Take a moment to explore which one best suits your needs.
- Create an Account:
If you don’t have an account yet, you’ll need to create one. Just click on the “Get Started” button and fill out your details. Don’t forget to verify your email address!
- Choose Your Plan:
Elementor Pro offers several plans. Decide whether you want the Personal, Plus, or Expert plan. Each plan has different features and pricing to match your business goals.
- Payment Information:
After selecting a plan, you’ll be prompted to enter your payment information. After your purchase, you’ll receive a confirmation email containing your purchase details.
- Download the Plugin:
Once your payment is processed, go to the “Downloads” section of your account. Click on the “Download” button next to Elementor Pro to grab the latest version of the plugin.
Installing Elementor Pro via WordPress Dashboard

Now that you have downloaded Elementor Pro, the next step is to install it. This can easily be done directly from your WordPress Dashboard. Here’s how:
- Log in to Your WordPress Dashboard:
Use your admin credentials to log into your WordPress site. You’ll find yourself on the dashboard, the control center for all things related to your website.
- Navigate to Plugins:
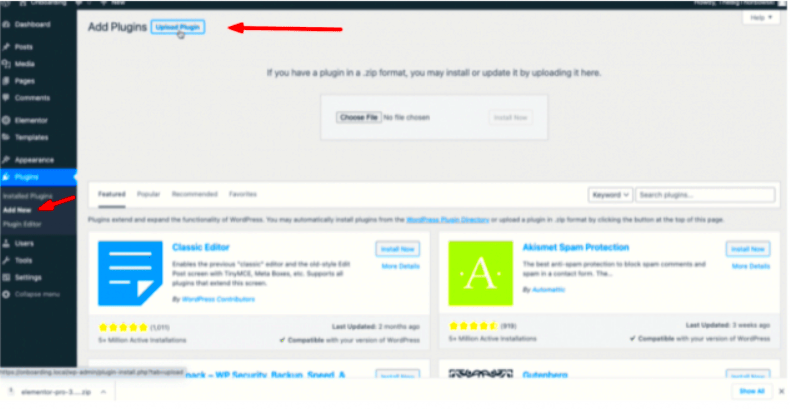
On the left sidebar, hover over or click on the Plugins menu and choose Add New.
- Upload Plugin:
At the top of the page, you will see an Upload Plugin button. Click on that, which will allow you to upload the Elementor Pro ZIP file you just downloaded.
- Choose File:
Click on the Choose File button and locate the Elementor Pro ZIP file on your computer. Select it and then click the Install Now button.
- Activate the Plugin:
Once installed, you’ll see an option to Activate. Click that, and voilà! Elementor Pro is now active on your site.
And that’s it! You’ve successfully installed Elementor Pro through your WordPress Dashboard. Now you’re ready to start designing beautiful pages! 🎉
5. Activating Elementor Pro

Once you’ve successfully installed Elementor Pro, the next step is to activate it. Without activation, you won’t be able to access the premium features that make Elementor Pro such a powerful tool for website building.
To activate Elementor Pro, follow these steps:
- Login to Your WordPress Dashboard: Start by navigating to your WordPress admin area. You’ll find this by going to
yourwebsite.com/wp-adminand entering your credentials. - Access Elementor License: On the left-hand menu, find and click on
Elementor. Within that menu, you’ll see an option labeledLicense. - Enter Your License Key: Here, you’ll need to enter the license key you received after purchasing Elementor Pro. Make sure to copy it directly to avoid any typos.
- Click Activate: After pasting your license key, click the
Activatebutton. You’ll see a confirmation message once the activation is successful.
And that’s it! You’ve successfully activated Elementor Pro. Now, you’re all set to take advantage of the extensive range of features that the Pro version offers, including additional widgets, templates, and advanced design capabilities. Enjoy exploring these new tools and transforming your website into something truly special!
6. Configuring Elementor Pro Settings
Once Elementor Pro is activated, it’s time to configure the settings to ensure the plugin works optimally for your needs. Proper configuration enhances usability and performance.
Here’s how to configure Elementor Pro settings:
- Access Elementor Settings: In your WordPress dashboard, click on
Elementorin the left-hand menu. Here, you’ll find an option that saysSettings. - General Settings: In the Settings tab, you can manage your default colors and fonts. This ensures consistency across your projects. You can also choose to enable or disable the Elementor loading in the frontend or backend.
- Integrations: Navigate to the
Integrationstab to connect valuable third-party tools and services like Mailchimp or Facebook Pixel. - Tools: Under the
Toolstab, you can find options for importing/exporting your templates, as well as options for managing your CSS and database.
Don’t forget to save your changes by clicking the Save Changes button at the bottom of the page. By taking a few moments to configure these settings, you’re setting yourself up for an enjoyable and efficient website-building experience!
7. Exploring Key Features of Elementor Pro
Elementor Pro is not just a page builder; it’s a powerful tool that transforms the way you design websites. Its robust features make it suitable for both beginners and seasoned developers. Let’s dive into some of the key features that set Elementor Pro apart!
- Theme Builder: With this feature, you can customize every aspect of your theme. From the header to the footer, you have complete control over the layout, ensuring consistency across your site.
- WooCommerce Builder: If you’re planning to set up an online store, Elementor Pro has dedicated features to help you create stunning product pages, category layouts, and more, all optimized for conversion!
- Dynamic Content: One of the most exciting features, dynamic content allows you to pull information from custom fields, user data, and post metadata, making your designs more interactive and personalized.
- Advanced Widgets: Elementor Pro comes packed with advanced widgets like forms, sliders, and galleries. These aren’t just pretty; they’re functional, helping you to engage your audience effectively.
- Global Widgets: Need to use the same widget across multiple pages? With global widgets, you can create it once and use it everywhere. Edit it in one place, and it updates everywhere—talk about efficiency!
- Popup Builder: Create stunning popups that can capture email addresses, promote special offers, or provide important announcements. The customization options are endless!
Exploring these features reveals that Elementor Pro is truly a game-changer for anyone looking to enhance their web design. Whether you’re running a blog, business site, or online store, you’ll find invaluable tools at your fingertips.
8. Troubleshooting Common Installation Issues
While installing Elementor Pro is usually a smooth process, you might run into a few bumps along the way. Don’t worry; we’ve got you covered! Here are some common issues and how to solve them:
| Issue | Possible Solution |
|---|---|
| Plugin Not Showing After Installation | Ensure that you’ve activated the plugin in your WordPress dashboard. Navigate to the “Plugins” section and check if Elementor Pro is activated. |
| Compatibility Issues | Sometimes, Elementor Pro might conflict with other plugins or themes. Try deactivating other plugins one by one to identify the culprit. Always ensure that both WordPress and your theme are updated to the latest versions. |
| License Activation Errors | Check your internet connection. Also, ensure that you’re using the correct license key. You can grab this from your Elementor account dashboard. |
| Page Loading Issues | Inspect if your server meets the necessary requirements for Elementor Pro. Increasing PHP memory limit and max execution time can often resolve this issue. |
If you encounter any other issues, Elementor’s support forum is a fantastic resource. With a little troubleshooting, you’ll be back on track, creating amazing designs in no time!
Conclusion
In conclusion, installing Elementor Pro is a straightforward process that can significantly enhance your WordPress website’s design and functionality. By following the outlined steps, you can unlock a world of creative possibilities and build stunning pages without any coding experience. Remember to keep your plugin updated for the best performance and access to new features.


