If you’ve ever thought about turning your photography or artwork into a source of income, Shutterstock is a fantastic platform to consider. But before you can start selling your images, you need to get approved as a contributor. The approval process might seem a bit intimidating at first, but don’t worry — it’s designed to ensure quality and consistency across the platform. Once you understand how it works, you can prepare your portfolio, meet the requirements, and increase your chances of getting approved quickly. Let’s walk through what the process involves and how you can navigate it smoothly.
Understanding Shutterstock’s Requirements and Guidelines
Shutterstock has specific requirements and guidelines to maintain a high standard for its marketplace. Knowing these inside out can make all the difference in getting approved faster. First, quality is king — your images should be sharp, well-lit, and free of noise or distractions. Avoid over-editing or excessive filters; natural, clean images perform better.
Next, your submissions need to meet technical specifications:
- File format: JPEG for photos, PNG for illustrations and vectors
- Minimum resolution: 4 MP (megapixels) for photos — higher is better
- Color profile: sRGB color space
Content guidelines are equally important. Shutterstock prefers unique, high-quality content that can appeal to a broad audience. Avoid submitting images with copyrighted material, recognizable people without model releases, or brand logos unless you have permission. Also, steer clear of images with watermarks, borders, or excessive branding.
Here are some key points to keep in mind:
- Authenticity: Your images should be genuine, not overly staged or artificial.
- Variety: Offer a diverse portfolio to demonstrate your versatility.
- Metadata: Provide accurate titles, descriptions, and keywords to help buyers find your work.
By understanding and adhering to these guidelines, you’ll align your submissions with Shutterstock’s standards, significantly boosting your chances of approval. Remember, quality and compliance are your best friends in this process! With a clear grasp of what they’re looking for, you can prepare your best work and approach the application with confidence.
Preparing Your Portfolio for Submission
Before you hit that submit button on Shutterstock, it’s super important to make sure your portfolio is polished, professional, and ready to impress. Think of your portfolio as your visual resume — it’s what showcases your skills, style, and originality to the Shutterstock reviewers. So, taking the time to prepare carefully can really speed up your approval process.
First, organize your best work. Instead of throwing everything you’ve ever created into one folder, curate a selection of your top images that demonstrate your versatility and technical skill. Aim for a mix — landscapes, portraits, lifestyle shots, whatever you excel at — to show Shutterstock you’re a well-rounded contributor.
Next, pay close attention to the technical details:
- Resolution: Ensure your images are high resolution, typically at least 4 MP or higher. This shows professionalism and readiness for commercial use.
- File Format: Submit in JPEG format with the highest quality settings, usually sRGB color profile.
- File Naming: Use descriptive, clean file names that reflect the content, like “mountain-sunset-hiking.jpg”.
Another critical aspect is metadata. Add detailed, accurate titles, descriptions, and keywords to each image. Think about what someone might search for when looking for content like yours. Use relevant keywords naturally — avoid keyword stuffing, but be thorough.
Also, double-check your images for any issues:
- Remove watermarks or logos.
- Ensure there are no distracting spots, blurriness, or noise.
- Make sure your images are properly exposed with good lighting and color balance.
Lastly, consider the diversity of your portfolio. Shutterstock prefers contributors who upload a variety of content. So, if you’re just starting out, try to include different themes and subjects to show your range. This not only increases your chances of getting approved but also helps you stand out as a versatile creator.
Tips for Creating High-Quality and Unique Content

Creating content that stands out on Shutterstock isn’t just about having good equipment; it’s about crafting images that are fresh, engaging, and valuable to buyers. Here are some insider tips to help you make high-quality, unique content that gets approved quickly and sells well.
First, focus on originality. Think about what’s missing in the stock library or what trends are emerging. Do some research: browse popular categories, see what’s trending on social media, or look at what competitors are uploading. Then, put your own spin on these ideas. Unique content catches the eye and is more likely to get approved and purchased.
Second, pay attention to lighting and composition. Natural light is often your best friend — golden hour shots (early morning or late afternoon) tend to have warm, appealing tones. Use the rule of thirds, leading lines, and framing techniques to make your images more engaging.
Third, be meticulous about the technical quality:
- Sharpness: Make sure your main subject is crisp and in focus.
- Exposure: Avoid overexposed highlights or underexposed shadows.
- Color Balance: Keep colors natural unless you intentionally want a stylized look.
Additionally, think about storytelling. Images that tell a story or evoke emotion tend to resonate more with viewers. Whether it’s a candid moment, a beautiful landscape, or a creative conceptual shot, aim to evoke feelings or ideas.
Don’t forget to keep it fresh and relevant. For example, seasonal themes, current events, or trending topics can give your portfolio a boost. If you’re into lifestyle photography, capturing authentic, candid moments often performs better than staged shots.
Finally, always keep learning. Study successful contributors, stay updated on Shutterstock’s content guidelines, and don’t be afraid to experiment. The more you practice creating high-quality, original content, the better your chances of quick approval and steady sales.
Submitting Your Work and Navigating the Application Process
So, you’re ready to submit your amazing photos or illustrations to Shutterstock. That’s exciting! But before you hit that upload button, let’s walk through what you need to know to make the process smooth and successful.
First things first, make sure your work meets Shutterstock’s quality standards. They’re looking for images that are sharp, well-lit, properly composed, and free of distractions or noise. Take a moment to review their technical requirements, such as file size, resolution (usually a minimum of 4MP for photos), and file format (JPEG for images, EPS or AI for vectors).
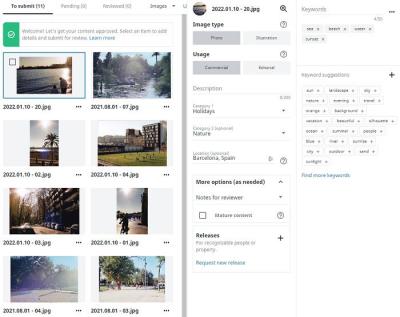
When you’re ready to upload, log into your contributor account and click on the “Upload” button. You’ll be prompted to select your files and fill out some essential details:
- Title and Description: Be clear and descriptive. Use relevant keywords naturally, but avoid keyword stuffing.
- Keywords: Add relevant tags that accurately describe your work. Think about what someone might search for if they’re looking for an image like yours.
- Categories: Choose appropriate categories to help your work get discovered.
Don’t forget to double-check your uploads before submitting. Preview your images, ensure all metadata is correct, and confirm that you’re not uploading duplicates or low-quality images. Once everything looks good, hit submit.
Now, here’s a pro tip: consider uploading in batches rather than one at a time. This saves time and allows you to manage multiple submissions efficiently. Also, keep a record of what you’ve uploaded and the keywords you’ve used, so you can optimize or revise later if needed.
After submission, Shutterstock will review your work. The review process can take anywhere from a few days up to a week, depending on the volume of submissions and the complexity of your content. During this time, avoid making multiple submissions of the same image, as it might delay the review process.
Once approved, your images will go live on the platform, ready for buyers around the world. Remember, consistency is key. Keep submitting high-quality work regularly, and over time, you’ll build a strong portfolio that increases your chances of getting approved quickly.
Common Reasons for Rejection and How to Avoid Them
Even the most talented creators face rejection at some point. It’s all part of the journey! But understanding the common reasons why images get rejected can help you improve your submissions and speed up your approval process.
Here are some typical reasons Shutterstock denies submissions, along with tips on how to avoid them:
| Reason for Rejection | How to Avoid It |
|---|---|
| Low Image Quality | Use a high-resolution camera, ensure proper focus, and avoid noise or graininess. Always review your images before uploading to confirm they meet the required standards. |
| Overly Commercial or Trademarked Content | Refrain from submitting images that feature visible logos, trademarks, or branded products without proper licensing. If you include recognizable people, get model releases. |
| Poor Composition | Pay attention to framing, lighting, and background. Avoid clutter or distracting elements that take away from the main subject. |
| Incorrect Metadata or Keywords | Be honest and precise with your keywords and descriptions. Avoid keyword stuffing, which can be flagged as spam. |
| Duplicate or Similar Images | Don’t upload multiple versions of the same shot. Instead, select the best one and make sure each image offers something unique. |
| Violation of Content Guidelines | Review Shutterstock’s content guidelines carefully. Avoid images that contain offensive, violent, or illegal content. |
By paying close attention to these common pitfalls, you increase your chances of getting approved faster. Always take time to review Shutterstock’s submission guidelines thoroughly, and don’t be discouraged by rejection—use it as a chance to learn and improve your craft. With patience and persistence, you’ll see your portfolio grow and your approval rate improve!
Boosting Your Chances of Approval with Best Practices
Getting your photos approved on Shutterstock can sometimes feel like a game of chance, but there are definitely some tried-and-true strategies to give yourself a leg up. Let’s talk about how you can increase your approval rate and make the process smoother.
First and foremost, focus on quality over quantity. Shutterstock values high-resolution, sharp, and well-composed images. Before uploading, double-check that your photos are in focus, properly exposed, and free of distracting elements. If your images have noise or blur, they’re less likely to get approved.
Next, pay attention to technical requirements. Make sure your files meet Shutterstock’s specifications: typically JPEG format, sRGB color space, and minimal compression artifacts. Keep your image dimensions at least 4 megapixels, and avoid watermarks or borders.
Follow the content guidelines religiously. Shutterstock has clear rules about what can and cannot be uploaded. Avoid images with recognizable logos, copyrighted artwork, or sensitive subjects like certain landmarks without proper releases. If your images include people, ensure you have model releases if needed.
Research current trends and popular categories. Take some time to browse Shutterstock’s top-performing images. Notice what themes, styles, and subjects perform well. This can inspire you to create content that aligns with what buyers are searching for, boosting your chances of approval and sales.
Optimize your keywording and descriptions. Use accurate, descriptive keywords that truly reflect the content of your image. Think like a buyer: what words would they use to find your photo? Clear, relevant keywords help your images get discovered and increase the likelihood of approval.
Stay consistent and patient. Regularly upload high-quality images and be patient with the review process. Sometimes, a batch of images might get rejected, but don’t get discouraged. Use rejection feedback to improve your future submissions.
Remember, the goal is to produce assets that meet Shutterstock’s standards and resonate with their global customer base. By following these best practices, you’ll not only improve your approval rate but also build a strong portfolio that can generate consistent income over time.
Final Steps After Submission and How to Track Your Application
Once you’ve uploaded your images and submitted them for review, the waiting game begins. But don’t just sit back — there are important steps you can take to stay on top of your application status and prepare for what’s next.
First, check your contributor dashboard regularly. Shutterstock provides a dashboard where you can see the status of your submissions. Typically, images go through a review process that can take anywhere from a few hours to several days, depending on the volume of submissions and complexity of review.
Look out for review statuses:
- Pending: Your images are in the queue awaiting review.
- Approved: Congratulations! Your images are now available for licensing.
- Rejected: Your images did not meet Shutterstock’s guidelines. You’ll see reasons for rejection, which is valuable feedback for future uploads.
Understand rejection reasons. When an image gets rejected, carefully read the feedback provided. Common reasons include technical issues, inappropriate content, or keyword problems. Use this information to improve your next batch of uploads.
Update and resubmit if possible. If you believe a rejection was a mistake or you’ve made the necessary adjustments, you can often resubmit the image. Some platforms allow this directly from your dashboard, so keep an eye out for that option.
Track your performance over time. Shutterstock offers analytics tools to monitor how your images are performing once approved. Keep an eye on your download stats, earnings, and popular images to understand what sells best and refine your content strategy accordingly.
Stay engaged and keep learning. Follow Shutterstock contributor resources, forums, and blogs. They often share tips on improving your portfolio and navigating the approval process more efficiently.
In summary, after submitting, consistently monitor your dashboard, learn from feedback, and use analytics to guide your future uploads. Staying proactive ensures you’re not just waiting passively but actively improving your chances of success on Shutterstock.