If you’re thinking about submitting your photos, vectors, or videos to Shutterstock, the first step is understanding what they’re looking for. Shutterstock has specific guidelines designed to ensure that only high-quality, original content makes it onto their platform. Knowing these requirements upfront can save you a lot of time and increase your chances of getting approved.
Here’s a quick rundown of the key submission requirements:
- Quality and Resolution: Your images should be sharp, well-exposed, and in high resolution. For photos, Shutterstock recommends at least 4 megapixels, but the higher, the better. Videos should be in HD or 4K resolution.
- File Formats: Photos should be in JPEG format with a minimum of 4,000 pixels on the longest side. Videos need to be in supported formats like .mov or .mp4.
- Original Content: Your submissions must be your original work. No copyrighted material or third-party assets unless you have explicit permission.
- Model and Property Releases: If your content features people or private property, you need proper releases. Shutterstock is strict about this to protect copyright and privacy rights.
- Content Restrictions: Shutterstock has a list of prohibited content, including violent, adult, or hateful material. Familiarize yourself with their content guidelines to avoid rejection.
Additionally, Shutterstock reviews submissions to ensure they meet their quality standards, so even if your content meets all the technical specs, it still needs to be visually appealing and well-crafted. Understanding these requirements helps you prepare your content properly, increasing your chances of acceptance and making the submission process smoother.
Preparing Your Content for Submission
Now that you know what Shutterstock expects, it’s time to get your content ready for submission. Preparation is key to making sure your work meets all technical and quality standards. Here are some tips to help you get your content in tip-top shape:
1. Edit and Enhance Your Content
Start with editing your photos or videos to ensure they are polished. Use editing tools to adjust brightness, contrast, and sharpness. Remove any distracting elements or blemishes. For videos, consider color correction and stabilization to improve quality. Remember, Shutterstock values sharp, vibrant, and professional-looking content.
2. Check Technical Specifications
Make sure your files are saved in the correct format and resolution. For photos, export as JPEG with a minimum of 4,000 pixels on the longest side and a quality setting of 10 (or maximum). For videos, export in supported formats like .mov or .mp4 with proper encoding settings.
3. Organize Your Files
Keep your files organized with clear naming conventions. This will make it easier to upload and manage your submissions. Create folders for different categories or themes, and ensure your metadata (titles, descriptions, tags) is ready and relevant.
4. Add Accurate Metadata
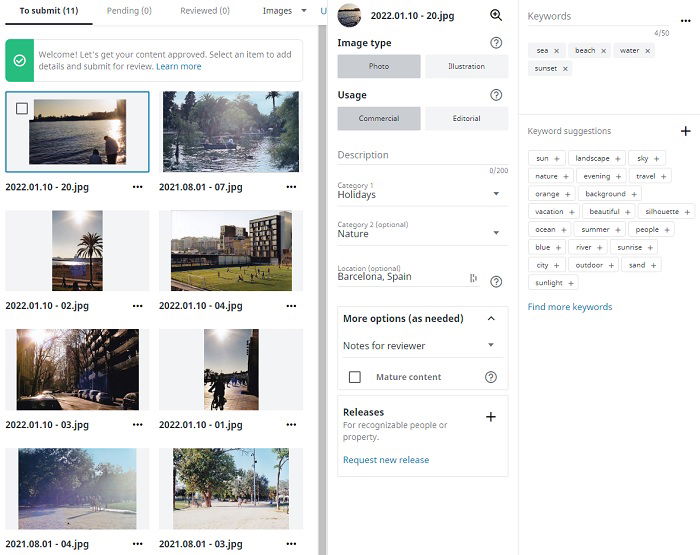
Metadata helps your content get discovered. Write clear, descriptive titles and detailed descriptions. Use relevant keywords and tags that match the content. Avoid keyword stuffing—be honest and precise to improve your chances of acceptance and visibility.
5. Obtain Necessary Releases
If your content features identifiable people or private property, secure the appropriate releases before submitting. Upload scanned copies of signed model or property releases along with your files. This is crucial to meet Shutterstock’s legal standards and avoid rejection.
6. Review Shutterstock’s Content Guidelines
Before uploading, revisit their content guidelines to ensure your work complies. Remove any prohibited content and double-check that your content aligns with their quality expectations.
By taking these steps to prepare your content carefully, you’ll be setting yourself up for a smoother approval process. Quality, organization, and attention to detail are your best friends when submitting to Shutterstock. Good luck, and happy creating!
Step-by-Step Process to Submit Your Work on Shutterstock
Getting your images or videos accepted on Shutterstock can feel a bit overwhelming at first, but once you understand the process, it’s pretty straightforward. Let’s walk through the steps so you can confidently submit your work and start earning.
Step 1: Create a Contributor Account
First things first, head over to the Shutterstock Contributor website and sign up. You’ll need to provide basic info like your name, email, and choose a username. Make sure to use an email you check regularly because Shutterstock will communicate with you through it. Once registered, verify your email address and log in to your dashboard.
Step 2: Review the Contributor Guidelines
Before submitting, take some time to read Shutterstock’s content guidelines. They specify what types of images, videos, and illustrations are acceptable. Familiarizing yourself with these rules will help you avoid common rejections and ensure your submissions meet quality standards.
Step 3: Prepare Your Files
Make sure your files are high quality. For photos, this typically means a minimum of 4 MP resolution, and for videos, they should be in a compatible format like MOV or MP4 with good lighting and clear focus. Edit your work to remove any imperfections, and watermark your images for review purposes if needed. Remember, Shutterstock prefers natural and authentic content that appeals to a global audience.
Step 4: Upload Your Content
Once your files are ready, go to your contributor dashboard and click on “Upload.” You can upload multiple files at once, which makes the process faster. Fill out relevant details like title, description, keywords, and categories. Be as descriptive as possible—this helps buyers find your work easily.
Step 5: Submit for Review
After uploading and tagging your files, hit the “Submit” button. Your work will then go into the review queue. Shutterstock’s review team will evaluate your submission based on quality, relevance, and compliance with guidelines. This process can take anywhere from a few days to a couple of weeks. Once approved, your files will be live and available for sale.
Step 6: Monitor Your Portfolio
Keep an eye on your contributor dashboard. You’ll see which files are approved, rejected, or pending. If some work gets rejected, don’t get discouraged! Shutterstock usually provides feedback, so you can learn and improve for next time. Keep submitting fresh content regularly to grow your portfolio and increase your chances of success.
And that’s pretty much it! Stay patient and consistent, and soon enough, you’ll be building a portfolio that earns you income.
Tips to Increase Your Chances of Approval
Getting approved on Shutterstock isn’t just about submitting work; it’s about submitting the right work. Here are some helpful tips to boost your approval rate and set you up for success:
- Focus on Quality: Always upload high-resolution images and videos with good lighting, sharp focus, and minimal noise. Blurry, pixelated, or poorly lit content stands little chance of approval.
- Follow the Guidelines: Carefully read Shutterstock’s content and technical guidelines. Don’t upload copyrighted material you don’t own, and avoid overly commercial or promotional content unless it fits the site’s standards.
- Use Accurate Keywords and Descriptions: Well-thought-out keywords help buyers find your work. Be specific and honest—avoid keyword stuffing, which can hurt your credibility.
- Showcase Unique Perspectives: While common themes are okay, try to bring something fresh or different to the table. Unique angles, compositions, or subjects can help your work stand out.
- Stay Consistent and Active: Regularly upload new content. The more quality work you have, the better your chances of approval and sales. Consistency also shows Shutterstock that you’re an active contributor.
- Review Rejections Carefully: If your work gets rejected, check the feedback provided. Use this insight to improve your future submissions. Sometimes, minor tweaks can turn a rejected image into an approved one.
- Study Successful Contributors: Browse Shutterstock’s top contributors to see what kind of work they upload and how they tag their files. Learning from those who are successful can give you valuable ideas.
- Stay Updated: Shutterstock occasionally updates their guidelines or preferred content styles. Keep an eye on their contributor blog or forums for tips and news.
Remember, patience and persistence are key. Even if you face some rejections initially, keep refining your work and learning from feedback. Over time, your portfolio will grow stronger, and your approval rate will improve. Happy submitting!
Common Reasons for Rejection and How to Avoid Them
Getting your images approved by Shutterstock can sometimes feel like navigating a tricky maze. Even talented photographers and designers face rejection, but the good news is that most of these pitfalls can be avoided with a bit of knowledge and preparation. Let’s talk about some of the most common reasons why submissions get rejected and, more importantly, how you can steer clear of them.
1. Poor Image Quality
One of the top reasons for rejection is images that are blurry, pixelated, or have poor lighting. Shutterstock expects high-resolution, sharp images with excellent clarity. To avoid this:
- Use a good quality camera or smartphone with a high megapixel count.
- Always shoot in the highest resolution possible.
- Review your images on a large screen to check for focus and sharpness.
- Ensure proper lighting—natural light or well-placed artificial lighting makes a big difference.
2. Watermarks or Logos
Shutterstock does not accept images with watermarks, logos, or branding. Before submitting, double-check that your image is clean and free of any markings. If you’ve edited your photo, make sure it’s a clean version without any overlays.
3. Over-Edited or Filtered Images
While some editing is fine, overly manipulated images—those with heavy filters, excessive saturation, or unnatural edits—may be rejected. Keep your edits subtle and natural-looking. Use editing tools to enhance, not distort, the original image.
4. Model and Property Releases Not Provided
If your image features recognizable people or private property, Shutterstock requires appropriate releases. Failing to include these can lead to rejection. Always obtain and upload necessary releases before submitting.
5. Content Violating Shutterstock Policies
Images that depict illegal activities, violence, hate symbols, or offensive content will be rejected. Familiarize yourself with Shutterstock’s content guidelines and ensure your images are appropriate and respectful.
6. Poor Composition
Bad framing, distracting backgrounds, or cluttered scenes can make an image less appealing. Take the time to compose your shots thoughtfully, focusing on the main subject and eliminating unnecessary distractions.
By paying attention to these common pitfalls and following best practices, you greatly improve your chances of approval. Remember, Shutterstock values quality, clarity, and compliance, so keep these in mind with every submission.
Final Tips for Successful Shutterstock Approval
Congratulations! You’re almost there. You’ve taken high-quality photos, checked your releases, and avoided common rejection pitfalls. Now, let’s go over some final tips to help ensure your submission process goes smoothly and increases your chances of approval.
1. Follow Submission Guidelines Carefully
Every marketplace has its own set of rules. Read Shutterstock’s contributor guidelines thoroughly. Pay attention to image dimensions, file formats, and naming conventions. Following instructions precisely shows professionalism and respect for the platform’s standards.
2. Keep Your Keywords Relevant and Accurate
Keywords help buyers find your images. Use descriptive, specific, and relevant keywords. Avoid keyword stuffing or irrelevant tags. Think about what someone searching for your image might type in and include those terms thoughtfully.
3. Provide Clear and Engaging Titles and Descriptions
A compelling title and detailed description can boost your image’s visibility. Be honest and accurate—highlight what makes your image special or useful. Well-crafted metadata can also reduce the chances of rejection due to mislabeling.
4. Upload Samples for Review
If you’re unsure about your image quality or compliance, consider uploading a small batch first to test the waters. Review the feedback, make necessary adjustments, and then submit more confidently.
5. Stay Consistent and Keep Practicing
Success on Shutterstock often comes from consistency. Keep uploading high-quality images regularly. Over time, you’ll learn what works best and develop a style that resonates with buyers.
6. Engage with the Contributor Community
Join forums or social media groups where Shutterstock contributors share tips and experiences. Learning from others can provide valuable insights, inspiration, and encouragement during your journey.
And lastly, be patient. Approval times can vary, and rejection isn’t the end of the world—it’s an opportunity to learn and improve. Keep refining your craft, stay positive, and continue submitting. Before long, you’ll find yourself celebrating your first (or next) approval!