Hey there! If you’re diving into the world of stock images on Shutterstock, one of the first things you’ll want to get a grip on is sizing. Whether you’re designing a website, creating a print project, or just looking for the perfect image, understanding sizing details helps you choose the right files without any surprises. Shutterstock makes it pretty straightforward, but sometimes the info can be a bit buried or confusing. Don’t worry—I’m here to guide you through how to find and interpret all the sizing info so you can pick the perfect image every time!
Understanding Image Dimensions and File Sizes
When it comes to stock images, two main things matter: image dimensions and file size. Let’s break down what each of these means and why they’re important.
Image Dimensions
Image dimensions refer to the width and height of the image, usually measured in pixels. For example, an image might be 1920 x 1080 pixels. This tells you how large the image will appear on a screen or in print.
Why does this matter? Well, if you need a high-resolution image for a billboard, you’ll want larger dimensions. Conversely, for web use, smaller dimensions often suffice and help load your page faster.
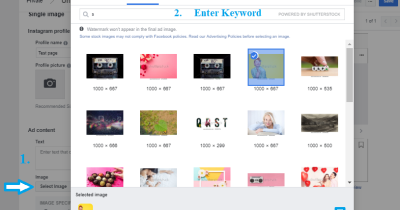
On Shutterstock, you can usually see the dimensions right on the image preview page, often below the thumbnail or in the image details section. Look for labels like “Size” or “Dimensions.” Sometimes, the dimensions are included in the filename or description as well.
File Size
File size indicates how much storage space the image takes up, measured in kilobytes (KB), megabytes (MB), or gigabytes (GB). A larger file size generally means higher quality but also more storage and longer loading times.
Why it’s important: If you’re working on a website, smaller file sizes help your pages load faster, boosting user experience and SEO. For print, larger file sizes usually mean better print quality.
On Shutterstock, file size info is often displayed alongside the dimensions. You might see something like “File Size: 2 MB” or similar. Keep in mind, the file size can vary depending on the image format (JPEG, TIFF, etc.) and compression settings.
How to Find This Information on Shutterstock
To find sizing info, follow these easy steps:
- Open the image you’re interested in on Shutterstock.
- Scroll down to the “Details” or “Information” section beneath the image preview.
- Look for entries labeled “Dimensions,” “Size,” or “File Size.”
- Alternatively, click on the “Download” button options—some sizes may show their specific pixel dimensions and file sizes before you purchase or download.
By paying attention to these details, you can ensure the image you choose will meet your project’s needs—whether it’s for digital or print use. Remember, always double-check the dimensions and file size to avoid surprises after downloading!
Locating Sizing Details on Shutterstock Website
When you’re browsing images on Shutterstock, finding the right size info can feel a bit like searching for a needle in a haystack. But don’t worry—once you know where to look, it’s pretty straightforward. Typically, the sizing details are tucked away in a few key spots that are easy to access once you’re familiar with the layout.
First, after you click on an image to view its details, look for the “Image Details” section. This is usually located below or beside the main image preview. Here, Shutterstock provides a concise overview of the image’s specifications, including the resolution (like 3000 x 2000 pixels), file size, and format.
Another helpful spot is the ‘Download Options’ menu. When you choose a license type and proceed to download, Shutterstock often displays the available sizes and resolutions for each option. This way, you can compare the options side-by-side before making your selection.
If you’re logged into your Shutterstock account and have purchased or are viewing your downloads, you can also check your ‘My Downloads’ section. Here, each downloaded image will have associated metadata, including its size and resolution details. This is especially useful if you want to verify the exact size of images you’ve already acquired.
Lastly, if you’re unsure or need more detailed technical info, Shutterstock sometimes provides a ‘Help’ or ‘FAQ’ section where they explain how to interpret image sizes and resolutions. It’s worth bookmarking this for quick reference, especially when working on projects with specific size requirements.
Using Shutterstock Download Options to Check Image Sizes
One of the easiest ways to verify an image’s size is through Shutterstock’s download process itself. When you select an image and choose a license type, Shutterstock displays the available download options, including the specific resolutions and file sizes. Here’s how to do it:
- Log in to your Shutterstock account and find the image you’re interested in.
- Click on the image to open the detailed view.
- Choose your desired license type (e.g., Standard or Enhanced). As you do this, Shutterstock will show the available sizes for each license option.
- Look for the ‘Download’ button or link. When you hover over or click it, a dropdown or side menu usually appears, listing the resolutions like 8 MP, 16 MP, or specific pixel dimensions.
- Click on the size you want, and Shutterstock will confirm the file size and resolution before you complete your download. This is a great way to double-check that the image meets your project’s size requirements.
Additionally, if you’ve already downloaded an image, you can check its size directly on your device. For example, on Windows or Mac, simply right-click the image file, select ‘Properties’ or ‘Get Info’, and view the image dimensions and file size. This ensures you’re working with the exact image you downloaded from Shutterstock.
Remember, choosing the right image size is crucial for maintaining quality in your project. Shutterstock makes it pretty straightforward to see what sizes are available at each step, so don’t hesitate to explore the download options thoroughly. It’s a simple way to ensure your images look sharp and professional, whether you’re creating a website, a print piece, or social media content.
Tips for Ensuring You Have the Correct Image Size for Your Needs
Getting the right image size is crucial whether you’re designing a website, creating a print piece, or sharing on social media. Here are some friendly tips to help you make sure your images are just right:
- Know Your Final Use: Before even looking at images, clarify what you’ll be using them for. Will they be a hero image on a website, a social media post, or a printed flyer? Each purpose has different size requirements.
- Check the Recommended Dimensions: Shutterstock often provides recommended image sizes for various uses. Use these as your starting point to ensure your images look sharp and professional.
- Pay Attention to Resolution: For digital use, 72-96 dpi (dots per inch) is standard. For printing, aim for 300 dpi or higher. Shutterstock images usually come with high resolutions, so make sure to select the right one for your project.
- Use Image Editing Tools: Tools like Photoshop, GIMP, or even online editors can help you resize images without losing quality. Resize to the exact dimensions you need, and always keep a copy of the original.
- Check the Image Details: When downloading from Shutterstock, look at the image details—especially the pixel dimensions and file size. This info helps you confirm whether the image will meet your needs.
- Test Before Finalizing: If possible, insert the image into your project early on to see how it looks. Resize or crop as needed, and ensure it maintains clarity and impact at your chosen size.
Remember, taking a little extra time to verify the correct size upfront can save you headaches down the line. It ensures your project looks polished and professional, no matter where it’s displayed!
Conclusion and Additional Resources for Image Sizing on Shutterstock
Finding the perfect image size on Shutterstock doesn’t have to be complicated. By understanding the basics—like checking pixel dimensions, resolution, and recommended sizes—you can confidently select images that fit your project’s needs. Keep in mind that Shutterstock’s detailed image information and available download options make it easier to find exactly what you need. Remember to consider your final use, test your images in context, and use editing tools when necessary to fine-tune sizing.
If you’re looking to deepen your understanding or streamline your workflow, here are some helpful resources:
- Shutterstock Help Center: Offers comprehensive guides on image licensing, sizing, and best practices.
- Adobe Photoshop Tutorials: Great for learning how to resize and optimize images without losing quality.
- Online Image Resizers: Free tools like Canva, Pixlr, or Fotor can help you quickly adjust image dimensions.
- Design Best Practices: Blogs and courses on design principles can give you insights into choosing the right image size for various platforms.
With these tips and resources, you’ll be well on your way to using Shutterstock images effectively—making your projects look sharp, professional, and just right for your audience. Happy designing!


