Ever wondered how to make your images stand out by removing distracting backgrounds? Shutterstock Editor is a fantastic tool that makes this task easy and accessible, even for beginners. Whether you’re creating social media graphics, marketing materials, or just want a clean look for your photos, understanding how to remove backgrounds is a game-changer. In this guide, we’ll walk you through the process step-by-step, so you can confidently edit your images like a pro. Let’s dive into what makes Shutterstock Editor a go-to choice for quick and effective background removal!
Getting Started with Shutterstock Editor
First things first, let’s get you set up. To start using Shutterstock Editor, you’ll need a Shutterstock account. If you don’t have one yet, signing up is quick and free — just head over to their website and follow the registration steps.
Once you’re logged in, navigate to the Shutterstock Editor. You can find it through the main menu or by searching for “Editor” in their search bar. When you open the editor, you’ll see a simple, user-friendly interface designed to help you upload and edit images effortlessly.
Here’s what you should do to get started:
- Upload Your Image: Click on the “Upload” button, usually located on the toolbar or the main dashboard. You can upload images from your computer, cloud storage, or even directly from Shutterstock’s library if you’re looking for stock images to edit.
- Select Your Image: Once uploaded, your image will appear in the workspace. Click on it to start editing.
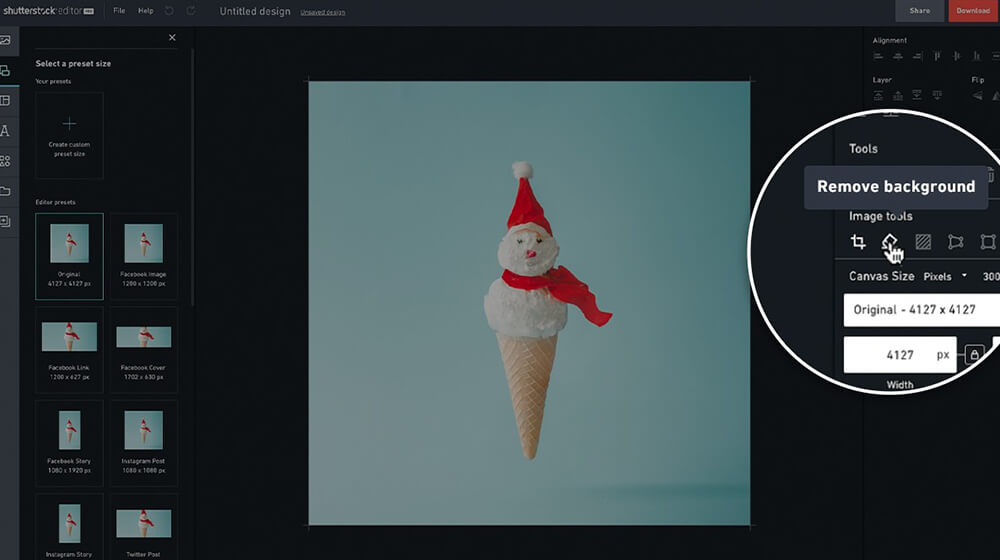
- Familiarize Yourself with the Tools: Take a quick look at the toolbar options. The most relevant for background removal is the “Cutout” or “Background Removal” tool, which is often represented by scissors or a magic wand icon.
- Save Your Progress: Before you start editing heavily, it’s a good idea to save your project. Shutterstock Editor usually autosaves, but manually saving ensures you don’t lose your work.
And that’s it! You’re now ready to begin removing backgrounds. In the next steps, we’ll explore how to use the background removal tool effectively to get clean, professional-looking results. Happy editing!
Uploading Your Image to Shutterstock Editor
Alright, now that you’re ready to start editing, the first step is getting your image into Shutterstock Editor. This part is pretty straightforward, but it’s important to do it right to ensure your background removal goes smoothly.
First things first, head over to the Shutterstock Editor website or open the app if you have it installed. Once you’re logged in, you’ll see a clear option to upload your image. Click on that button, which is usually labeled Upload or sometimes represented by a cloud icon with an arrow.
When the upload window pops up, navigate to the folder on your computer where your image is stored. Shutterstock supports a variety of file formats, including JPEG, PNG, and TIFF, so choose the one you prefer. For best results, try to upload high-resolution images, especially if you plan to make large edits or use the image professionally.
After selecting your image, click Open (or the equivalent button). The upload process will begin—this might take a few seconds depending on your internet speed and image size. Once uploaded, your image will appear on the editor’s workspace, ready for you to start editing.
Tip: If you have multiple images you’d like to work on, you can upload them all at once! Shutterstock Editor generally allows batch uploads, which saves you time. Just select all your images in the upload window, and they’ll appear as thumbnails in your workspace.
Pro tip: Before you start erasing backgrounds, take a moment to review your image. Make sure it’s oriented correctly, well-lit, and free of any unwanted objects or watermarks. This will make the background removal process much easier and more effective.
Using the Background Eraser Tool in Shutterstock Editor
Now that your image is uploaded, it’s time to actually remove that pesky background. Shutterstock Editor offers a handy Background Eraser Tool designed to make this task as simple as possible—even if you’re not a professional designer.
To access the tool, look for the Tools Panel usually located on the left or right side of the workspace. Click on the icon labeled Background Eraser—it often looks like a magic wand or an eraser with a dotted circle around it.
Once activated, the background eraser works in a way similar to a brush. You can click and drag over areas of the background you want to remove. The tool automatically detects edges and helps you erase backgrounds with precision. As you drag, you’ll see the background disappearing, revealing transparent areas or the new background you plan to add.
Here are some helpful tips to get the best results:
- Adjust the brush size: Use the size slider to make your eraser brush larger or smaller depending on the detail of the area you’re working on. Smaller brushes are great for detailed edges, like hair or intricate objects.
- Use the “Refine” option: Many background erasers include a refinement feature. This allows you to fine-tune the edges, smoothing out jagged lines or cleaning up leftover background bits.
- Zoom in for detail work: Zooming in (using the zoom tool or shortcuts) helps you see exactly where you’re erasing, especially around tricky areas like hair or shadows.
- Be patient and undo if needed: Don’t worry if you make a mistake. Shutterstock Editor typically offers an undo button or allows you to erase and re-erase sections until you get it just right.
Remember, while the background eraser is powerful, it might take a little practice to perfect your technique. Take your time, and don’t rush through it. The more precise you are now, the better your final image will look.
Once you’re satisfied with your background removal, you can move on to adding a new background, making further edits, or saving your image for download. Easy peasy! Happy editing!
Adjusting and Refining the Erased Background
Once you’ve used the Shutterstock Editor to remove the background from your image, it’s a good idea to take a closer look and make some adjustments. Sometimes, the automatic erasing isn’t perfect—there might be leftover edges, tiny bits of background, or areas that need a little more finesse. Don’t worry, though—refining your image is straightforward and can really make your final result look professional.
First, zoom in on your image so you can see the details clearly. Look for any areas where the background might still be visible or where the edges look rough or jagged. The Shutterstock Editor offers handy tools to help with this:
- Brush Tool: Use this to manually add or erase parts of the background. Switch between the “Erase” and “Restore” brushes to fine-tune specific areas.
- Edge Softening: If your cutout has harsh edges, look for options like “Feather” or “Smooth” to soften the transition between the subject and the background. These features help create a more natural look.
- Refine Edge Tool: Some editors include a specific ‘Refine Edge’ feature that allows you to adjust the edge detection, making it easier to handle tricky areas like hair or fuzzy edges.
When refining, be patient and take your time. Small adjustments can make a big difference. For example, zooming in and gently brushing around fine details like hair strands or intricate patterns ensures they look natural and well-integrated into the new background or transparent canvas.
Remember, it’s all about balancing the image’s natural look with your desired outcome. If you’re going for a clean, crisp cutout, you might want to sharpen the edges after softening them. Conversely, if you want a more blended look, softening and feathering can help achieve that.
Finally, preview your image frequently as you work—most editors let you toggle between the original and edited versions. This helps you see the impact of your adjustments and ensures you’re happy with the final look before moving on to saving or exporting.
Saving and Exporting Your Edited Image
Great job! Once you’re satisfied with your refined background removal, it’s time to save and export your masterpiece. Shutterstock Editor makes this process simple and flexible, whether you want a transparent background, a specific file format, or a particular size.
First, look for the “Save” or “Download” button—usually located at the top or bottom of the editing interface. Clicking this will open a menu of options. Here’s what to consider:
- File Format: If you want to keep the background transparent (perfect for logos or overlays), choose PNG with transparency enabled. For high-quality images suitable for printing, JPEG might be preferable, but note that JPEG doesn’t support transparency.
- Resolution and Size: Decide on the resolution based on your project needs. For web use, 72 DPI is sufficient, but for print, aim for 300 DPI or higher. Some editors allow you to resize the image during export, so choose dimensions that match your intended use.
- Quality Settings: Higher quality settings produce larger files but better visual fidelity. If file size is a concern, you can usually balance quality and compression during export.
Before finalizing, double-check the preview to ensure everything looks perfect. Some platforms also give you the option to name your file and select a save location—make sure to choose a folder where you can easily find your work later.
Once you hit “Download” or “Export,” the editor will process your file. Depending on the image size and your internet speed, this might take a few seconds to a minute. When the download completes, open your file to verify that the background removal and adjustments look just right.
And that’s it! You now have a clean, polished image ready to be used in your designs, presentations, or social media posts. With a little practice, background removal in Shutterstock Editor becomes a quick, effortless step in your creative workflow. Happy editing!
Tips for Achieving the Best Results When Removing Backgrounds
Removing backgrounds can be a game-changer for your designs, but getting it just right takes a little practice and know-how. Here are some friendly tips to help you achieve those clean, professional-looking results every time you use Shutterstock Editor:
Pay Attention to the Edges
One common challenge is dealing with jagged or rough edges around your subject. To fix this, zoom in on your image and carefully examine the edges. Use the eraser tool or refine edge features available in Shutterstock Editor to smooth out any rough spots. Softening the edges can make your subject blend seamlessly into new backgrounds or layouts.
Use the Zoom and Precision Tools
Don’t rush the selection process. Zooming in allows for more precise selection and removal. Take your time to carefully outline your subject, especially around tricky areas like hair or fur. The more precise your initial selection, the better your final result will look.
Adjust the Threshold Settings
If your background removal tool isn’t quite capturing everything, play around with the threshold or sensitivity settings. Increasing the threshold might remove more background, but be cautious — too high and you risk losing parts of your subject. Find that sweet spot where the background disappears cleanly without sacrificing detail.
Refine Your Selection
Most background removal tools, including Shutterstock Editor, offer options to refine or fine-tune your selection. Use features like “Refine Edge” or “Feather” to soften the transition between your subject and the background, creating a more natural look.
Keep Original Files Handy
Always save a copy of your original image before you start editing. This way, if something doesn’t turn out as expected, you can go back and try again without losing quality or details.
Practice Makes Perfect
The more you experiment with different images and settings, the better you’ll get at removing backgrounds quickly and cleanly. Don’t be discouraged if it takes a few tries — each project is a learning opportunity!
Use the Right Image
High-resolution images with good contrast between the subject and background tend to produce the best results. Blurry or low-quality images might make it harder to achieve a clean removal. When possible, start with the best quality files you have.
Frequently Asked Questions About Background Removal in Shutterstock Editor
Have questions about removing backgrounds? You’re not alone! Here are some of the most common questions users ask, along with friendly answers to help you navigate the process confidently.
Q: Can I remove backgrounds from complex images with lots of detail?
A: Absolutely! Shutterstock Editor is capable of handling detailed images, but the process might require a bit more patience. Use zoom, refine edges, and adjust settings carefully. For extremely complex images, consider doing multiple passes or refining manually for the best results.
Q: Will removing the background affect the quality of my image?
A: When done properly, background removal should not compromise your image’s quality. However, if you overly compress or save the image repeatedly, you might see some loss of quality. Always work with high-resolution images and save your edits in a high-quality format.
Q: Can I add a new background after removing the original?
A: Definitely! Once you’ve erased the background, you can upload and add any new background you like. Shutterstock Editor makes it easy to layer images, so you can create stunning composites or clean, professional-looking visuals.
Q: Is there a limit to how many images I can edit at once?
A: Shutterstock Editor is optimized for individual image editing. While you can work on multiple images over time, each background removal might require individual attention for the best results.
Q: What should I do if the background removal isn’t perfect?
A: Don’t worry! Use the refine tools to smooth or adjust the edges. Sometimes, a little manual erasing or feathering can make all the difference. If you’re still not satisfied, consider starting over with a different selection or adjusting your original image for better contrast.
Q: Is background removal in Shutterstock Editor free?
A: It depends on your subscription plan. Some features might be available for free, but advanced tools or high-resolution exports may require a paid plan. Check Shutterstock’s current offerings to see what’s included in your package.
Remember, practice and patience are key. With these tips and answers, you’ll become a background removal pro in no time! Happy editing!