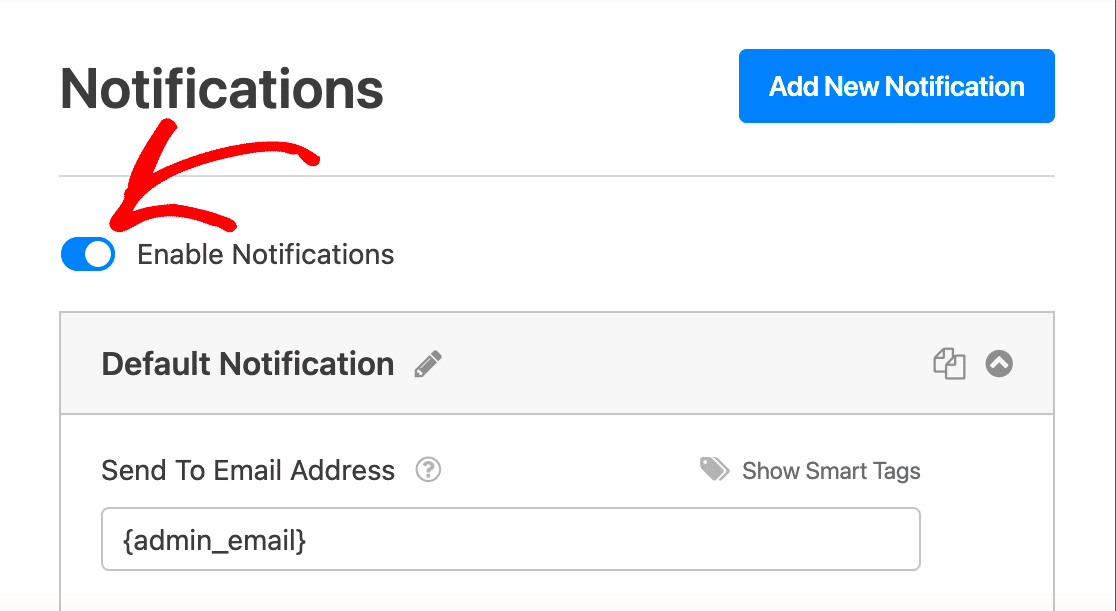
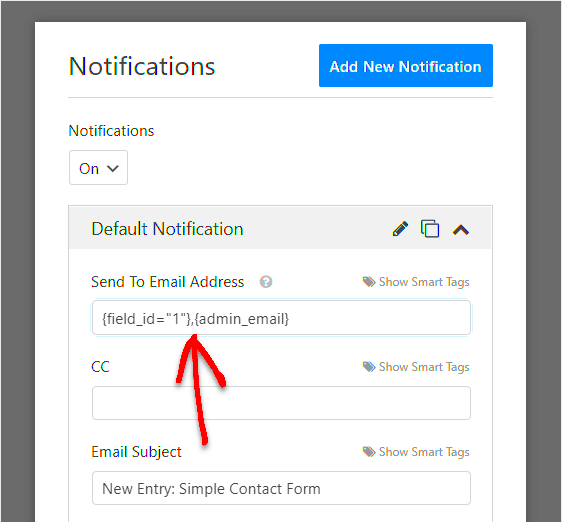
Email notifications are a key feature for any WordPress site that uses forms. Whether you’re running a blog, an eCommerce store, or any type of business, receiving timely updates about form submissions can keep you connected with your audience. Imagine being notified whenever someone fills out your contact form, registers for a webinar, or makes an online purchase. This instant communication can help you respond quickly to inquiries and facilitate better engagement with your visitors. Here, we’ll explore how to easily enable these email notifications and why they matter.
Understanding the Importance of Email Notifications

So, why should you care about email notifications for form submissions? Let’s break down the key reasons:
- Timely Responses: Receiving a notification right after someone submits a form means you can address their needs immediately. This responsiveness can significantly enhance customer satisfaction.
- Improve Communication: With email notifications, you can keep an open line of communication with your audience. You’ll never miss important inquiries or leads.
- Stay Organized: Email notifications help you maintain a record of submissions which is vital for tracking inquiries, registrations, and sales.
- Customization: Many forms allow for customizable notification settings. You can choose to alert different team members depending on the type of form submitted.
Lastly, consider this quick idea: imagine you’re away from your desk when someone expresses interest in your services. With email alerts set up, you can respond promptly, making a great first impression!
To sum it up, email notifications are not just a convenience; they’re an essential tool for optimizing engagement and enhancing user experience on your WordPress site.
Choosing the Right Form Plugin for WordPress
When it comes to adding forms to your WordPress site, picking the right form plugin is crucial. With so many options available, it can feel a bit overwhelming, but let’s break it down together.
First off, consider what exactly you need from a form plugin. Are you looking for simple contact forms, or do you need advanced features like payment processing and conditional logic? Here are a few key factors to think about:
- Ease of Use: Look for a plugin with a user-friendly interface that allows you to create forms without any coding skills.
- Customizability: Make sure the plugin offers customizable templates or a drag-and-drop builder so you can design your forms as you like.
- Integration Options: Check if the plugin integrates with other tools you use, like email marketing services or CRM systems.
- Support and Documentation: A reliable support system and comprehensive documentation can save you time and headaches.
Some popular form plugins you might consider are:
| Plugin Name | Features | Pricing |
|---|---|---|
| Contact Form 7 | Simple forms, shortcode support | Free |
| WPForms | Drag-and-drop builder, templates | Starts at $39.50/year |
| Ninja Forms | Add-ons for extra functionality | Free with options to upgrade |
Take your time to explore the options. After all, the right plugin will significantly enhance your website’s functionality and user engagement!
Installing and Activating Your Chosen Form Plugin
Now that you’ve chosen the perfect form plugin for your WordPress site, it’s time to get it up and running. Don’t worry; this process is usually straightforward!
Here’s a step-by-step guide to help you install and activate your chosen form plugin:
- Log in to Your WordPress Dashboard: Head over to your WordPress site and enter the admin area.
- Navigate to Plugins: On the left-hand menu, click on “Plugins” and then select “Add New.”
- Search for Your Plugin: In the search bar, type the name of the plugin you want to install, for example, “WPForms.”
- Install the Plugin: Once you find your desired plugin, click the “Install Now” button.
- Activate the Plugin: After installation, the button will change to “Activate.” Click it to enable the plugin on your site.
Once activated, most plugins will add a new menu item to your WordPress dashboard. This is where the fun begins! You can start creating your first form, customizing it, and setting up email notifications.
And there you have it! Installing and activating your form plugin is a simple yet crucial step toward enhancing your WordPress site’s interactivity and functionality. So don’t hesitate; get started and watch your site come to life!
Configuring Email Notifications in the Form Plugin
When you have a form plugin installed on your WordPress site, setting up email notifications is usually a straightforward task. Most plugins come equipped with customizable settings that allow you to receive an email each time someone submits a form. Let’s break down the steps to configure these notifications effectively.
Here’s a simple guide to get you started:
- Access Your Form Plugin Settings: First, navigate to the dashboard of your WordPress site. Find your form plugin—some popular choices include Contact Form 7, WPForms, and Ninja Forms. Click on the plugin to access its settings.
- Select Your Form: Once inside the plugin interface, select the specific form for which you want to set up email notifications. This could be a contact form, a newsletter signup, or any other form you’ve created.
- Find Notification Settings: Look for a tab or section labeled “Notifications” or “Emails.” This is usually where you’ll configure how and when your notifications are sent out.
- Set Recipient Email Address: Here, you can input the email address where you want the notifications to be sent. You can often add multiple addresses by separating them with commas.
- Choose Trigger Conditions: Some plugins allow you to set conditions for when notifications are sent. You might want to send notifications for specific fields being filled out, or only for certain submissions.
After you’ve configured everything, don’t forget to save your changes! You can conduct a test by submitting the form yourself to ensure that the notifications are working as expected.
Customizing Email Templates for Notifications
Once you have email notifications set up, you might want to personalize them to better reflect your brand and provide a better user experience. Customizing email templates can help ensure that your emails are engaging and consistent with your site’s aesthetics.
Let’s dive into how you can tweak these templates:
- Template Selection: Many form plugins provide a default email template that includes basic formatting. You can often choose from different templates or start from scratch. Review your plugin’s documentation for the available options.
- Personalize the Subject Line: Make your subject line clear and descriptive. Instead of a generic “New Form Submission,” consider something like “New Contact Request from Your Website,” which gives the recipient context at a glance.
- Message Body Customization: Use the message body to provide more personalized content. You can include fields from the form submission using shortcodes, which can create a seamless experience for the person receiving the notification. For example:
| Field | Example Shortcode |
|---|---|
| Name | {name} |
| {email} | |
| Message | {message} |
Branding Elements: Don’t forget to include your logo and a signature line! A simple footer with your business details can lend credibility to your emails and reinforce your brand.
After you’ve customized your email template, it’s essential to send a test email to see how it looks in the recipient’s inbox. A well-crafted email can enhance user experience and improve communication efficiency!
7. Testing Email Notifications
Once you’ve set up your email notifications for form submissions on your WordPress site, it’s crucial to test them. Think of this step as a quality check to ensure everything is functioning as intended. After all, what’s the point of setting up notifications if they don’t reach your inbox?
Here’s a simple method to test your email notifications:
- Submit a Test Form: Fill out the form on your site as if you were a user. Make sure to include all the required fields to see if everything works seamlessly.
- Check Your Inbox: After submitting, check the email address you’ve set up to receive notifications. You should receive the email almost instantly.
- Review Email Content: Open the email and verify that the information matches what you submitted. Look out for any formatting issues or missing information.
- Check Spam Folder: If you don’t see the email in your inbox, it may have ended up in your spam or junk folder. Make sure to mark it as “not spam” if you find it there.
Additionally, consider checking the email headers if you’re familiar with that. This can give you insights into the server address and any issues that might have occurred during delivery.
Don’t forget to repeat this test periodically, especially after making changes to your forms or your WordPress setup. It’s an essential step in maintaining effective communication with your users!
8. Troubleshooting Common Issues with Email Notifications
We’ve all had those moments when technology just doesn’t cooperate. If your email notifications for form submissions aren’t working, don’t panic! Here are some troubleshooting steps to help you get back on track:
- Email Ends Up in Spam: As mentioned, check your spam folder. If your emails often end up there, consider using a more recognizable “From” name and address to improve deliverability.
- Email Configuration Settings: Double-check your email settings in whatever plugin you’re using. Ensure that the “From” email address is correctly set and that it’s a valid email domain.
- Use SMTP Plugin: Sometimes your server’s PHP mail function may not be reliable. Using an SMTP plugin like WP Mail SMTP can significantly improve email delivery. They often require configuration but do wonders for email functionality.
- Form Plugin Compatibility: If you recently updated your form plugin or your WordPress version, there might be compatibility issues. Check for any plugin updates or patches that might resolve these problems.
- Hosting Provider Limitations: Some hosting providers have strict limits on sending emails. If you’re sending a high volume of emails, consider speaking with your provider about it.
By keeping these common issues in mind, you’ll be better prepared to tackle any hiccups that arise. Remember, the ultimate goal is to maintain clear lines of communication with your users, and a little troubleshooting can go a long way in ensuring that!
Conclusion and Best Practices for Form Submission Notifications
Enabling email notifications for form submissions on your WordPress site is not just a technical improvement; it’s a strategic enhancement that can lead to better user engagement and timely responses. As you implement this feature, consider the following best practices to maximize its effectiveness:
- Choose the Right Plugin: Utilize reliable and popular plugins like WPForms, Contact Form 7, or Gravity Forms to ensure seamless functionality.
- Customize Notifications: Tailor your email notifications to include essential details like the submitter’s information and the form content. This makes follow-up easier.
- Test Your Forms: Before going live, conduct multiple tests to ensure that the notification system is functioning properly and that emails are delivered successfully.
- Use a Professional Email Address: Send notifications from a professional email address (e.g., [email protected]) to increase the likelihood of emails hitting the inbox rather than the spam folder.
- Monitor Response Time: Aim to respond promptly to form submissions to enhance user satisfaction and build trust with your visitors.
Additionally, regularly check your spam folder and email server settings to ensure you don’t miss important submissions. Consider integrating other tools, such as CRM software, to automate and manage follow-ups. By adhering to these best practices, you can optimize your form submission notifications, ensuring you never miss an opportunity for engagement.


