So, you’ve found the perfect video on Shutterstock to elevate your project, but now you want to add your own touch? Editing Shutterstock videos is a fantastic way to customize content, make it more relevant, or just have some fun putting your creative spin on it. Whether you’re creating a marketing video, a presentation, or just experimenting with video editing, understanding the basics can make the process smoother and more enjoyable. Don’t worry if you’re new to this—once you get the hang of it, you’ll be surprised at how easy and rewarding editing can be!
Choosing the Right Video Editing Software
Picking the right video editing software is a crucial step in creating professional-looking content from Shutterstock videos. There are plenty of options out there, ranging from free tools for beginners to advanced programs for seasoned editors. Your choice depends on your experience level, the complexity of your project, and your budget.
For beginners: Consider user-friendly options like iMovie (Mac users), Windows Video Editor, or Shotcut. These programs offer basic editing features such as trimming, cropping, adding music, and simple transitions, all without overwhelming you with too many options.
For intermediate users: Software like Adobe Premiere Elements, CyberLink PowerDirector, or DaVinci Resolve provide more advanced tools while still being accessible. They let you do things like color correction, multiple video tracks, and effects, giving your projects a more polished look.
For professionals: If you’re aiming for high-end editing, consider Adobe Premiere Pro, Final Cut Pro, or Avid Media Composer. These programs support complex editing workflows, detailed color grading, motion graphics, and integration with other professional tools.
| Feature | Beginner Software | Intermediate Software | Professional Software |
|---|---|---|---|
| User Interface | Simple & Intuitive | Moderately Complex | Advanced & Customizable |
| Cost | Free or Low Cost | Moderate | High |
| Features | Basic Editing | Effects, Transitions, Color Correction | Multi-layer Editing, Motion Graphics, 3D Effects |
Remember, the best software for you is the one that matches your skill level and project needs. Don’t be afraid to try out a few options—many programs offer free trials so you can test them before committing. Happy editing!
Downloading and Preparing Shutterstock Videos for Editing
So, you’ve found the perfect video clips on Shutterstock and you’re ready to get started on your project. Before diving into editing, it’s important to download and prepare your footage properly. This step might seem straightforward, but taking a little extra time here can make your editing process smoother and more efficient.
First things first, ensure you have the right license for your intended use. Shutterstock offers different licenses, so double-check that your download permits editing and commercial use if needed. Once you’ve selected the videos, add them to your cart and proceed with the purchase or subscription plan.
After completing your download, locate the video files on your computer. Typically, they download as MP4 or MOV files, which are widely compatible with most editing software. Before importing into your editing program, consider organizing your files into folders—something like “Raw Footage,” “Audio,” and “Assets”—to keep everything tidy and accessible.
Next, it’s a good idea to preview the videos. Play through each clip to get a sense of the content, quality, and whether any parts are unnecessary or need trimming. This step helps you plan your editing more effectively.
Another preparation tip is to check the video resolution and format. Most Shutterstock videos come in HD (1920×1080) or 4K quality. Make sure your editing software supports the resolution you’re working with. If necessary, convert the files to a compatible format using free tools like HandBrake or Adobe Media Encoder.
If your project requires specific sections of a clip, consider creating rough cuts or in/out points using a media player or simple editing tools. This way, you can import only the parts you need, saving time and processing power.
Lastly, back up your original downloaded files. Always keep a pristine copy of the raw footage untouched, so you can revert to it if necessary. Once everything is organized and prepared, you’re ready to jump into the editing process with confidence!
Basic Editing Techniques for Shutterstock Videos
Now that your footage is downloaded and ready, it’s time to start editing. Don’t worry if you’re new to video editing — there are some simple techniques that can dramatically improve your project and make your videos look professional.
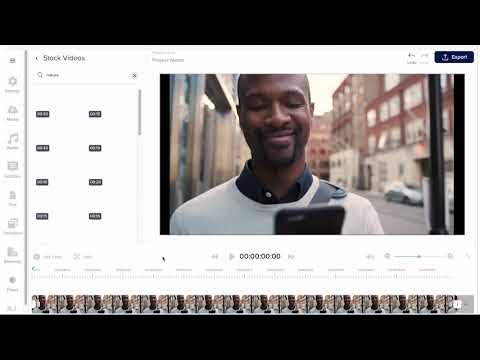
Cutting and Trimming: The foundation of editing is removing unwanted parts and refining your clips. Use your editing software’s razor or cut tool to trim the beginning and end of clips, or cut out any mistakes or distractions. Keeping your clips concise helps maintain viewer engagement.
Arranging Clips: Drag your trimmed clips onto the timeline and arrange them in the desired order. Think about the flow of your story or message. You can also add transitions between clips—simple fades or wipes—to make the switch smooth and visually appealing.
Adding Text and Titles: Incorporate text overlays to highlight key points, add captions, or introduce sections. Most editing tools offer customizable fonts, colors, and animations. Keep text clear and concise to ensure your message is easily understood.
Adjusting Audio: Good audio quality makes a big difference. Adjust volume levels, add background music, or include voiceovers. Shutterstock videos often come with decent sound, but you might want to mute the original audio if it’s noisy or irrelevant, then add your own soundtrack.
Applying Basic Effects: Simple effects like brightness, contrast, and saturation adjustments can improve the overall look. Use filters sparingly—subtle enhancements can make your footage pop without overwhelming the viewer.
Using Speed Controls: Sometimes, speeding up or slowing down clips adds emphasis or creates a dramatic effect. For example, slow motion can highlight specific actions, while time-lapses can show a process quickly.
Exporting Your Video: Once you’re happy with your edits, export the video in the format and quality suitable for your project. Common formats include MP4 and MOV. Be mindful of your target platform’s specifications—social media might need different settings than a presentation or website.
Remember, the key to good editing is practice and experimentation. Start simple, and as you get more comfortable, try out more advanced techniques. Before you know it, your Shutterstock footage will be transformed into a polished, professional-looking video ready to impress your audience!
Adding Effects and Transitions to Enhance Your Videos
Once you’ve selected the perfect Shutterstock footage and made your initial edits, it’s time to make your videos pop! Adding effects and transitions can really take your project to the next level, making it more engaging and professional-looking. Don’t worry—it’s easier than you might think.
Most video editing tools, whether you’re using Adobe Premiere Pro, Final Cut Pro, or even simpler options like Canva or InShot, come equipped with a variety of effects and transitions. These are designed to smoothly connect clips or add visual flair to your footage.
Here’s a quick rundown on how to do it:
- Select your clips: Make sure your clips are in the timeline and properly trimmed.
- Choose transitions: Browse the transition library—common options include fades, wipes, slides, and dissolves.
- Drag and drop: Simply drag your preferred transition between two clips on the timeline.
- Adjust settings: Customize the duration and style of the transition for a seamless look.
For effects, think about color grading, adding filters, or even special visual effects like glitch or blur. These can be applied to individual clips or the entire timeline, depending on your desired outcome.
Remember, moderation is key. Overusing effects and transitions can make your video feel cluttered or distracting. The goal is to enhance the story—so choose effects that complement your footage and keep the viewer engaged.
Pro tip: Preview your video regularly after adding effects to see how everything flows. Sometimes, a simple fade can be more impactful than a flashy transition. Experiment, but always keep your audience in mind!
Inserting Text and Graphics into Shutterstock Footage
Adding text and graphics is a fantastic way to convey information, emphasize points, or simply add a touch of style to your video. Whether you’re creating a tutorial, promotional content, or a social media clip, text can help communicate your message clearly.
The process is straightforward, and most editing tools offer intuitive options for inserting text and graphics. Here’s how to do it:
- Select the Text Tool: Usually represented by a “T” icon, click on it to open your text options.
- Choose a style: Pick from preset templates or create your own style—adjust fonts, sizes, colors, and animations.
- Position your text: Drag it onto the preview window and place it where it looks best—top, bottom, center, or creatively overlayed.
- Add graphics or shapes: Use built-in graphic libraries or import your own images to overlay on your footage.
- Animate if needed: Many tools allow simple animations like fade-in or slide-in to make your text and graphics more dynamic.
For example, if you’re editing Shutterstock footage of a product, you might add a bold title at the beginning, descriptive labels during key moments, or animated arrows pointing to features. This not only makes your video more engaging but also helps viewers understand your message quickly.
Tip: Keep your text clear and concise. Use contrasting colors to ensure readability against your footage. Also, avoid cluttering your screen—give each text element enough space and time to be read comfortably.
Experiment with different fonts and styles to match your video’s tone. For a professional look, stick with clean, simple fonts. For a fun or casual vibe, try playful fonts and animations.
Remember, adding text and graphics is not just about decoration—it’s about storytelling. Use them thoughtfully to guide your viewers through your content and make your project memorable!
Exporting and Saving Your Edited Videos
Once you’ve finished editing your video from Shutterstock, the next step is to export and save it in the best possible way. This part is crucial because it determines how your final project will look and perform when shared or uploaded.
First things first, always double-check your project. Play through your edited video to ensure everything is just right — from the clips and transitions to the audio levels. Once you’re happy with the result, look for the export or render option in your editing software. It’s usually represented by a button labeled Export or Render.
When you open the export settings, you’ll often see options to customize things like:
- File format (such as MP4, MOV, AVI, etc.)
- Resolution (1080p, 4K, etc.)
- Bitrate (which affects quality and file size)
- Frame rate (commonly 24, 30, or 60 fps)
For most online projects, MP4 with H.264 codec is a safe bet because it balances quality and file size nicely. If you’re aiming for higher quality or professional use, consider exporting in a higher resolution or a different format suited for post-production.
It’s also smart to choose a destination folder that’s easy to find later. Name your file clearly, including the project name and version, so you don’t accidentally overwrite or lose it.
Finally, before hitting export, check if your software offers a preview or estimated time. Depending on your video’s length and quality settings, export times can vary from a few seconds to several minutes. Once the export is complete, review the saved video on your device to confirm everything looks and sounds perfect.
Saving your video in multiple formats or backup locations can be a good idea, especially if you plan to make further edits or share it across different platforms.
Tips for Maintaining Video Quality During Editing
That’s it — your video is edited and ready to be shared! But before you hit that export button, let’s talk about how to keep your video looking sharp throughout the editing process. Maintaining quality is key to making sure your final project looks professional and engaging.
Here are some tried-and-true tips:
- Start with high-quality footage: Always use the best available clips from Shutterstock. Low-resolution or compressed videos are hard to fix later and will result in a less polished final product.
- Use the right editing settings: When working in your editing software, set your timeline to match your original footage’s resolution and frame rate. Avoid unnecessary conversions that can degrade quality.
- Limit excessive compression: During editing, avoid repeatedly compressing your video. Each compression can reduce quality, so work with a high-quality master file and only compress when exporting final versions.
- Be mindful with effects and transitions: Some effects can cause pixelation or artifacts if overused or applied improperly. Keep effects subtle and ensure they don’t overshadow your content.
- Maintain proper color grading: Adjust brightness, contrast, and color balance carefully. Overdoing these adjustments can introduce noise or banding, so tweak gradually and preview often.
- Use hardware acceleration if available: Many editing programs support hardware acceleration, which can speed up rendering and reduce the chance of quality loss due to software limitations.
- Preview your work at full resolution: Always view your project in the highest quality preview mode before exporting. This helps catch issues that might not be obvious in lower-quality previews.
Remember, patience is key. Rushing through editing or exports can lead to quality loss. Take your time, review your work carefully, and you’ll end up with a professional-looking video that truly shines.
Legal Considerations When Using Shutterstock Videos
Before you dive headfirst into editing those stunning Shutterstock videos, it’s super important to understand the legal side of things. Using stock footage without paying attention to licensing rules can lead to big headaches down the road. So, let’s break down what you need to keep in mind to stay on the right side of copyright laws and Shutterstock’s policies.
First off, always review the licensing type associated with the footage you plan to use. Shutterstock offers different licenses, mainly Standard and Extended. The Standard license usually covers most common uses like online videos, social media, and presentations. However, if you want to use the footage in a commercial project, TV broadcast, or merchandise, you might need an Extended license. It’s worth double-checking to avoid any infringement issues.
Next, pay attention to the specific restrictions. For example, some clips might have limitations on how many times they can be used or in what context. Also, if your project involves sensitive topics or recognizable people or brands, you might need model or property releases. Shutterstock often provides this documentation, so always look for those before editing or publishing.
Another tip is to keep a record of your licenses and downloads. This documentation can come in handy if you’re ever questioned about the footage’s legality. Plus, it’s a good habit for organized project management.
Lastly, be cautious about incorporating footage that features recognizable individuals, private property, or trademarks without proper permissions. Even if the footage is licensed, using it in a way that implies endorsement or commercial association without authorization can lead to legal trouble.
In summary, always:
- Check the license type for each clip.
- Understand the usage restrictions.
- Obtain model or property releases when needed.
- Keep records of all licenses and downloads.
- Be mindful of trademarks, logos, and recognizable individuals.
Taking these steps ensures your edited videos are not only professional but also legally safe to share and distribute. Better safe than sorry, right?
Conclusion and Final Tips for Successful Video Editing
Wow, you’ve made it to the end! Editing videos from Shutterstock can seem daunting at first, but with a little practice and these handy tips, you’ll be turning out polished projects in no time. Let’s wrap things up with some final thoughts to keep your video editing journey smooth and enjoyable.
First, always plan your project before you start editing. Think about the story you want to tell, the mood you’re aiming for, and the key messages. This clarity helps you choose the right footage, music, and effects, making your editing more cohesive and impactful.
Second, don’t be afraid to experiment. Play around with different cuts, transitions, and color corrections. Sometimes, a small tweak can make a huge difference in how your video feels. Remember, editing is as much an art as it is a technical skill, so trust your instincts and have fun with it.
Third, keep your edits clean and simple. Overusing flashy effects or transitions can distract viewers from your main message. Focus on clarity and flow — viewers should feel engaged, not overwhelmed.
Fourth, pay attention to audio. Good sound quality and music can elevate your project significantly. Use royalty-free music or Shutterstock’s licensed audio tracks, and make sure your dialogue or narration is clear and synchronized.
Here are some final tips for success:
- Organize your files — keep your footage, audio, and project files neatly arranged to save time.
- Use keyboard shortcuts — they speed up your workflow and make editing more efficient.
- Preview frequently — watch your project multiple times during editing to catch issues early.
- Seek feedback — a fresh pair of eyes can offer valuable insights and spot areas for improvement.
- Stay updated — keep your editing software and plugins current to access new features and improvements.
Remember, every great editor was once a beginner. Keep practicing, stay patient, and don’t be afraid to learn new techniques. With these tips, you’re well on your way to creating captivating videos that impress your audience and meet your project goals. Happy editing!