If you’re working on a project that demands high-quality visuals, Shutterstock images can be a fantastic resource. But what happens when the perfect image isn’t quite perfect? That’s where editing comes in! Whether you want to tweak colors, crop for better composition, or add your own touch, editing Shutterstock images can elevate your work to a professional level. Just keep in mind, it’s not just about making the images look good—it’s about respecting licensing rules and making sure your edits align with their licensing agreements. Let’s dive into how you can do this effectively and ethically.
Understanding Licensing and Usage Rights for Shutterstock Images
Before you start editing Shutterstock images, it’s crucial to understand the licensing options and usage rights. Shutterstock offers different types of licenses, mainly Standard and Enhanced, each with its own set of permissions and restrictions.
Standard License: This license generally covers most common uses, like websites, presentations, and social media. However, it limits the number of copies or views, and you cannot use the image in merchandise or products for resale.
Enhanced License: This offers broader rights, including unlimited reproduction, use in merchandise, and print runs exceeding a certain number. It’s ideal for commercial products or large-scale campaigns.
Understanding these licenses is vital because certain edits or uses may be restricted under the Standard license. For example:
- Using images in merchandise for resale might require an Enhanced license.
- Editing images to create a derivative work may be restricted if it alters the original licensing terms.
- Always check the specific license attached to each image before editing or publishing.
Additionally, keep in mind that even with the appropriate license, you must avoid creating images that could be considered defamatory, misleading, or infringing on someone’s rights. Proper attribution isn’t typically required with Shutterstock licenses, but respecting the licensing terms is your best safeguard. When in doubt, contact Shutterstock support or review their licensing FAQs to ensure your intended use complies with their policies. This careful approach will help you avoid legal issues and ensure your final product remains professional and compliant.
Choosing the Right Editing Software for Shutterstock Images
When it comes to editing Shutterstock images, selecting the right software can make all the difference. You want tools that are user-friendly, versatile, and capable of handling high-resolution images without sacrificing quality. Whether you’re a seasoned designer or just getting started, there’s a range of options to suit your needs.
Some popular choices include:
- Adobe Photoshop: The industry standard for professional photo editing. It offers advanced features like layers, masks, and a wide array of filters. Perfect for detailed retouching, compositing, and color correction.
- Adobe Lightroom: Great for quick edits, color grading, and batch processing. Ideal if you’re working with large sets of images and need consistent adjustments.
- GIMP (GNU Image Manipulation Program): A free, open-source alternative to Photoshop. It has many similar features and is perfect if you’re on a budget but still want powerful editing capabilities.
- Canva: User-friendly and web-based, Canva is excellent for simple edits, adding text, overlays, or preparing images for social media or web use. While it may not have all the advanced tools, it’s very accessible for quick tasks.
When choosing software, consider:
- Your skill level: Beginners might prefer Canva or Lightroom, while professionals may lean towards Photoshop or GIMP.
- Type of edits needed: Simple cropping or color adjustments? A lightweight tool might suffice. Complex retouching or compositing? Go for Photoshop.
- Budget: Free options are available, but investing in premium software can unlock more advanced features.
Remember, the right software should streamline your workflow, help you maintain image quality, and give you the creative freedom to make your Shutterstock images look polished and professional.
Steps to Prepare Shutterstock Images for Editing
Before diving into editing, it’s essential to prepare your Shutterstock images properly. Proper preparation ensures that your edits are clean, accurate, and professional-looking, saving you time and frustration down the line.
Here’s a simple step-by-step guide to get your images ready:
- Download the Highest Resolution Version: Always start with the highest quality image available from Shutterstock. This gives you more flexibility during editing and ensures your final output is sharp and detailed.
- Organize Your Files: Create a dedicated folder for your images. Naming files descriptively can save you time later, especially if you’re working with multiple images.
- Inspect the Image: Check for any issues like noise, artifacts, or blemishes. Noticing these early allows you to address them during editing.
- Crop and Resize if Needed: Decide on the final dimensions and crop the image accordingly. Doing this before detailed edits helps you work with the composition you want from the start.
- Adjust Orientation and Straighten: Make sure the horizon lines are level and the image is correctly oriented. This minor step sets a solid foundation for further edits.
- Backup the Original: Save a copy of the original, untouched image. This way, you always have a clean version to return to if needed.
- Clean Up the Image: Use basic tools like Spot Healing Brush or Clone Stamp to remove dust spots or distractions that might interfere with your editing goals.
By following these steps, you ensure that your Shutterstock images are primed for a smooth editing process. Proper preparation not only enhances your workflow efficiency but also leads to more polished, professional results. Remember, taking a few extra minutes at this stage can save you hours later and produce images that truly stand out.
Basic Editing Techniques to Enhance Shutterstock Photos
Once you’ve selected a great Shutterstock image, the next step is to give it a little personal touch to make it stand out and fit your project perfectly. Don’t worry—these basic editing techniques are simple to master and can dramatically improve the visual appeal of your photos.
Crop and straighten are the first things to consider. Sometimes, the composition can be improved by removing distractions or focusing on the main subject. Use cropping tools to eliminate unnecessary elements, and ensure your horizon lines are level to give your image a professional feel.
Next, adjust the brightness, contrast, and exposure. These tweaks can help bring out details and create a balanced look. For example, increasing contrast slightly can make colors pop, while adjusting brightness ensures your image isn’t too dark or too washed out.
Another key adjustment is saturation and vibrancy. Boosting these can make your colors more lively, but be careful not to overdo it—over-saturation can look unnatural. Typically, a subtle increase is enough to make the image more eye-catching.
Sometimes, minor blemish removal or spot healing can tidy up your photo. Many photo editing tools have quick fixes for removing dust spots or small distractions, giving your image a cleaner, more professional appearance.
Finally, consider applying some sharpening to enhance details. Sharpening can make textures more defined, but avoid going overboard—over-sharpened images can look harsh and unnatural.
These basic edits are a great starting point that can be achieved with most photo editing software, whether it’s Adobe Photoshop, Lightroom, or even free tools like GIMP or Canva. Remember, the goal is to make the image look natural and appealing—sometimes, less is more!
Advanced Editing Tips for a Polished, Professional Look
Ready to take your Shutterstock images to the next level? Advanced editing techniques involve more precise adjustments and creative touches that give your photos a truly polished, professional vibe. Let’s dive into some tips that can elevate your images from good to stunning.
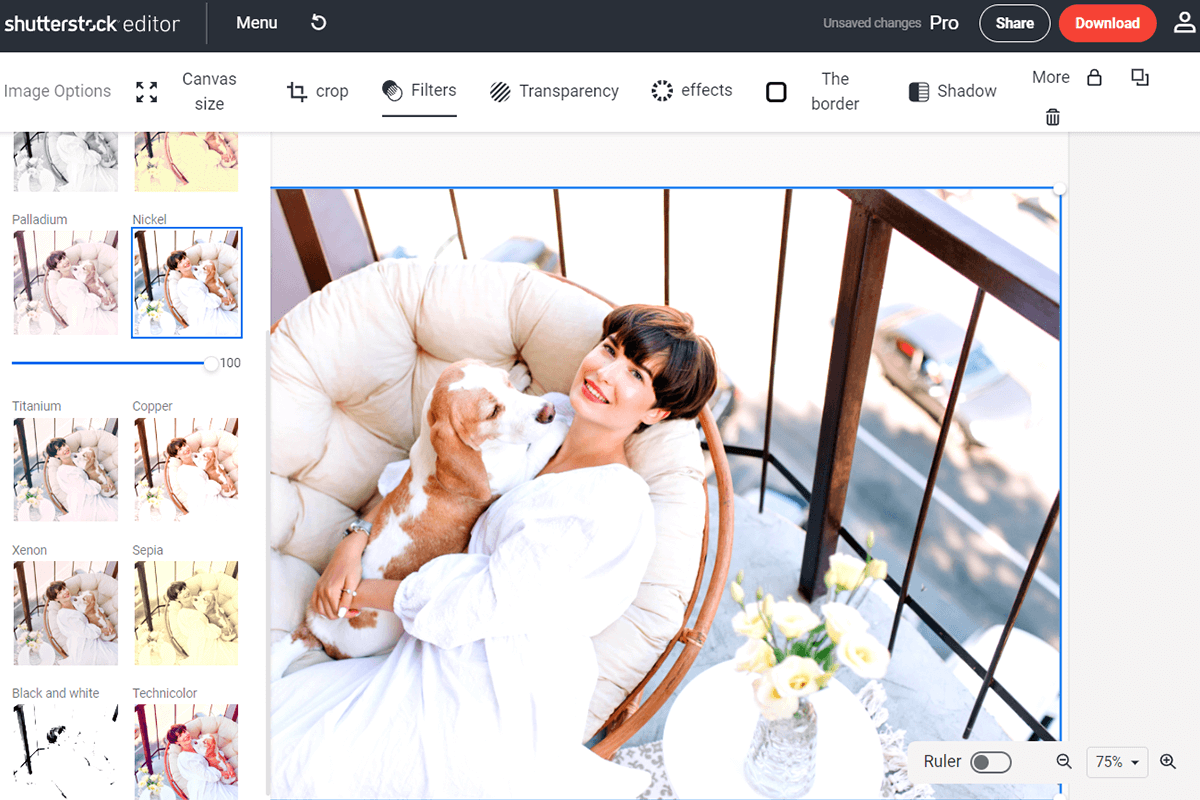
Color grading and tone adjustments are powerful tools. Instead of just tweaking saturation, try applying color presets or filters to create a specific mood or style. For instance, a warm tone can evoke comfort, while cooler tones can add a sleek, modern feel. Many editing software options let you manipulate shadows, midtones, and highlights separately for more control.
Another advanced technique is frequency separation, often used in portrait editing. This allows you to smooth skin or remove imperfections without losing fine details like pores or hair. It’s a bit more complex but results in a natural, flawless look.
For images that require a more creative touch, consider compositing or background replacement. This involves isolating your subject and placing it onto a different background—perfect for marketing or creative projects. Make sure your edges are clean and colors match for realism.
Utilize masking and layers to make selective adjustments. For example, you might want to brighten just the subject’s face while keeping the background darker. Masks allow for precise control, ensuring edits are subtle and targeted.
Adding special effects or filters can also enhance your image. Things like lens flares, light leaks, or subtle vignettes can add depth and focus. Just remember to keep effects tasteful so they enhance rather than distract from the main subject.
Lastly, always aim for consistency. When editing a series of images, use the same color tones, contrast levels, and styles to create a cohesive look. This is especially important for branding, portfolios, or marketing campaigns.
In summary, advanced editing requires a bit more skill and patience but yields professional results that can truly set your work apart. Practice, experiment with different techniques, and don’t be afraid to push creative boundaries—your images will thank you!
Ensuring Compliance with Shutterstock Licensing When Editing Images
Before you start editing Shutterstock images, it’s super important to understand the licensing terms attached to each image. Shutterstock offers different types of licenses—primarily Standard and Extended—and each comes with specific rules about how you can use and modify the images.
Why does this matter? Well, licensing restrictions are there to protect the rights of the image creators and to make sure you’re using the images legally. If you ignore these rules, you might run into legal issues down the line, which nobody wants.
Here are some key points to keep in mind:
- Check the license type: Always verify whether the image you plan to edit is under a Standard or Extended license. Standard licenses typically cover general use, but there are limits—like the number of copies or the nature of the project. Extended licenses give you more flexibility, especially for commercial uses or large-scale projects.
- Review the usage restrictions: Some images come with restrictions on how they can be used after editing. For example, you might not be allowed to create merchandise or products for resale, or you might need to give attribution in certain cases.
- Don’t remove or alter licensing info: If the image comes with watermarks or licensing info, make sure you’re compliant. When you purchase a license, it grants you certain rights, but it doesn’t transfer ownership of the image.
Best practices for staying compliant:
- Always keep a record of your license purchase or subscription proof.
- Use the images strictly within the bounds of your license agreement.
- If you’re unsure about whether your editing or use is compliant, reach out to Shutterstock’s support or consult their licensing FAQ.
Remember, respecting licensing terms not only keeps you safe legally but also supports the talented photographers and artists behind those beautiful images. So, take a moment to double-check your licensing info before diving into your editing process!
Final Tips for Saving and Exporting Edited Shutterstock Images
Once you’ve put your creative touch on those Shutterstock images, the last step is to save and export your project properly. Doing this right ensures your images look professional and are ready for their final use, whether that’s on a website, in print, or for social media.
Here are some handy tips to keep in mind:
Choose the Right File Format
- JPEG: Perfect for most web uses and quick sharing. Just keep in mind that it’s a compressed format, so some quality loss can happen.
- PNG: Great for images needing transparency or higher quality, especially logos or graphics with text.
- TIFF or PSD: Best if you plan to do further editing later or want the highest quality for print.
Set the Correct Resolution and Size
- For web use, 72-150 dpi is usually sufficient. Keep the dimensions optimized for your platform to avoid slow load times.
- For print, aim for 300 dpi or higher to ensure sharpness and clarity.
- Always double-check the dimensions—make sure they fit your project’s specifications.
Pay Attention to Color Profiles
If you’re working on images for print, convert your color profile to CMYK. For digital projects, sRGB is the standard. Proper color management ensures your images look consistent across different devices and media.
Final Quality Check
- Zoom in and review your image for any residual artifacts or errors.
- Check that all text is legible and that important details are sharp.
- Make sure the overall composition and color balance match your vision.
Save Multiple Versions
It’s a good idea to save your work in different versions—such as a master file (like PSD) for future edits and a finalized version for publishing. Keep backups in case you need to revisit or tweak your project later.
By following these final tips, you’ll ensure your edited Shutterstock images are polished, professional, and ready to impress your audience. Happy editing!
Conclusion and Best Practices for Using Edited Shutterstock Images Professionally
Successfully editing Shutterstock images for professional use requires a combination of technical skills, creative judgment, and adherence to legal guidelines. Remember that high-quality editing can significantly enhance visual impact, but it’s essential to respect copyright laws and Shutterstock’s licensing agreements to avoid potential legal issues. When using edited images in your projects, consider the context and audience to ensure the visuals align with your brand message and professional standards.
Best Practices include:
- Maintain Image Quality: Always preserve the original resolution and avoid over-compression to ensure clarity and sharpness in your final product.
- Consistent Style: Develop a cohesive editing style that reflects your brand identity, whether through color grading, filters, or composition adjustments.
- Proper Licensing: Verify that your edits comply with Shutterstock’s licensing terms, especially if making substantial modifications or using images commercially.
- Use Non-Destructive Editing: Prefer editing techniques that allow you to revert changes easily, such as working with adjustment layers or maintaining layered files.
- Optimize for Medium: Tailor your images for their final use—whether print or digital—by adjusting resolution, color profiles, and file formats accordingly.
In conclusion, mastering the art of editing Shutterstock images for professional use involves thoughtful editing, legal awareness, and strategic application. When done correctly, edited images can elevate your projects and effectively communicate your message with visual impact.