So, you’ve got some great photos and you’re ready to upload them to Shutterstock. But did you know that editing your images can make a huge difference in how often they get purchased? Properly edited images are more eye-catching, professional, and aligned with what buyers are looking for. In this post, we’ll explore simple yet effective editing tips to boost your sales and help your images stand out in a crowded marketplace. Whether you’re new or experienced, understanding how to fine-tune your visuals can be a game-changer for your stock photography journey.
Understanding Shutterstock’s Image Guidelines and Requirements
Before diving into editing, it’s essential to understand Shutterstock’s rules to ensure your images meet their standards. Shutterstock has specific guidelines designed to maintain high quality and consistency across their platform, which ultimately helps your images get approved faster and attract more buyers.
Here are some key points to keep in mind:
- Resolution: Shutterstock recommends images be at least 4 megapixels (for example, 3600 x 2400 pixels) to ensure they look good across various uses.
- File Format: Upload images in JPEG format with high quality (usually 8-10 in your editing software’s quality slider).
- Color Profile: Use sRGB color space, as it displays colors consistently across different devices.
- Sharpness and Clarity: Your images should be crisp, with no blurriness or pixelation. Proper sharpening during editing helps achieve this.
- Avoid Watermarks and Overlays: Shutterstock only accepts original, clean images without logos, watermarks, or branding.
Beyond technical specs, Shutterstock emphasizes visual quality—images should be well-composed, correctly exposed, and free of noise or artifacts. Understanding these guidelines helps you tailor your editing process to produce images that not only pass review but also appeal to buyers.
Getting familiar with their content restrictions is also crucial. Shutterstock discourages images with certain themes, such as offensive content or images that infringe on trademarks or privacy rights. By aligning your editing efforts with these guidelines, you’ll set yourself up for success and maximize your sales potential.
Choosing the Right Editing Tools for Shutterstock Images
When it comes to editing your Shutterstock images, the tools you select can make all the difference in creating compelling visuals that catch buyers’ eyes. With so many options out there, it’s easy to get overwhelmed, but don’t worry—we’ll break down what you need to look for to pick the perfect tools.
First off, consider ease of use. If you’re not a professional designer, you’ll want an editing platform that’s intuitive and user-friendly. Tools like Canva, Fotor, or Adobe Express are fantastic for quick edits and simple enhancements. They come with pre-made templates, filters, and easy drag-and-drop features that help you get professional-looking results without a steep learning curve.
Next, think about the features you need. Basic editing functions like cropping, resizing, adjusting brightness, contrast, and color saturation are essential. If you want to go further, look for tools with features such as retouching, removing backgrounds, adding text, and applying creative filters.
Compatibility and file support are also crucial. Make sure your chosen editor can handle the image formats you work with, like JPEG or PNG, and export at high resolutions suitable for Shutterstock’s quality standards.
Another important aspect is whether the tool supports batch editing. If you’re managing multiple images, batch processing can save you a lot of time by applying the same adjustments across all images simultaneously.
Lastly, consider budget and subscription plans. Many editing tools offer free versions with limited features, while premium versions unlock advanced capabilities. Since quality counts on Shutterstock, investing in a reliable editing tool can pay off in higher sales and better customer satisfaction.
In summary, the right editing tools should be easy to use, feature-rich, compatible with your files, and cost-effective. Taking some time to choose wisely will streamline your editing process and help your images stand out in the marketplace.
Step-by-Step Guide to Editing Your Shutterstock Images
Now that you’ve picked your ideal editing tools, it’s time to get hands-on and transform your images. Here’s a simple, step-by-step guide to help you edit Shutterstock images effectively and increase their appeal to buyers.
Step 1: Start with a high-quality image
Choose an image with good resolution and clarity. Even the best editing can’t fix a blurry or low-resolution shot. Upload your original image to your editing platform and make a quick assessment of what needs enhancement.
Step 2: Crop and resize for optimal composition
Use the crop tool to frame your subject perfectly. Remember, images that are well-composed attract more attention. Resize your image to meet Shutterstock’s recommended dimensions, ensuring it’s not too small or overly large, which can affect download quality and file size.
Step 3: Adjust brightness, contrast, and color
Enhance your image’s visual impact by tweaking these settings. Brighten dull images, increase contrast to add depth, and fine-tune colors to make your image pop. Be subtle—overdoing it can make your photo look unnatural.
Step 4: Remove distractions and imperfections
Use retouching tools to eliminate blemishes, dust spots, or distracting objects. If your tool supports background removal or smoothing, utilize those features to clean up your image and focus on the main subject.
Step 5: Add finishing touches
Apply filters or creative effects if appropriate, but keep it professional. Adding a slight vignette or sharpening can help your image stand out without overwhelming it.
Step 6: Save and export with the right settings
Save your edited image in the appropriate format, usually JPEG, at the highest resolution allowed by Shutterstock. Use the export settings to optimize for web quality, balancing visual quality and file size.
By following these steps, you’ll create polished, attractive images that resonate with buyers and boost your sales potential. Remember, editing isn’t just about making images look good—it’s about telling a story, evoking emotion, and making your visuals irresistible to your target audience.
Tips for Enhancing Image Quality and Appeal
When it comes to selling images on Shutterstock, first impressions matter a lot. High-quality, eye-catching photos are more likely to stand out and attract buyers. So, how can you enhance your images to boost their appeal? Here are some practical tips to get you started:
Focus on Sharpness and Clarity
Always ensure your images are sharp and clear. Blurry or pixelated photos can turn potential buyers away. Use tools like sharpening filters in editing software such as Adobe Photoshop or Lightroom to bring out fine details. Just be careful not to overdo it, as too much sharpening can create unnatural halos.
Adjust Brightness and Contrast
Proper lighting makes a huge difference. Brighten up dull images and increase contrast to make colors pop. A well-lit photo appears more vibrant and professional. Experiment with sliders until the image feels lively but still natural.
Color Correction and Balance
Accurate colors are key. Use color correction tools to fix any color casts or inconsistencies. Adjust white balance to make whites appear true and enhance colors for a more appealing look. Remember, natural-looking images tend to sell better—avoid overly saturated or unrealistic hues.
Crop for Composition
Good composition draws attention to the main subject. Crop your images to eliminate distractions and follow principles like the rule of thirds. Sometimes, a simple crop can dramatically improve the visual impact of your photo.
Remove Imperfections
Use clone stamp or healing brush tools to eliminate dust spots, blemishes, or unwanted objects. Clean images look more professional and trustworthy. Take your time to make these edits seamless so they don’t look artificially altered.
Use Filters and Effects Sparingly
While filters can add mood or style, moderation is key. Overusing effects can make images look unnatural or gimmicky. Focus on subtle enhancements that improve the overall quality without overpowering the original scene.
Test on Different Devices
Finally, preview your images on various screens—desktop, mobile, tablets—to ensure they look great everywhere. What looks good on your monitor may not translate perfectly elsewhere, so make adjustments if needed.
Remember, investing a little extra time in editing can significantly increase the perceived value of your photos. High-quality, appealing images are more likely to catch buyers’ eyes and lead to more sales!
Common Mistakes to Avoid When Editing Shutterstock Photos
Editing is an essential part of preparing your images for sale, but it’s easy to fall into some common traps. Avoiding these mistakes will help ensure your photos look professional and meet Shutterstock’s standards:
Over-Editing or Excessive Filters
This is a big one. Overdoing it with filters, saturation, or sharpening can make images look unnatural or gimmicky. Buyers prefer authentic, high-quality photos. Keep edits subtle and true to the original scene.
Ignoring Image Resolution and Size
Uploading images with low resolution or incorrect dimensions can lead to rejection or poor display quality. Always check Shutterstock’s requirements—generally, images should be at least 4MP in resolution. Use high-resolution files to maintain quality after editing.
Overlooking Color Accuracy
Incorrect white balance or color grading can make images look dull or off-tone. Always verify your colors and aim for natural, vibrant hues that accurately represent the scene.
Failing to Remove Distractions or Imperfections
Leaving dust spots, sensor spots, or distracting objects in your photos can reduce their professional appeal. Take the time to carefully clean up your images before submitting.
Not Maintaining Consistency
If you’re building a portfolio or a series of images, inconsistency in style, tone, or editing can confuse buyers. Develop a consistent editing approach so your images look cohesive.
Ignoring Shutterstock Guidelines
Every platform has its rules. Make sure you understand Shutterstock’s content policies and technical requirements. Violating these can lead to rejection, even if your images are high quality.
Skipping the Final Review
Before uploading, always review your images at full size. Check for any unnoticed issues, such as artifacts, unnatural skin tones, or cropping problems. A thorough review helps catch mistakes that might hurt your sales.
By being mindful of these common pitfalls, you’ll increase your chances of creating standout images that sell well. Remember, good editing isn’t about making your photos look fake—it’s about enhancing their natural beauty and professionalism to attract more buyers!
Optimizing Edited Images for Better Visibility and Sales
Once you’ve put in the effort to edit your images and make them stand out, the next crucial step is optimizing them for maximum visibility and sales. Think of it like dressing up for an important event — you want to look your best so that more people notice you. Similarly, optimized images are more likely to catch the eye of buyers browsing Shutterstock.
First, pay attention to the image titles and descriptions. Use clear, descriptive, and keyword-rich text that accurately reflects the content of your image. For example, instead of a generic title like “Beautiful Scene,” try “Sunset over Mountain Lake with Reflection.” This helps Shutterstock’s search algorithm understand what your image is about and makes it easier for potential buyers to find.
Next, leverage relevant tags. Tags are like keywords that categorize your image. Be specific and include various related terms. For instance, if your image features a “business meeting,” add tags like “corporate,” “teamwork,” “office,” and “professional.” The more relevant tags you add, the higher the chances of your image appearing in searches.
Another tip is to ensure your images are of high quality and correctly formatted. Shutterstock prefers images with high resolution (at least 4 MP) and proper color profiles (sRGB). Avoid over-editing or adding filters that could distort the image’s natural look, as this can deter buyers looking for authentic visuals.
Additionally, consider creating multiple versions or variations of your edited images. Different crops, color adjustments, or minor edits can appeal to different buyers’ needs. Uploading a diverse set of versions increases the likelihood of your images being selected for various projects.
Finally, keep an eye on trending topics and seasonal themes. Updating your portfolio with images related to current events, holidays, or popular culture can boost visibility. Use Shutterstock’s trending keywords and explore what types of images are in demand to tailor your edits accordingly.
In summary, optimize by crafting compelling titles and descriptions, utilizing relevant tags, maintaining high-quality standards, and staying aligned with market trends. These small but significant steps can dramatically increase your images’ visibility and, ultimately, your sales.
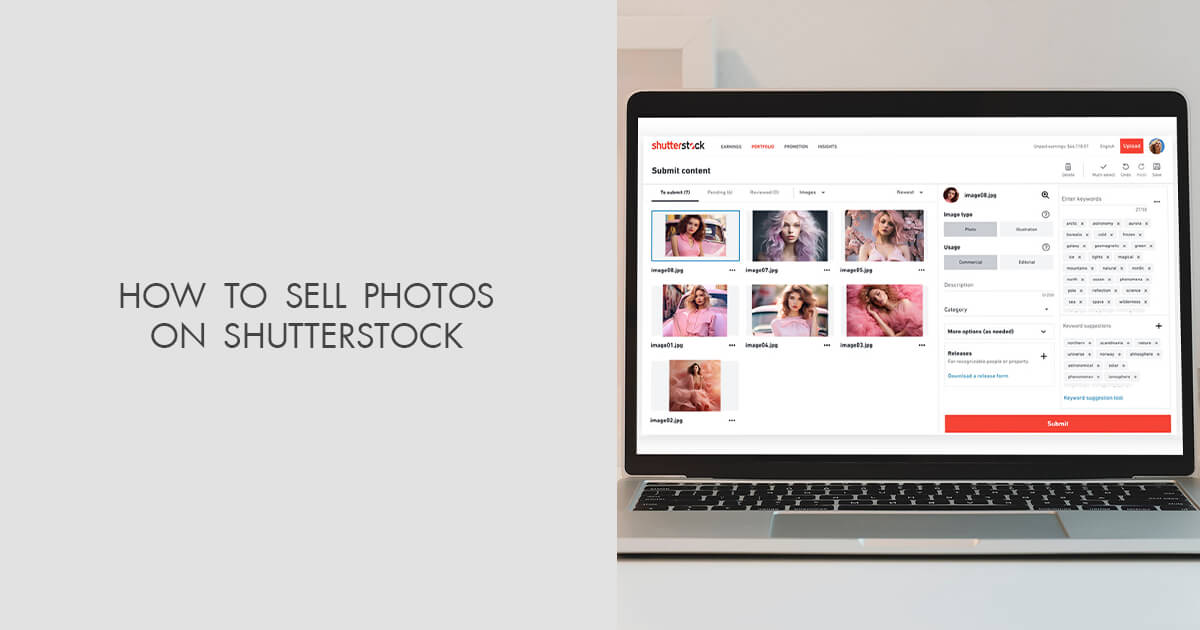
Uploading and Managing Your Edited Images on Shutterstock
Now that your images are polished and optimized, it’s time to upload and manage them effectively on Shutterstock. Think of this as setting up your virtual gallery — you want everything organized and appealing to attract buyers.
Start by logging into your Shutterstock Contributor account. From the dashboard, click on the “Upload” button. You’ll be prompted to select your images from your device. Before uploading, double-check that each image adheres to Shutterstock’s technical requirements: high resolution, sRGB color profile, and no watermarks or logos.
Once uploaded, you’ll need to add the metadata — that is, titles, descriptions, tags, and categories. As mentioned earlier, spend some time crafting descriptive and keyword-rich metadata. This is your primary way to help buyers find your images. Be honest and precise — don’t overuse keywords, as this can be flagged as spam.
After submitting your images for review, Shutterstock’s review team will assess them for quality, relevance, and compliance. This process usually takes a few days. During this period, you can monitor the status of your uploads in your contributor dashboard.
Managing your images post-upload is just as important. Regularly review your portfolio to identify which images are performing well and which aren’t. Shutterstock provides analytics tools showing views, downloads, and sales. Use this data to inform your future editing and uploading strategies.
Organizing your images into folders or collections can save you time and make it easier to update or replace images later. For example, create separate folders for seasonal images, specific themes, or projects. This organization helps you quickly locate and manage your portfolio.
Keep your portfolio fresh by consistently uploading new images and updating existing ones when needed. If an image isn’t performing well, consider re-editing or replacing it with a new version, optimizing its metadata for better visibility.
Finally, stay informed about Shutterstock’s platform updates, new features, and best practices by checking their contributor resources regularly. Active management and strategic uploads can help you maximize your sales potential and keep your portfolio thriving.
Conclusion and Best Practices for Maximizing Shutterstock Sales
Successfully editing images on Shutterstock can significantly boost your sales and visibility. To maximize your results, it’s essential to follow a set of best practices that align with platform standards and market demands. First, always ensure your images are high quality, well-composed, and properly optimized for the intended use. Use editing tools to enhance clarity, color accuracy, and overall aesthetics, but avoid over-editing that can mislead buyers. Consistency is key; maintain a recognizable style or theme across your portfolio to attract repeat customers.
Next, pay attention to keywording and metadata. Properly tagging your images with relevant, specific keywords improves discoverability. Regularly review trending topics and popular search terms on Shutterstock to align your content accordingly. Additionally, consider the following best practices:
- Follow Shutterstock guidelines for image quality, content, and technical specifications.
- Update your portfolio frequently with fresh, relevant content to stay competitive.
- Analyze your sales data to identify what types of images perform best and focus your editing efforts there.
- Engage with the community by participating in forums or feedback channels to stay informed about platform updates and trends.
By consistently applying these best practices, you can enhance your image quality, improve discoverability, and ultimately increase your Shutterstock sales. Remember, patience and ongoing learning are vital components of a successful contributor journey on the platform.