Curl error: HTTP/2 stream 1 was not closed cleanly: INTERNAL_ERROR (err 2)
Getting started with Elementor is a breeze! The first step to revamping your website is to install the Elementor plugin on your WordPress site. Let’s break it down into simple steps:
- Log In to Your WordPress Dashboard: Start by logging into your WordPress admin area. This is usually your website’s URL followed by “/wp-admin”.
- Navigate to Plugins: Once you’re in, look for the menu on the left-hand side. Click on Plugins.
- Add New Plugin: Next, you’ll see an option that says Add New. Click on that to open the plugin search area.
- Search for Elementor: In the search bar, type “Elementor”. The search results will quickly bring up the Elementor Page Builder.
- Install Elementor: You’ll see a button next to the Elementor plugin that says Install Now. Click that button. WordPress will take care of downloading the plugin for you.
- Activate the Plugin: After installation, the button will change to Activate. Click it to activate Elementor on your site.
- Check Your Installation: Once activated, you can find Elementor in the left sidebar of your dashboard, under the heading Elementor. That means it’s ready to go!
And there you have it! You’ve successfully installed Elementor. Now you’re ready to start creating stunning pages and layouts for your website.
Understanding the Elementor Interface

Now that you have Elementor installed, let’s dive into the interface itself! Understanding how to navigate through Elementor is crucial for creating beautiful pages without any coding experience.
The Elementor interface is designed to be user-friendly, making it easy for anyone to use. Here’s a breakdown of what you’ll find:
The Elementor Dashboard:
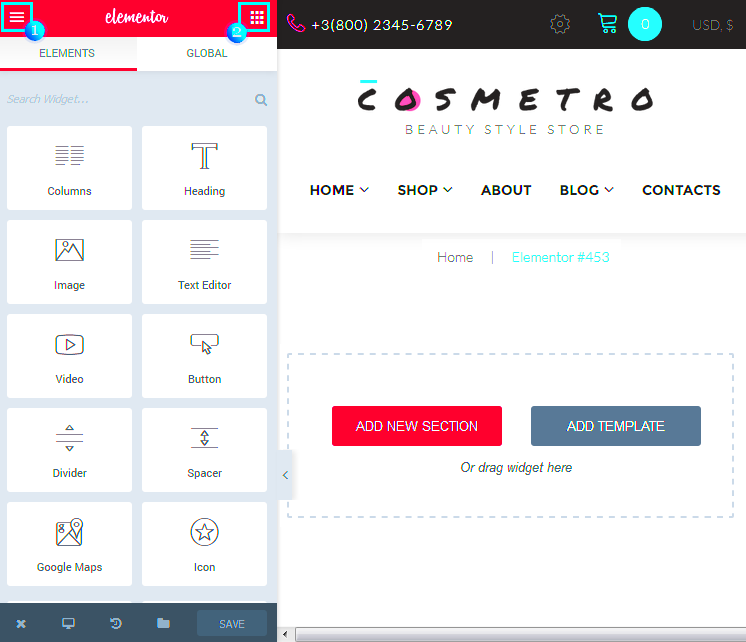
Once you open a page or post with Elementor, you’ll be greeted by a clean interface that consists of two main areas:
- Content Area: This is the central part of your screen where you’ll see your website’s content, including text, images, and other elements as you build them.
- Panel Sidebar: Located on the left side, this panel contains all the widgets and settings you’ll use to design your page.
Widgets:
The left panel features a variety of widgets you can drag and drop into your content area. Here are a few popular options:
- Heading: Add titles and subtitles.
- Text Editor: This is where you can edit your web page text.
- Image: Upload and insert images.
- Button: Create links that users can click.
- Video: Embed videos from platforms like YouTube.
Editing Tools:
Each widget comes with its own set of editing tools, which can be found in the left panel once you select a widget. You can:
- Adjust Content: Modify text, images, and other elements.
- Style Settings: Change colors, fonts, sizes, and spacing.
- Advanced Options: Set margins, paddings, animations, and additional custom CSS.
Once you’re happy with your design, don’t forget to click the Publish button at the bottom to make your changes live! With this interface, you’ll be creating stunning pages in no time. Happy designing!
Creating Your First Page with Elementor

So, you’re ready to dive into the exciting world of web design using Elementor! If you’re new to this plugin, creating your first page can feel a bit daunting, but don’t worry, I’ve got you covered. Let’s break it down step by step.
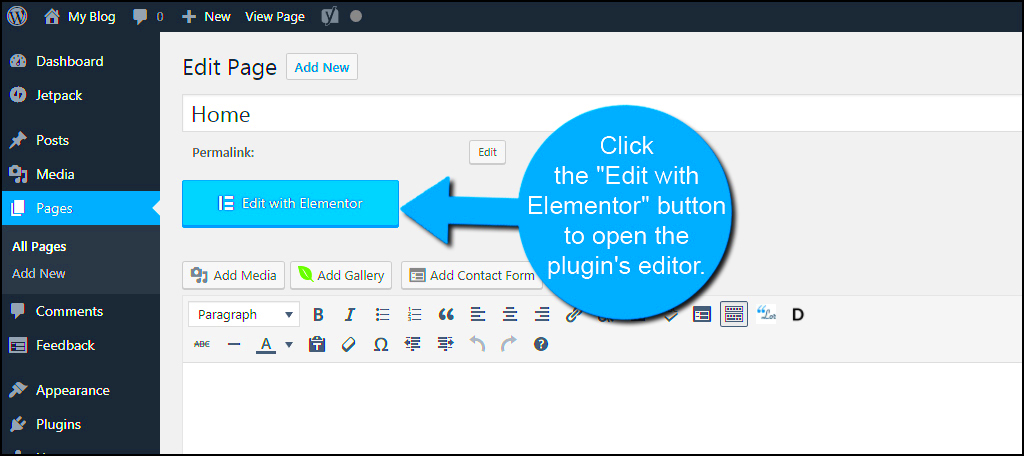
First things first, to start a new page with Elementor, navigate to your WordPress dashboard. Click on “Pages” and then “Add New.” Give your page a catchy title that reflects its purpose. Once you’re done, look for the “Edit with Elementor” button and click on it. Just like that, you’re transitioned to the Elementor editing interface, where the magic happens!
Now, the layout should feel a bit empty, but that’s the beauty of it! You essentially get to design your page from scratch. Think about how you want your page to look. Do you want a full-width layout, or maybe a compact one with a sidebar? You can switch between these options easily through the settings. Some key things you might want to consider include:
- Header: A clear and catchy headline grabs attention.
- Content: Think about text, images, or videos that will engage your visitors.
- Call to Action: Encourage users to take action, like signing up or making a purchase.
Once you’ve settled on a layout, it’s all about dragging and dropping elements into place. Don’t hesitate to play around and experiment—Elementor makes it fairly user-friendly! After you’re satisfied with your design, hit “Publish,” and voilà! You’ve just created your first page with Elementor. Give yourself a pat on the back!
Using Elementor Widgets and Elements
Alright, now that you’ve got a shiny new page created, let’s talk about the fun part: using Elementor Widgets and Elements! Elementor is packed with a multitude of widgets that allow you to add everything from text to image galleries and forms. It’s like having a limitless toolbox all at your fingertips!
When you’re in the Elementor editor, you’ll notice a panel on the left side that’s brimming with options. Here’s a quick rundown of some popular widgets you might want to use:
- Heading: Create eye-catching titles.
- Text Editor: Perfect for adding detailed descriptions or articles.
- Image: Place images to complement your content.
- Button: Ideal for creating clickable calls to action.
- Video: Embed videos to engage your audience more deeply.
To add a widget, all you need to do is drag it from the left panel into your desired position on the page. Each widget comes with its own set of customization options. When you click on a widget, you’ll see tabs for Content, Style, and Advanced. This allows you to adjust various aspects, such as:
| Tab | What You Can Do |
|---|---|
| Content | Manage text, images, and links. |
| Style | Adjust typography, colors, margins, and paddings. |
| Advanced | Set positioning, responsive options, and custom CSS. |
Don’t shy away from experimenting with different combinations and styles! The beauty of using Elementor is that you can preview changes in real-time, making it super easy to tweak things here and there until they’re just right. So, whether you’re aiming for something bold and colorful or sleek and minimalistic, Elementor’s widgets have got you covered!
Customizing Your Layout with Sections and Columns
When it comes to building an attractive and functional website with Elementor, one of the most powerful features at your disposal is the ability to customize your layout using sections and columns. This flexibility allows you to create a unique, visually appealing design that meets your specific needs.
First, let’s break down what sections and columns are:
- Sections: They are the largest building blocks in Elementor. A section acts as a full-width container, allowing you to house various elements like columns, images, and text.
- Columns: Within each section, you can have multiple columns. Columns help to organize your content horizontally. Think of them as smaller containers within the section.
To customize your layout:
- Adding a Section: Click the “+” button to add a new section. You can choose from various layouts such as one-column, two-columns, or even more complex configurations.
- Inserting Columns: Within a section, you can easily add or adjust the number of columns. Just drag the column handle to split or merge them as needed.
- Adjusting Sizing: Click on a section or column and use the settings menu to tweak the width, height, and padding. This level of customization helps you achieve the exact look you want.
- Using Backgrounds: Make your sections pop! Consider adding background colors, images, or videos to enhance visual appeal.
The best part is that this entire process is intuitive and visual. You can see changes in real-time as you design, making it a breeze to create a layout that captures your brand’s personality!
Responsive Design with Elementor
In an age where people browse websites from various devices—be it a desktop, tablet, or smartphone—ensuring your site looks great across all screen sizes is crucial. That’s where Elementor’s responsive design features come into play.
So, what exactly is responsive design? It’s the practice of ensuring your website adapts seamlessly to different screen sizes and orientations. Here’s how Elementor makes this easy for you:
- Responsive Editing: Elementor allows you to edit specifically for desktop, tablet, and mobile views. Just switch between the views and adjust your design accordingly.
- Custom Breakpoints: Elementor comes with built-in breakpoints, letting you decide how your layout breaks down on smaller screens. This ensures everything remains user-friendly.
Here are some practical steps to achieve a responsive design with Elementor:
- Set Visibility Options: You can choose to show or hide sections and widgets based on the device type. For example, you might want to hide a large banner on mobile but keep it for desktops.
- Adjust Font Sizes: What looks good on a laptop might be too small on a smartphone. Elementor lets you customize font sizes for different devices, ensuring legibility everywhere.
- Column Order: On mobile devices, you often want a different column arrangement. Elementor allows you to change the order of columns for mobile viewing.
With these tools, creating a responsive website is not only doable but also enjoyable! Just remember to preview your work across different devices before hitting publish to ensure your audience has a fantastic experience, no matter how they choose to browse.
9. Advanced Features: Templates and Theme Builder
When it comes to creating a website with Elementor, mastering the advanced features like Templates and the Theme Builder can truly elevate your design game. These features allow you to maintain a consistent look and feel across your site while streamlining your workflow.
Templates serve as a great starting point. Elementor comes with a rich library of pre-designed templates that you can customize to fit your brand’s aesthetics. Whether you need a template for a landing page, blog, or promotional content, you’ll find plenty of options that can save you time. Here’s how to use them:
- Go to the Elementor editor and click the “Folder” icon to open the template library.
- Browse through the available templates, and select one that resonates with your vision.
- Click “Insert” to add the template to your page, and then customize it as needed to make it your own.
The Theme Builder is another powerhouse tool that lets you create and customize the essential parts of your website, such as headers, footers, single post templates, and archive pages. Instead of individually designing each page, you can set global styles and structures for these components. Here’s a quick overview of how to use the Theme Builder:
- Go to your WordPress dashboard and navigate to Templates > Theme Builder.
- Select the component you want to design, such as Header or Footer.
- Click “Add New,” choose a pre-designed template, or start from scratch.
- Customize using Elementor’s intuitive interface, then click “Publish” once you’re satisfied.
With Templates and Theme Builder, your website’s design potential is limitless. So dive in and get creative!
10. Publishing and Updating Your Changes
After you’ve spent time crafting the perfect design with Elementor, the last crucial step is to publish and update your changes. But don’t worry; it’s a straightforward process! Here’s how to go about it:
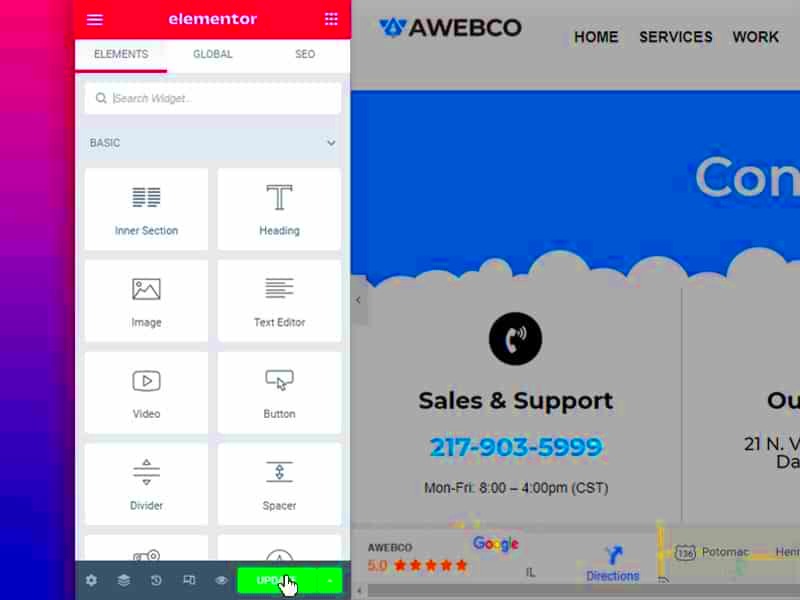
Once you’re happy with your edits, look for the “Publish” or “Update” button in the bottom panel of the Elementor editor. It’s as simple as clicking that button! However, there are a few more tips to ensure everything goes smoothly:
- Preview Your Changes: Before hitting publish, use the “Preview” option. This gives you a live look at how your page will appear to visitors.
- Check for Responsiveness: Make sure to check how your design looks on mobile and tablet views. Elementor offers responsive editing options, allowing you to make adjustments for different devices seamlessly.
- Clear Cache: If you’re using a caching plugin or a WordPress host with caching enabled, remember to clear your cache after publishing. This ensures that your visitors see the most up-to-date version of your page.
Moreover, when updating existing content, you can revert to previous versions if things go awry. Elementor automatically saves your revisions, letting you roll back easily.
In summary, publishing with Elementor is quick and user-friendly, but don’t skip over the checks and tweaks that can make a world of difference. Go ahead, publish that stunning website, and watch your audience engage!
Troubleshooting Common Issues
Editing a website with Elementor can unlock a world of possibilities for your online presence, but it’s not without its hiccups. Sometimes, you may run into issues that impede your progress. Here’s a guide to troubleshoot the most common problems you might encounter while using Elementor.
- Elementor Not Loading: This can be frustrating! Often, this is due to a plugin conflict or a memory limit issue. Consider these fixes:
- Deactivate other plugins and see if Elementor loads smoothly.
- Increase your PHP memory limit in the wp-config.php file.
- Widgets Not Displaying: If your widgets are missing or not showing correctly:
- Clear your browser cache.
- Ensure that you’re using compatible themes and that Elementor is updated.
- Preview Issues: Sometimes the changes you make in Elementor might not reflect on the live site. Try the following:
- Make sure you are saving your changes correctly.
- Check if your caching plugin is active; clear the cache.
- Responsive Design Problems: If your site looks great on desktop but not on mobile:
- Utilize Elementor’s responsive preview mode to adjust your designs accordingly.
- Double-check your padding and margin settings, as they can differ across devices.
If troubleshooting these common issues doesn’t resolve your problem, consider reaching out to the Elementor support community for more specific guidance. Remember, every technical hurdle is just an opportunity to learn more about your website!
Conclusion and Next Steps
Congratulations! You’ve now walked through the essentials of editing a website using Elementor, and you’re equipped with the knowledge to tackle common issues. It’s natural to feel a sense of accomplishment. But what’s next? Here are a few steps you might want to consider:
- Explore Advanced Features: Dive into some of the more advanced options Elementor offers. Features like pop-ups, forms, and custom CSS can enhance your website further.
- Optimize for SEO: Use SEO tools to make sure your website is not just beautiful, but also optimized for search engines. A good-looking website deserves to be found!
- Create Regular Backups: As you make changes, remember to back up your website regularly. This can save a lot of headaches later on.
- Join the Community: Engage with the Elementor community forums or related social media groups. Sharing experiences and learning from other users is invaluable.
So, take a deep breath and get back to editing your website with confidence. With the fundamental skills you’ve acquired, along with a few tricks up your sleeve, you’ll be well on your way to creating a stunning web presence. Happy editing!


