Have you ever wondered how to keep your WordPress site under wraps, away from prying eyes? Disabling Google indexing is a great way to ensure your content isn’t publicly searchable. Whether you’re working on a personal project or simply want to control your site’s visibility, this guide will help you through the process in a straightforward manner. Let’s dive into what Google indexing is about and how it can impact your website!
Understanding Google Indexing
Before we jump into the nitty-gritty of disabling indexing, it’s essential to understand what Google indexing really is. Simply put, Google indexing is the process whereby Google crawls your website, collects data, and adds it to its search database. This allows your content to appear in search results when users look for relevant information. Here are some key points to consider:
- Crawling: This is the process by which Google discovers new and updated pages on your website.
- Indexing: After crawling your page, Google stores it in its database so that it can be displayed in search results.
- Search Results: If your site is indexed, it can show up when someone searches for related keywords on Google.
Now, while indexing can be beneficial for increased visibility, there are valid reasons to keep your site private:
- Privacy: You may want to work on your site before going live.
- Exclusivity: Some sites, like membership or internal business sites, are meant for limited audiences only.
- Test Environments: If you’re experimenting with new features, indexing could complicate things.
Understanding these fundamentals will help you decide if disabling indexing is the right choice for your WordPress site. Ready to take control? Let’s get into the steps you need to follow!
Why Disable Google Indexing?
Google indexing can feel like a double-edged sword. On one hand, you want your content to be discoverable by users searching for information related to your niche; on the other hand, there are valid reasons why you might want to keep certain pages off Google’s radar. Here are some reasons why you might consider disabling indexing for your WordPress site:
- Privacy Concerns: If your website contains sensitive information, client data, or unpublished work, it’s crucial to restrict Google from indexing these pages. You wouldn’t want your private content to end up in search results.
- Site Development: If your website is still a work in progress, temporarily disabling indexing is a good idea. You don’t want search engines to crawl unfinished or poorly optimized pages that may give a bad impression of your website.
- Duplicate Content: Sometimes, you might create multiple versions of similar content for specific campaigns or experiments. Disabling indexing helps you manage duplicate content issues that could hurt your SEO ranking.
- Staging Sites: If you’re working on a staging site for testing before going live, it’s best to keep it out of Google’s index to avoid confusion or potential negative SEO impacts.
- Selective Visibility: Sometimes, you may not want certain parts of your site to be publicly accessible. Disabling indexing on specific pages ensures only your desired content gets the spotlight.
Ultimately, the decision to disable Google indexing should align with your online strategy and how visible you want your content to be.
Methods to Disable Google Indexing on WordPress
If you’ve decided that disabling Google indexing is the right move for your WordPress site, you’re probably wondering how to go about it. Fortunately, there are several straightforward methods you can employ, each suited to different scenarios:
- Using the WordPress Settings:
Navigate to your WordPress dashboard and go to Settings > Reading. Here, you’ll find an option that says Discourage search engines from indexing this site. Check this box and save your changes. This will notify search engines that they should not index your site.
- Using a SEO Plugin:
If you’re using SEO plugins like Yoast SEO or All in One SEO, you can easily disable indexing. In the plugin settings, look for an option related to Robots.txt or Search Engine Visibility and configure it to prevent indexing on specific pages or the entire site.
- Robots.txt File:
You can also edit your robots.txt file to block search engines from indexing specific sections of your site. For example, adding
User-agent: *andDisallow: /your-private-page/will prevent all search engines from crawling that specific page. - Noindex Meta Tag:
For granular control, you can add noindex meta tags directly in the HTML of pages you wish to exclude from indexing. If you use WordPress page builders, they often provide simple options for adding this tag.
- Password Protection:
If security is a major concern, consider using password protection for specific pages or posts. This not only restricts access but also prevents indexing as search engines cannot reach password-protected content.
Choose the method that best fits your needs, and remember that you can always change your mind later if you want to make your content public again!
Using WordPress Settings to Disable Indexing
One of the simplest ways to prevent search engines from indexing your WordPress site is to adjust the settings directly from your WordPress dashboard. Here’s how you can do it:
1. Log in to your WordPress Admin Panel: Start by logging in to your WordPress dashboard. You can typically do this by visiting `yourwebsite.com/wp-admin`.
2. Access the Reading Settings: Once logged in, navigate to the left sidebar and click on Settings. From the dropdown, select Reading.
3. Discourage Search Engines: In the Reading Settings menu, you’ll find a section titled “Search Engine Visibility”. Here, there’s a checkbox that reads, “Discourage search engines from indexing this site.” Make sure to check this box.
4. Save Changes: Don’t forget to scroll down and click the Save Changes button. This will ensure your settings are applied.
It’s important to note that while checking this box sends a signal to search engines not to index your site, it does not guarantee that they will comply. Nevertheless, it’s a relatively straightforward and effective method to convey your intentions.
For those who are working on a new site or a private project, this setting can be a lifesaver as it keeps your site hidden from the prying eyes of search engines until you’re ready to launch it publicly.
Editing the Robots.txt File
If you want to take a more technical approach to control how search engines interact with your site, editing the `robots.txt` file is a great option. The `robots.txt` file tells search engine crawlers what they can and cannot index on your site. Follow these steps to edit this file:
1. Access Your File Manager: You can find the `robots.txt` file in the root directory of your WordPress installation. You can access this through your web hosting control panel (like cPanel) or via an FTP client.
2. Locate or Create the File: If you can’t find a `robots.txt` file, you can create a new one. Simply open a plain text editor and name the file `robots.txt`.
3. Add the Directives: To prevent all web crawlers from indexing your site, you need to add the following lines:
User-agent: *Disallow: /
This tells all search engine bots (indicated by the asterisk) not to crawl any pages on your website (indicated by the forward slash).
4. Save and Upload: If you’ve created a new `robots.txt` file, upload it to the root directory of your website. If you edited an existing file, just save your changes.
5. Test Your Robots.txt File: It’s a good idea to test if your `robots.txt` file is working correctly. You can use various online tools or the Google Search Console to see if search engines respect your settings.
By using the `robots.txt` file, you have precise control over what parts of your site are visible to search engines, making it an essential tool for webmasters who prioritize their privacy or are still in development.
7. Using a Plugin to Control Indexing
When it comes to managing Google indexing for your WordPress site, using a plugin can be one of the most straightforward approaches. Plugins bring a host of features to help users easily control how search engines interact with their pages, without needing extensive technical knowledge. So, if you’re not comfortable editing code directly, a plugin can be your best friend.
There are several popular plugins designed specifically to help with indexing control, such as:
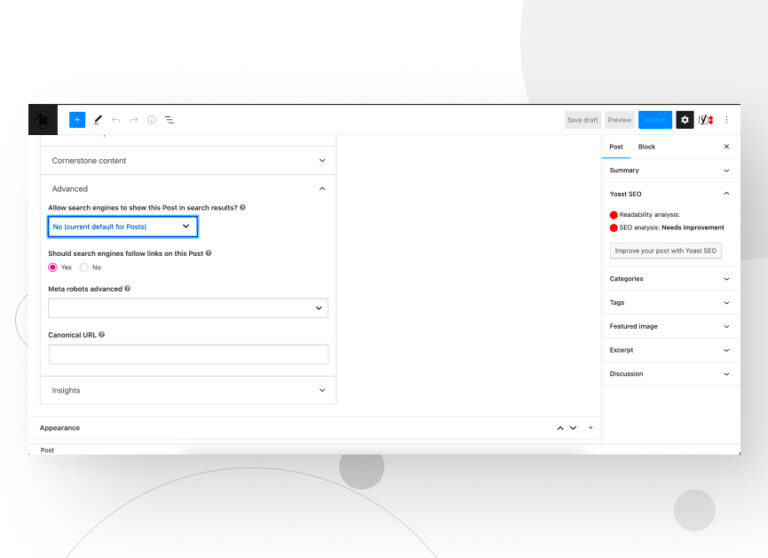
- Yoast SEO: This mighty tool not only helps you optimize your content but also gives you the option to set visibility preferences for specific pages or posts. With Yoast, you can easily toggle the “Allow search engines to show this Post in search results?” setting.
- All in One SEO Pack: This plugin offers similar indexing controls. It allows you to disable indexing on specific pages and includes options for advanced settings if you wish to get more technical.
- Robots.txt Editor: While not as comprehensive as general SEO plugins, it focuses solely on robots.txt management, allowing you to make precise adjustments to control what gets indexed.
Once you choose and install a plugin, you’ll typically navigate to the settings section, where you can easily configure your indexing preferences. Remember to always double-check your settings and confirm that they align with your site’s goals. Disabling indexing on important pages can lead to reduced visibility, so it’s essential to only restrict what’s necessary.
In summary, plugins offer a user-friendly and efficient means of controlling Google indexing for your WordPress site, giving you the power to manage your visibility with ease!
8. Checking Your Changes
After you’ve made changes to disable Google indexing on your WordPress site, the next critical step is checking to ensure those changes have taken effect. You wouldn’t want to invest time into making adjustments only to find out they didn’t work. Here’s how to verify your configurations!
There are several methods you can use to check the status of your site’s indexing:
- Google Search Console: This tool allows you to see how Google views your site. You can check the “Coverage” report to see if the pages you intended to block from indexing are listed as “Excluded” or “Crawled.” If they are still included, double-check your plugin settings.
- Robots.txt File: You can verify if your robots.txt file is correctly set up by typing
yourdomain.com/robots.txtinto your browser. Make sure the rules you set align with your intentions. A correct entry likeUser-agent: * Disallow: /will prevent indexing for all content. - Site: Search Command: By using the search command
site:yourdomain.comin Google, you can quickly see which of your web pages are indexed. Any pages you expect to be excluded should ideally not appear in this list.
Lastly, keep in mind that changes might not reflect immediately. Google takes time to crawl and index pages. However, monitoring these aspects can provide you with the assurance that you’re on the right track to manage your site’s visibility effectively!
Conclusion
Disabling Google indexing for your WordPress site is crucial for maintaining privacy or controlling content visibility while your site is under development. By following the steps outlined in this guide, you can effectively prevent search engines from indexing your website and ensure that only authorized users can access your content.
To summarize, here are the key methods discussed:
- Use the WordPress Settings: Navigate to Settings > Reading and check the box that says “Discourage search engines from indexing this site.”
- Implement a Robots.txt File: Add a
User-agent: *andDisallow: /directive to restrict all search engines. - Utilize a Plugin: Install an SEO plugin like Yoast SEO to manage indexing settings effortlessly.
- Set Up HTTP Authentication: Add basic authentication to restrict access to your website.
Always remember to revisit your settings once your website is ready to go live to ensure it is indexed properly. Keeping your site hidden can be beneficial for development, staging, or private sites but needs careful monitoring as you transition to a public view.

