So, you’ve decided that WooCommerce isn’t the right fit for your WordPress site anymore? No worries! Deleting WooCommerce can seem daunting at first, but with the right guidance, it can be a smooth and safe process. In this blog post, we’ll guide you step-by-step through the intricacies of removing WooCommerce from your WordPress site without losing your valuable data or causing any unexpected issues. Ready? Let’s dive in!
Understanding the Implications of Deleting WooCommerce

Before you hit that delete button, it’s essential to understand what deleting WooCommerce entails. This isn’t just a simple ‘uninstall’ – it can have ripple effects on your website’s functionality and stored data. Here are some key implications to consider:
- Loss of E-commerce Functionality: Naturally, the most immediate impact is that your site will no longer support e-commerce operations. This means customers won’t be able to make purchases, access cart functionalities, or checkout.
- Data Loss: When WooCommerce is deleted, all associated data such as products, order history, and customer information may be permanently lost unless you back it up first. This is super important if you plan on using this data in the future.
- Impact on Theme and Plugin Compatibility: Some themes and plugins are designed specifically for WooCommerce. Deleting it could cause these to malfunction, leading to broken layouts or unexpected behaviors on your site.
- SEO Considerations: If your site was previously generating traffic through e-commerce, you might notice a drop in search engine rankings as your site content changes. Be mindful of retaining the necessary SEO elements.
- Migration to an Alternative Platform: If you’re seeking to switch to another e-commerce platform, ensure you have a migration plan in place to transfer your data smoothly.
Ultimately, understanding these implications can help you make an informed decision and prepare adequately for the next steps in deleting WooCommerce safely from your WordPress site.
Backing Up Your WordPress Site

Before diving into the process of deleting WooCommerce from your WordPress site, the very first step you should take is creating a backup. Trust me, there’s nothing worse than losing valuable data because of an unexpected hiccup during the deletion process. So let’s break down how to back up your site effectively.
Backing up your WordPress site can be done in several ways. You can choose from plugins, manual backup methods, or use your hosting provider’s backup services. Here’s some useful information on each method:
- Using a Plugin: There are various WordPress backup plugins available, such as UpdraftPlus, BackupBuddy, and Duplicator. These plugins simplify the backup process by allowing you to create and restore backups with just a few clicks.
- Manual Backup: If you’re comfortable diving into your site’s files, you can manually back up your WordPress files and database. You can do this via FTP by downloading all your files and using phpMyAdmin to export your database. This method requires a little tech knowledge, so be cautious!
- Hosting Provider Backup: Many hosting services offer backup solutions as part of their packages. Check if this feature is available with your host, as it can save time and effort.
After backing up, verify that your backup was successful. You’ll want to ensure all essential files, plugins, and the database are included. Being able to restore your site in case things go awry is priceless. In short, a good backup gives you peace of mind as you proceed.
Steps to Deactivate WooCommerce
Once your backup is secured, you’re ready to take the next step: deactivating WooCommerce. It’s a straightforward process, but there are a few important points to consider. Here’s a friendly guide to walk you through it:
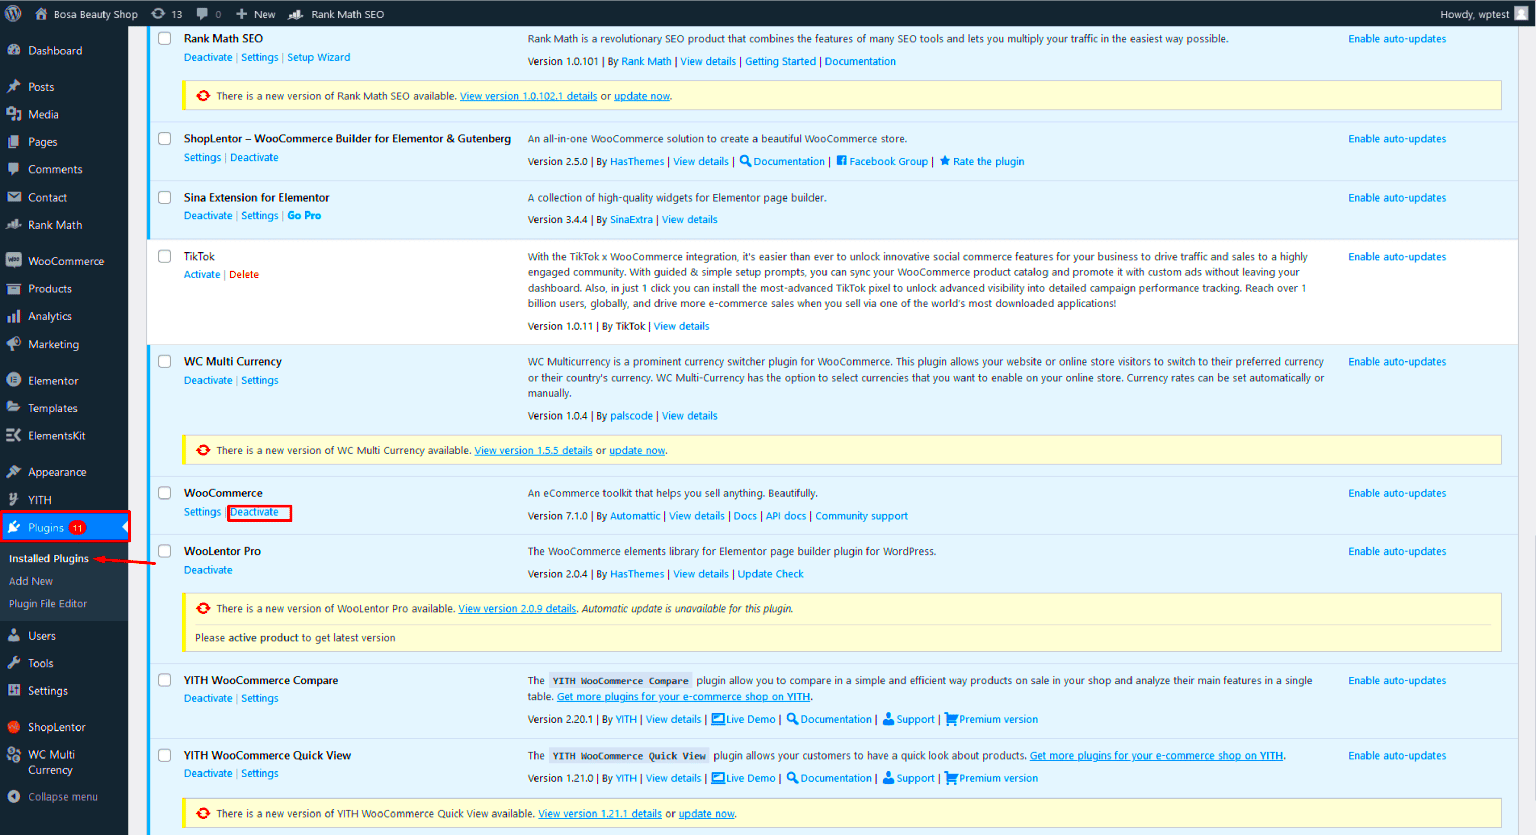
- Log into Your WordPress Dashboard: Start by logging into your WordPress admin area. This is usually done by going to yourwebsite.com/wp-admin.
- Navigate to Plugins: On the left sidebar, click on “Plugins” to display all the plugins currently installed on your site.
- Find WooCommerce: Scroll through the list or use the search feature to find the WooCommerce plugin. It will likely be at or near the top of the list.
- Deactivate the Plugin: Hover over the WooCommerce plugin name, and you will see an option to “Deactivate.” Click that, and WooCommerce will be disabled on your site.
Note: Deactivating WooCommerce removes its functionalities temporarily, but your data will remain intact. If you decide to reactivate it later, all your settings, products, and customer data will still be there.
Congratulations! You’ve successfully deactivated WooCommerce. If you’re sure you want to completely delete it, you’re just one step away. But make sure to proceed with caution—having a backup means you’re always covered.
5. Removing WooCommerce Plugin Files
Now that you’ve made a thoughtful decision to remove WooCommerce from your WordPress site, it’s time to tackle the plugin files. This step is crucial to ensure that no remnants of WooCommerce linger around, which could cause issues down the road.
First, let’s make sure you have a backup of your site. It’s like wearing a seatbelt while driving; better safe than sorry! After the backup, follow these steps to remove the WooCommerce plugin files:
- Log in to your WordPress Admin Dashboard: Enter your credentials and access your site.
- Navigate to Plugins: On the left sidebar, click on “Plugins” and then “Installed Plugins.”
- Locate WooCommerce: Scroll down until you find the WooCommerce plugin.
- Deactivate and Delete: Click on “Deactivate” first, then “Delete.” Confirm the prompt to remove the plugin.
But wait, we’re not done just yet! You might want to check your file manager:
- If you’re using a hosting provider, access your site’s file manager or FTP.
- Head to the /wp-content/plugins/ directory.
- Look for any leftover woocommerce folder and delete it.
Cleaning out the files ensures that there’s nothing left that could potentially conflict with other plugins or themes in the future. You’ve now successfully removed WooCommerce plugin files from your WordPress site and are on a clear path to decluttering your digital space!
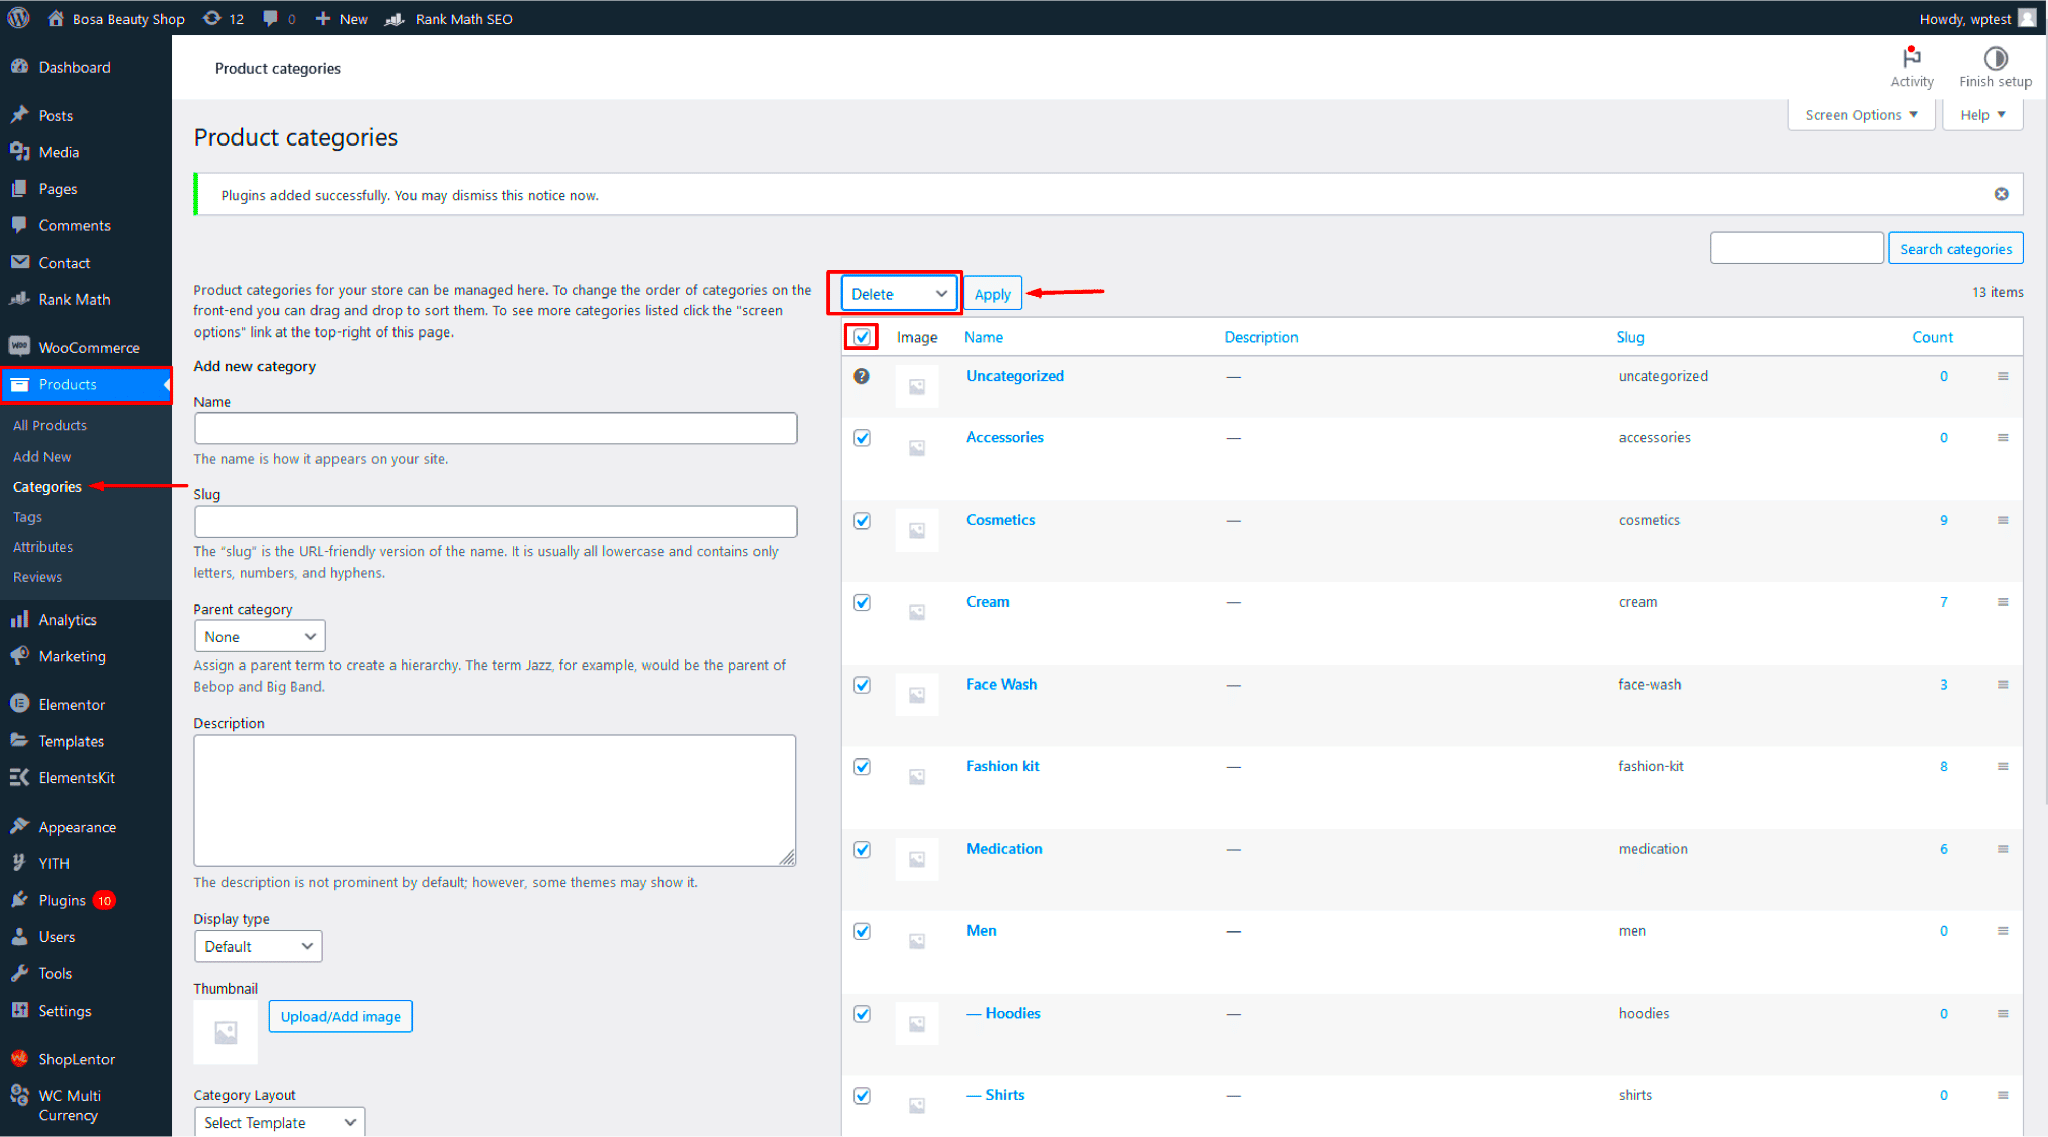
6. Cleaning Up Database Entries
Alright, so you’ve deleted the WooCommerce plugin files. Great job! But to truly wrap things up, it’s time to clean up your database. When you uninstall a plugin like WooCommerce, it doesn’t always erase all the data it added to your database. Think of it like cleaning out a closet; you wouldn’t want to leave behind any extra junk!
Here’s how to effectively clean up the database entries related to WooCommerce:
- Access Your Database via phpMyAdmin: Most hosting providers have phpMyAdmin in their control panel. Log in and select your WordPress database.
- Backup Your Database: Before making any changes, back up your database. This way, if something goes wrong, you can easily restore it.
- Identify WooCommerce Tables: Look for tables prefixed with wc_ and wp_woocommerce_. Common tables include:
- Drop the Tables: After you’ve identified the relevant tables, you can drop them. Use the SQL command:
- Delete WooCommerce-related Options: Look for options that start with woocommerce_ in the options table. You can delete these options to remove leftover settings.
| Table Name | Description |
|---|---|
| wp_wc_product_meta_lookup | Stores product metadata for lookup. |
| wp_woocommerce_order_items | Contains order-related information. |
| wp_wc_order_product_lookup | Links orders with products sold. |
DROP TABLE wp_wc_product_meta_lookup, wp_woocommerce_order_items, wp_wc_order_product_lookup;
By following these steps, you’re not just uninstalling; you’re giving your website a fresh start. Cleanup can significantly improve your site’s performance—who doesn’t love that?
7. Removing WooCommerce-related Themes and Customizations
When you’ve successfully uninstalled WooCommerce, it’s essential to take a look at the themes and customizations that might still be lingering around. Many themes are designed specifically with WooCommerce in mind, adding elements that won’t be necessary once WooCommerce is gone. Here’s how to identify and remove them:
- Identify WooCommerce Themes: Check the themes you have installed on your WordPress site. Many themes have specific compatibility with WooCommerce, which means they include templates and styles optimized for online selling.
- Switch to a Default Theme: Consider switching to a default WordPress theme, such as Twenty Twenty-One. This can help you identify whether any issues arise from your previous WooCommerce-specific theme.
- Remove Unused Themes: If you find that you don’t need a particular WooCommerce theme anymore, simply navigate to Appearance > Themes, find the theme, and click Delete.
Also, pay attention to customizations that may have been added to your site for WooCommerce functionalities, like specific stylesheets or JavaScript files. Here’s how to clean those up:
- Check for Custom Code: If you’ve added any custom code for WooCommerce functionality, such as snippets in your theme’s
functions.phpfile, you need to remove those. - Remove Custom Styles and Scripts: Navigate to Appearance > Customize and undo any WooCommerce-specific styles or configurations that are no longer necessary.
By carefully removing these themes and customizations, you ensure that your WordPress site runs smoothly, without any leftover clutter from your WooCommerce setup.
8. Verifying the Removal of WooCommerce
After you’ve uninstalled WooCommerce and stripped your site of its related themes and customizations, it’s crucial to verify that everything has been completely removed. Here’s how to check:
- Check Your Plugins: Go to Plugins > Installed Plugins and make sure WooCommerce is no longer listed. If it is, click Deactivate and then Delete.
- Review Your Database: Sometimes, WooCommerce-related data remains in the database. You can use a tool like phpMyAdmin to access your database and manually check for leftover tables prefixed with
wp_wc_.
If you aren’t comfortable with direct database management, you can also use plugins like WP-Optimize to clean the database safely.
Check Your Site Functionality
It’s also important to check the general functionalities of your site:
- Test Site Performance: Navigate through your site to ensure that it’s functioning well–look for broken links or missing elements.
- Inspect the Frontend: Ensure that the shopping cart, product pages, and checkout processes are no longer present.
Lastly, clearing any caching plugins you have will help reflect the most accurate state of your site. Refresh your browser and check everything to confirm that WooCommerce is entirely gone. This thorough verification not only gives you peace of mind but ensures that your WordPress site remains lean and efficient!
Troubleshooting Common Issues
If you’ve decided to delete WooCommerce from your WordPress site, you might run into a few hiccups along the way. Don’t worry; it’s not uncommon, and we’ve got your back with some troubleshooting tips to help smooth out the process. Here are some common issues and how to resolve them:
- Residual Data: Even after uninstalling the WooCommerce plugin, you might find that some data remains in your database. This can happen if you opted not to remove the associated data during the uninstallation process. If you notice leftover products or settings, consider using a plugin like WP-Optimize to clean up your database.
- Compatibility Problems: After removing WooCommerce, you could face compatibility issues with other plugins or themes that relied on it. If you notice any strange behavior on your site, try deactivating those plugins or switching themes temporarily to identify the culprit.
- Page Errors: Sometimes, deleting WooCommerce can lead to 404 errors, especially if you had WooCommerce pages like the Cart or Checkout. To fix this, go to Settings > Permalinks and simply click “Save Changes” to flush your rewrite rules.
- Missing Styles: If your site looks off after deleting WooCommerce, it could be due to styles associated with the plugin. Clear your cache or check for optional CSS that may be lingering on your site.
- Backup Issues: Ideally, you’d have a backup before making significant changes like removing WooCommerce. If you encounter too many issues, restoring your site to its previous state can be a good way to start over. Use a plugin like UpdraftPlus for easy restoration.
Dealing with these common issues might feel daunting, but with a bit of troubleshooting and patience, you’ll soon have a WooCommerce-free WordPress site running smoothly!
Conclusion
So there you have it! Removing WooCommerce from your WordPress site isn’t just a process of clicking “delete.” It involves careful planning and execution to ensure a smooth transition without any negative impacts on your overall site performance. Here’s a quick recap of what we discussed:
- Back Up Your Site: Always start with a backup. This can save you countless hours if things go south.
- Deactivate and Uninstall: Properly deactivate the plugin and choose whether or not to delete existing data.
- Check for Residual Issues: After deletion, keep an eye out for data left behind, compatibility issues, and page errors.
- Consult Documentation: If you encounter more complex issues, don’t hesitate to search the WordPress support forums or WooCommerce documentation.
By following these steps and tips, you’ll be well-equipped to handle the removal of WooCommerce. Ultimately, whether you’re pivoting your business model, updating your website, or simply decluttering, knowing how to safely delete WooCommerce will empower you as a WordPress user. Thanks for reading, and happy site managing!


