Plugins are like little tools or add-ons that enhance the functionality of your software. They can make your workflow smoother, add new features, or integrate with other services. Managing these plugins—installing, updating, or removing them—is an essential part of keeping your software running efficiently. If you’ve ever felt overwhelmed by all the plugins or unsure about which ones are necessary, you’re not alone. Knowing how to properly handle plugins, especially third-party ones like Shutterstock, helps ensure your software stays secure and performs at its best.
Reasons You Might Want to Remove the Shutterstock Plugin
There are several common reasons why you might decide to delete the Shutterstock plugin from your software. Maybe you’ve completed your project and no longer need access to stock images, or perhaps you’ve found a better alternative that suits your needs better. Sometimes, plugins can cause compatibility issues or slow down your system, prompting users to remove them. Additionally, if you’re concerned about security or privacy—especially if the plugin isn’t being maintained or updated regularly—it’s wise to consider removing it. Lastly, if the plugin is consuming more resources than it’s worth or if you simply want to declutter your workspace, uninstalling it is a straightforward way to streamline your setup. Whatever your reason, knowing how to safely remove the Shutterstock plugin ensures you maintain control over your software environment without disrupting your workflow.
Preparing to Uninstall the Shutterstock Plugin
Before you jump into deleting the Shutterstock plugin, it’s a good idea to take a moment to prepare. Think of it like cleaning up your workspace before a big move — a little prep work makes the whole process smoother and less stressful.
First, consider why you’re uninstalling the plugin. Are you no longer using it? Did it cause issues? Or maybe you’re switching to a different service? Knowing your reason can help you decide if you need to back up any settings or data related to the plugin before removal.
Next, check if there are any updates or downloads you want to save. Sometimes plugins store preferences or licenses that might be useful later. If you’re worried about losing important information, look for options to export settings or save license keys.
It’s also wise to close any software or applications that are currently using the Shutterstock plugin. This reduces the risk of errors or conflicts during uninstallation. Restarting your device can help ensure no processes are running in the background that could interfere.
Finally, make sure you have administrative rights or necessary permissions on your device. Without these, you might run into issues uninstalling the plugin. If you’re on a shared or work computer, check with your IT department or system admin to ensure you’re allowed to make these changes.
In summary, a quick prep — understanding your reason, backing up data, closing relevant applications, and ensuring permissions — sets you up for a hassle-free uninstallation process.
How to Delete the Shutterstock Plugin from Different Software Platforms
Uninstalling the Shutterstock plugin isn’t one-size-fits-all — it varies depending on the software platform you’re using. Here’s a quick guide to help you remove it from some of the most common platforms:
Removing the Shutterstock Plugin from Adobe Photoshop
- Open Adobe Photoshop.
- Navigate to Edit > Preferences > Plugins.
- Look for the Shutterstock plugin in the list of installed plugins.
- Select it and click Remove or Disable.
- Close Photoshop and restart your computer.
- Go to your system’s Plugins or Extensions folder (usually in your Program Files or Applications folder).
- Delete the Shutterstock plugin folder or files.
- Reopen Photoshop to ensure the plugin is gone.
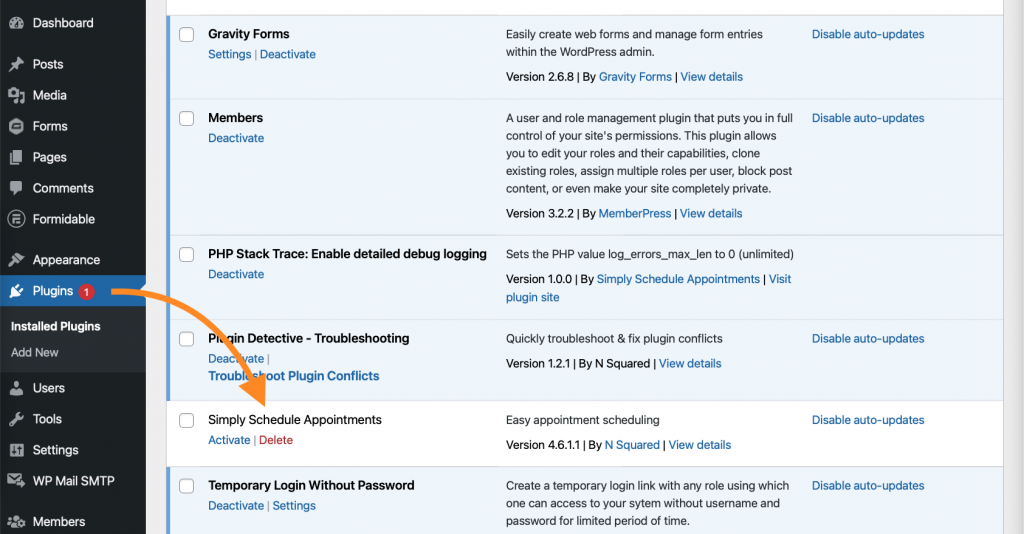
Uninstalling from WordPress
- Log in to your WordPress admin dashboard.
- Go to Plugins > Installed Plugins.
- Find the Shutterstock plugin in the list.
- Click Deactivate next to it, then click Delete.
- A confirmation prompt will appear — click Yes, delete these files.
- Clear your cache if necessary, and verify the plugin has been removed from your site.
Removing from Adobe Lightroom
- Open Lightroom.
- Navigate to File > Plug-in Manager.
- Find the Shutterstock plugin in the list.
- Select it and click Remove.
- Confirm the removal, then restart Lightroom.
- Optionally, delete plugin files from your system’s plugin directory to free up space.
General Tips for Other Platforms
- Always consult the official documentation if available — each platform might have specific steps.
- Look for uninstall options within the software’s settings or preferences.
- If the plugin installed via a third-party installer, use that installer to uninstall it.
- Remember to restart your software or device after removal to ensure changes take effect.
Deleting the Shutterstock plugin from your software might seem tricky at first, but with the right steps, it’s straightforward. Just take it one platform at a time, and don’t forget to double-check that the plugin’s gone after you finish!
Troubleshooting Common Issues During Plugin Removal
Removing a Shutterstock plugin from your software might seem straightforward, but sometimes, you’ll encounter hiccups along the way. Don’t worry—most issues are manageable with a bit of patience and some simple steps. Let’s go over some of the common problems and how to fix them.
Problem 1: Plugin Won’t Uninstall or Delete
If you find that the plugin refuses to uninstall, it could be due to permissions issues or residual files blocking the removal process. Here’s what you can do:
- Check your user permissions: Make sure you have admin rights or the necessary permissions to delete files from your software directory.
- Close the software completely: Sometimes, the plugin can’t be removed if the application is running. Fully close and restart your software before trying again.
- Delete manually: If the plugin folder remains after attempting uninstallation, locate the plugin files manually in your software’s plugin directory and delete them. Be cautious—only delete files related to the Shutterstock plugin.
Problem 2: Residual Files or Settings Persist
After uninstalling, you might notice leftover settings or files. This can cause conflicts if you try to reinstall or update later. To clean up:
- Clear cache or temporary files: Some software stores plugin data in cache folders. Clearing these can resolve conflicts.
- Reset plugin preferences: Check your software’s settings to remove any remaining Shutterstock-specific preferences or data.
- Use cleanup tools: Some applications offer built-in or third-party cleanup tools to thoroughly remove leftover plugin data.
Problem 3: Software Crashes or Errors After Removal
If your software crashes or shows errors after removing the plugin, it might be due to incomplete removal or corrupted files. Here’s how to troubleshoot:
- Restore from backup: If you have a recent backup, restore it to revert to a stable state.
- Reinstall the software: Sometimes, reinstalling the main program helps replace corrupted files and stabilize the application.
- Contact support: If problems persist, don’t hesitate to reach out to the software’s customer support for guidance.
Remember, patience is key. Most issues are fixable with a methodical approach. Always back up your settings or data before making significant changes, so you can restore your work if needed.
Final Tips for Managing Your Software Plugins Effectively
Managing plugins like the Shutterstock plugin is an ongoing process. Keeping your software clean, up-to-date, and organized can save you headaches later on. Here are some final tips to help you stay on top of your plugin management game:
1. Regularly Review Your Installed Plugins
Periodically check which plugins you have installed and assess whether they’re still useful or necessary. Removing unused plugins can improve your software’s performance and reduce security risks.
2. Keep Plugins Updated
Developers often release updates to fix bugs, improve security, or add features. Regularly check for updates for your Shutterstock plugin and other tools to ensure compatibility and stability.
3. Use a Plugin Management System or List
Maintain a simple list or spreadsheet of your plugins, their versions, and installation dates. This helps you track updates, troubleshoot issues, and decide when to remove or replace plugins.
4. Backup Before Making Major Changes
Before installing or removing plugins, back up your software settings or entire project files. This safety net ensures you can revert if something doesn’t go as planned.
5. Follow Best Practices for Security
Only install plugins from trusted sources, and keep them updated. Be cautious about removing plugins that might be deeply integrated into your workflow, and always verify the source before installation or removal.
6. Document Your Plugin Changes
Keep a record of when you install or remove plugins, especially if you’re working in a team. Clear documentation helps everyone stay informed and troubleshooting becomes much easier.
By staying proactive and organized, managing your software plugins becomes a smooth part of your workflow rather than a chore. Remember, the right plugins can boost your productivity, but keeping them under control is equally important!