Deactivating all plugins in WordPress might seem like a daunting task, but it’s actually quite straightforward. Whether you’re troubleshooting issues, making changes, or just taking a break from certain functionalities, knowing how to deactivate plugins is an essential skill for any WordPress user. In this guide, we’ll walk you through why you might want to do this and how to do it effectively. So, grab your favorite cup of coffee and let’s get started!
Understanding Plugins in WordPress
Plugins are like apps for your WordPress site. They enhance functionality and provide various features that help tailor your website to meet your specific needs. Here’s a deeper dive into what plugins are and why they matter:
- What Are Plugins?
Plugins are bits of software that add specific capabilities to your WordPress site. They range from SEO tools and contact forms to social media integrations and e-commerce solutions.
- Types of Plugins:
- Free Plugins: Offered in the WordPress Plugin Directory, these are budget-friendly options to enhance your site without spending a dime.
- Premium Plugins: These come with a cost but often offer more advanced features and dedicated support.
- Benefits of Using Plugins:
- Enhance functionality without coding knowledge.
- Save time and effort in website development.
- Customize your site to fit your brand’s needs.
- Potential Downsides:
While plugins are useful, too many can slow down your site or conflict with one another. Regular maintenance is crucial.
In summary, plugins play a vital role in the WordPress ecosystem, making it essential for users to manage them effectively. Understanding how to manage these tools can greatly improve your website’s performance!
Why You Might Need to Deactivate Plugins
Deactivating plugins in WordPress can be a necessary step for various reasons, and understanding these can really help streamline your website management. Here are some common scenarios where you might find yourself needing to deactivate plugins:
- Troubleshooting Issues: If your website is experiencing errors or slow performance, deactivating plugins can help identify which one is causing the issue. By turning them off individually, you can isolate the problem.
- Plugin Conflicts: Sometimes two or more plugins interact in unexpected ways, causing functionality issues. If you recently added a new plugin and noticed problems, it might be time to deactivate some plugins to find the culprit.
- Website Speed: Too many plugins can slow down your site. By deactivating plugins that you don’t use regularly, you can improve your site’s loading time and overall performance.
- Security Reasons: Outdated or poorly coded plugins can expose your website to security vulnerabilities. If a plugin is known for its weaknesses, it’s wise to deactivate it until you can find a better alternative or update it.
- Redundancy: If you’ve found new plugins that offer the same functionality as older ones, it makes sense to deactivate and possibly remove the outdated plugins.
Ultimately, the ability to deactivate plugins is an essential part of managing your WordPress site efficiently, ensuring that everything runs smoothly and securely.
Method 1: Deactivating Plugins via the WordPress Dashboard
One of the easiest and most common methods of deactivating plugins in WordPress is through the WordPress Dashboard. Follow these steps to deactivate your plugins:
- Log Into Your Dashboard: Start by logging into your WordPress admin area. Usually, this is found at
yourwebsite.com/wp-admin. - Navigate to the Plugins Section: Once logged in, look for the Plugins option in the left sidebar. Click on it to view all the installed plugins.
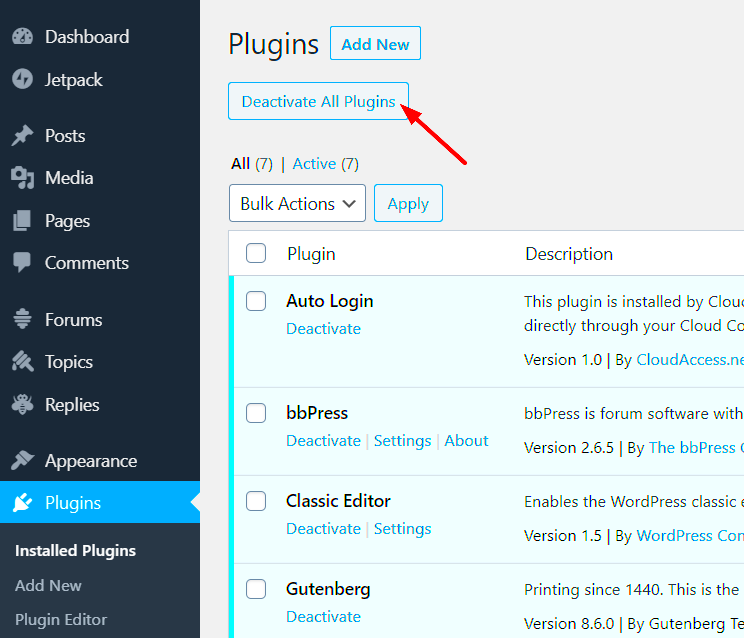
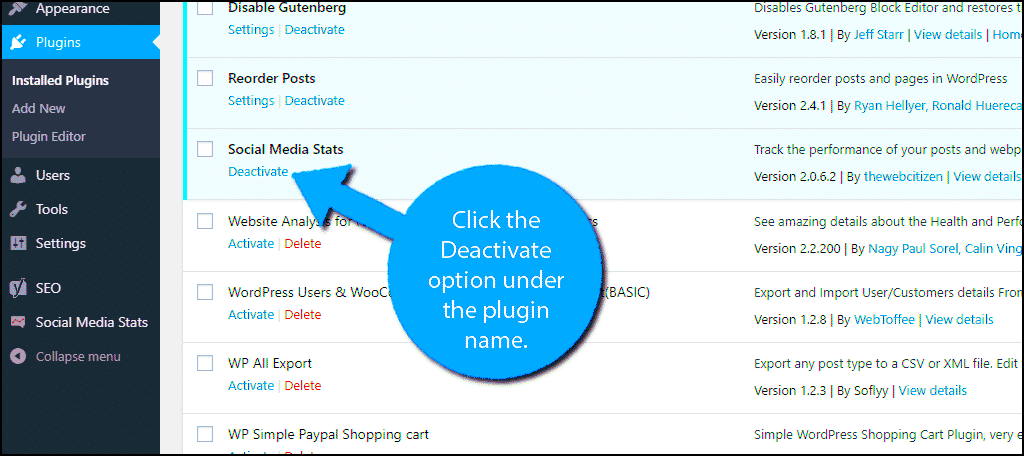
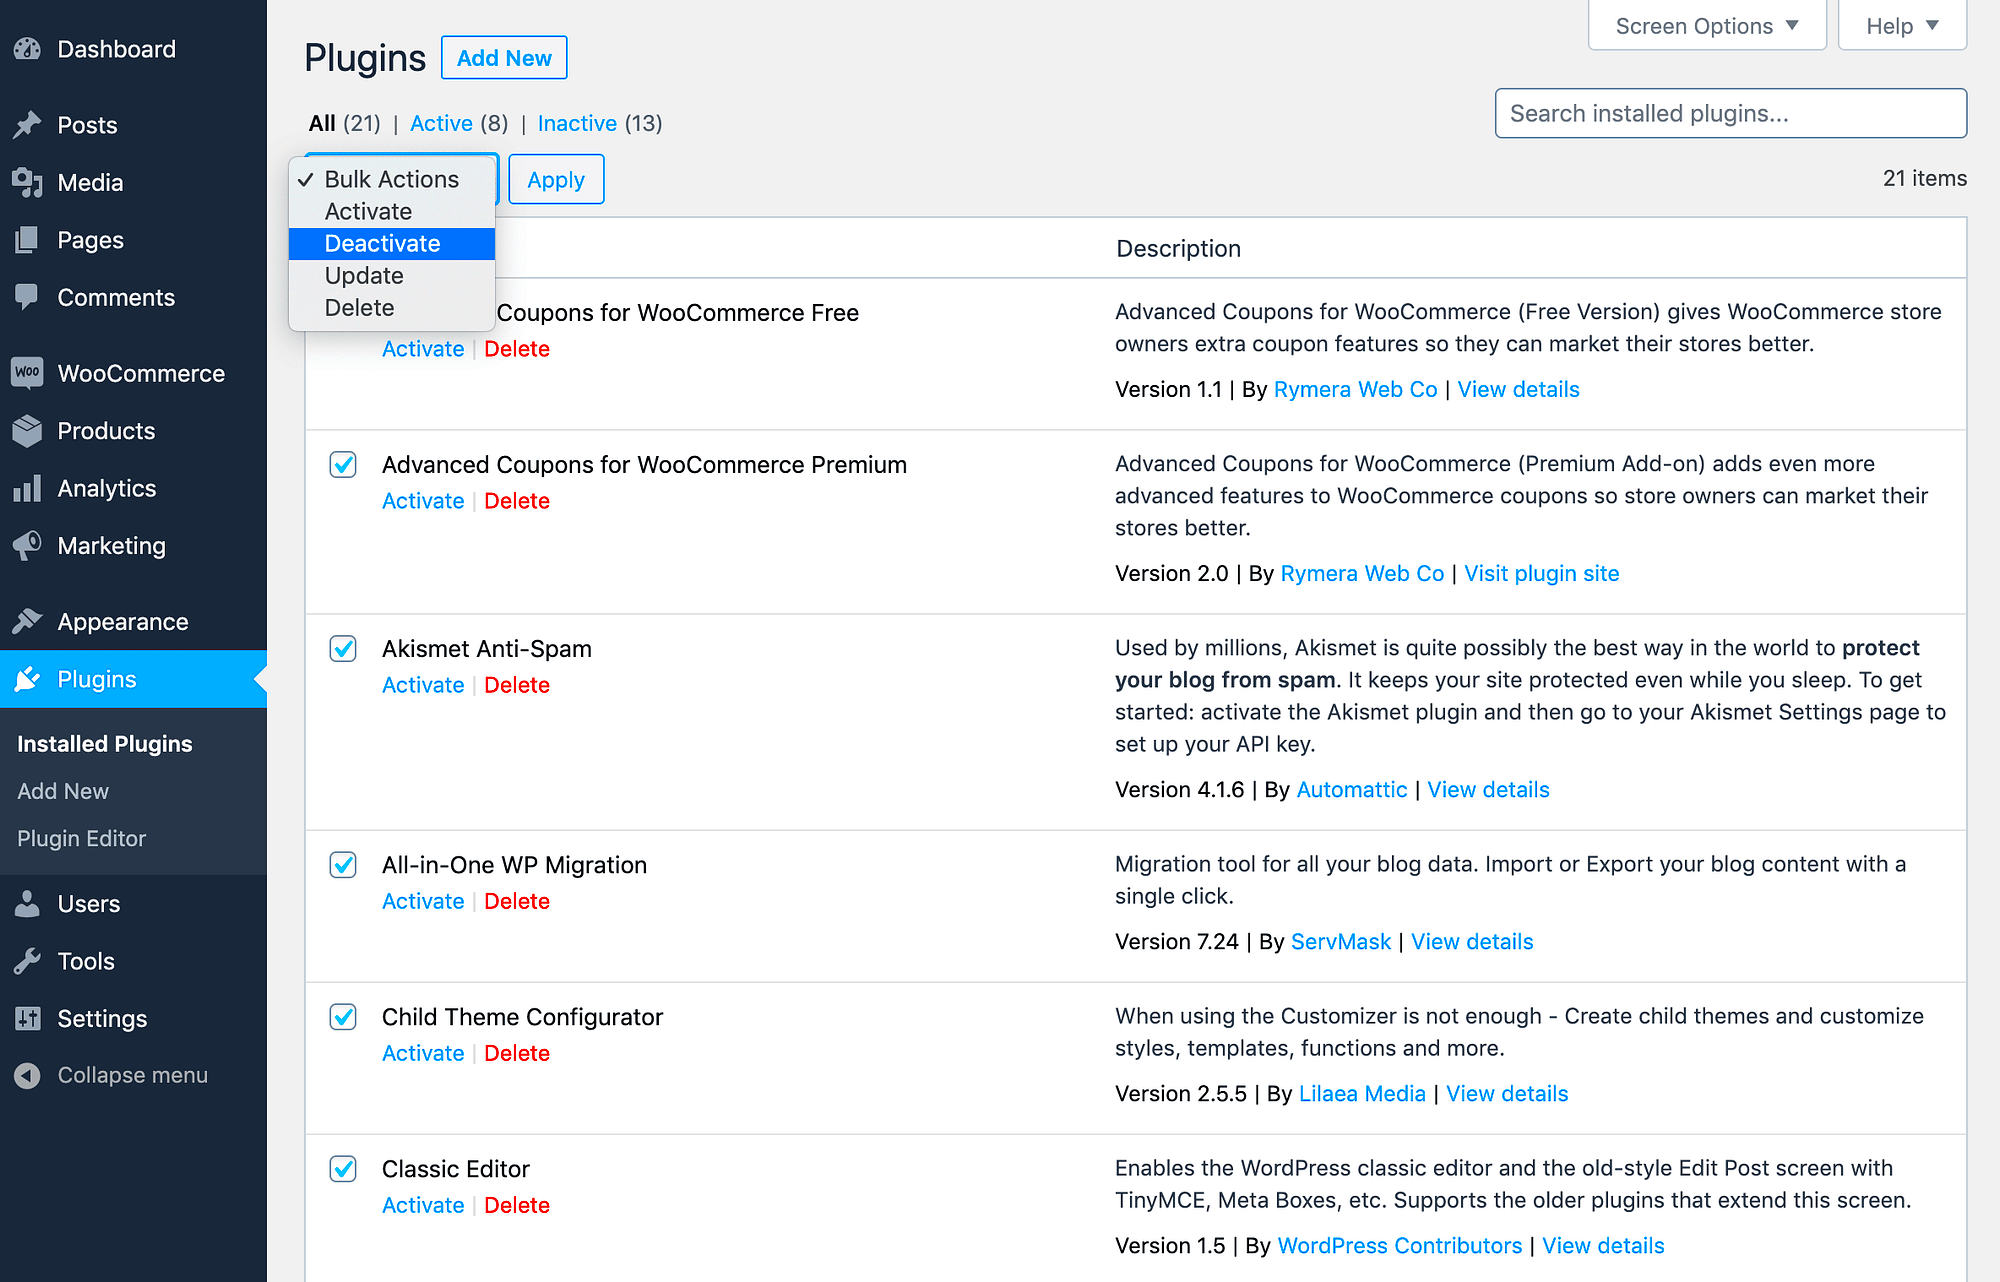
- Select the Plugins to Deactivate: You will see a list of all your active plugins. To deactivate a single plugin, simply click on the Deactivate link below the plugin name. If you want to deactivate multiple plugins at once, check the boxes next to their names.
- Deactivate Multiple Plugins: After selecting multiple plugins, choose Deactivate from the bulk actions dropdown menu located at the top of the plugins list. Then, click on Apply.
Just like that, your chosen plugins will be deactivated! It’s a straightforward process that gives you great control over your site’s functionality. And remember, deactivating a plugin doesn’t delete it. You can reactivate it anytime you need!
Method 2: Deactivating Plugins via FTP
When you encounter issues with your WordPress site that make it impossible to access the admin dashboard, deactivating plugins via FTP can be a lifesaver. FTP, or File Transfer Protocol, allows you to connect to your web server and manage your files directly. Here’s how you can do it:
- Set Up an FTP Client: If you haven’t already, download an FTP client like FileZilla or Cyberduck. These applications make it easy to connect to your server.
- Connect to Your Server: You’ll need your FTP credentials, which you can usually find in your web hosting account. Use these credentials to log in to your server through your FTP client.
- Navigate to the Plugins Folder: Once logged in, locate the “public_html” or “www” directory, then go to “wp-content” and finally “plugins.” Here, you’ll see a list of all the installed plugins.
- Deactivate Plugins: To deactivate all plugins, simply rename the “plugins” folder to something like “plugins_backup.” This action will automatically deactivate all plugins on your site.
- Reactivate Plugins (Optional): If you want to reactivate individual plugins, return to the “plugins” folder and change its name back to “plugins.” Then, rename each plugin folder back to its original name one by one through your FTP client.
And there you have it! Using FTP to deactivate plugins is a straightforward process that can help you regain control over your site. Just remember to stay organized and rename your folders carefully.
Method 3: Using phpMyAdmin to Deactivate Plugins
If you’re comfortable diving a bit deeper into your WordPress database, using phpMyAdmin is another effective way to deactivate plugins. This method is particularly useful if other methods fail, as it directly interacts with your site’s database. Here’s how to do it:
- Access phpMyAdmin: Log into your hosting account and find the phpMyAdmin tool, usually located in the cPanel or hosting dashboard.
- Select Your Database: Once inside phpMyAdmin, you’ll see a list of databases on the left sidebar. Identify and select your WordPress database. If you’re unsure which one it is, check your “wp-config.php” file for the database name.
- Locate the Options Table: Next, find the table named “wp_options.” (Note that the prefix may differ; it could be “wp_xyz_options” if you chose a custom prefix during installation.)
- Edit the Active Plugins Field: Look for the row titled “active_plugins.” Click the “Edit” button next to it. In the value field, you’ll see a serialized array. Simply clear out the contents to deactivate all plugins!
- Save Your Changes: Click the “Go” button to save your changes. This will immediately deactivate all your plugins.
Using phpMyAdmin might seem intimidating, but don’t worry! Just follow the steps carefully, and you’ll be able to deactivate your plugins in no time. Always remember to back up your database before making changes, just to be safe!
Common Issues When Deactivating Plugins
Deactivating plugins in WordPress is generally a straightforward task, but sometimes things can go awry. Here’s a rundown of some common issues you might face during the process.
- Site Performance Problems: Occasionally, when you deactivate a plugin, you might notice that your website behaves differently. This can include slower loading times or certain features not functioning as expected. It’s always a good idea to check your site’s performance post-deactivation.
- Dependency Conflicts: Some plugins rely on others to operate correctly. If you deactivate a central plugin that many others depend on, you could experience several functionalities breaking. Always check compatibility and dependencies before deactivation.
- Loss of Settings: Some plugins save settings that you might lose upon deactivation. If you’re planning to re-enable the plugin later, jot down any important settings first, or check if the plugin allows exporting settings.
- Database Changes: Many plugins make significant changes to your WordPress database. If you deactivate one of these plugins, you might still encounter issues due to leftover data. Consider cleaning up your database afterward to avoid clutter.
- Templates and Themes Issues: Sometimes a plugin interacts closely with your theme. Deactivating it could result in display issues or errors on your site’s front end. Always preview changes in a staging environment if possible.
If you encounter any issues, don’t panic! It’s always a good idea to keep a backup of your site before making any significant changes. That way, you can quickly revert back if anything goes wrong.
After Deactivation: What to Do Next
Once you’ve successfully deactivated the plugins, there’s a series of steps you should consider taking to ensure your WordPress site remains in tip-top shape.
- Test Your Site: First things first, check your website thoroughly. Navigate through different pages and features to ensure everything functions smoothly. This includes checking forms, sliders, and any interactive elements.
- Check for Performance Improvements: If you deactivated plugins to improve performance, run a performance test using tools like GTmetrix or Google PageSpeed Insights. You may notice better loading times and overall performance.
- Clear Cache: If you’re using a caching plugin (or your host provides caching), make sure to clear the cache after deactivating your plugins. This will ensure that your visitors see the most current version of your site.
- Revisit Your Strategy: Reflect on why you deactivated certain plugins. Do you need a replacement for a specific feature? Consider researching alternatives that are lightweight and more efficient.
- Monitor Site for Bugs: Continue to monitor your site for a few days post-deactivation. This will allow you to catch any lingering issues that may pop up.
- If you do encounter bugs, investigate the source and consult the WordPress community or forums for support.
Finally, remember to maintain a routine of checking your plugins. Regular maintenance can prevent issues from cropping up the next time you decide to deactivate or update your plugins!
Conclusion
Deactivating all plugins in WordPress is a crucial step for troubleshooting issues, optimizing performance, or preparing for significant updates. Following the correct process ensures that your website remains functional while you manage your plugins effectively. Here’s a quick summary of the methods to achieve this:
- WordPress Dashboard: Navigate to the Plugins menu and select all plugins to deactivate them in bulk.
- File Manager or FTP: Access your website files and rename the plugins folder to deactivate all plugins simultaneously.
- Database Method: Use phpMyAdmin to modify the active_plugins option in the WordPress database.
Each method serves different situational needs, from ease of use to extreme cases where the dashboard is not accessible. Always ensure you have a complete backup of your site before making significant changes, as deactivating plugins can sometimes lead to unexpected results.
In conclusion, understanding how to deactivate all plugins in WordPress empowers you to maintain control over your website’s functionality and performance. Whether troubleshooting, implementing new designs, or performing site maintenance, these straightforward methods provide a reliable path to managing your plugins efficiently.

