Have you ever wanted total control over your online store’s appearance? That’s where BricksBuilder and WooCommerce come into play. BricksBuilder is a powerful, intuitive page builder that lets you craft stunning websites without needing to code—perfect for users of all skill levels. When paired with WooCommerce, the leading eCommerce platform for WordPress, it becomes a game-changer for anyone looking to sell products online. Let’s dive into how you can customize the WooCommerce cart page using BricksBuilder, ensuring your customers have a seamless shopping experience.
Setting Up Your Development Environment

Before you start customizing your WooCommerce cart page with BricksBuilder, it’s essential to set up an efficient development environment. Here’s how you can do it step-by-step:
- Choose a Hosting Provider:
Start by selecting a reliable hosting provider. Look for options that support WordPress and offer features like:
- Fast loading speeds
- SSL certificates for security
- Automatic backups
- Install WordPress:
Once you’ve chosen your host, install WordPress. Most hosts provide a one-click installation process, making it easy to get started.
- Install WooCommerce:
Navigate to your WordPress dashboard, go to Plugins > Add New, and search for WooCommerce. Click Install Now and then Activate.
- Install BricksBuilder:
Next, you’ll want to install BricksBuilder. Purchase a license from the official site and upload the plugin through the Plugins > Add New section in your dashboard.
- Configure WooCommerce Settings:
Once everything is installed, configure your WooCommerce settings by going to WooCommerce > Settings and setting up your store location, currency, and payment methods.
By following these steps, you’ll create a solid foundation for customizing your WooCommerce cart page with BricksBuilder. Let’s move to the fun part—designing your cart page!
Understanding the Default Cart Page Layout
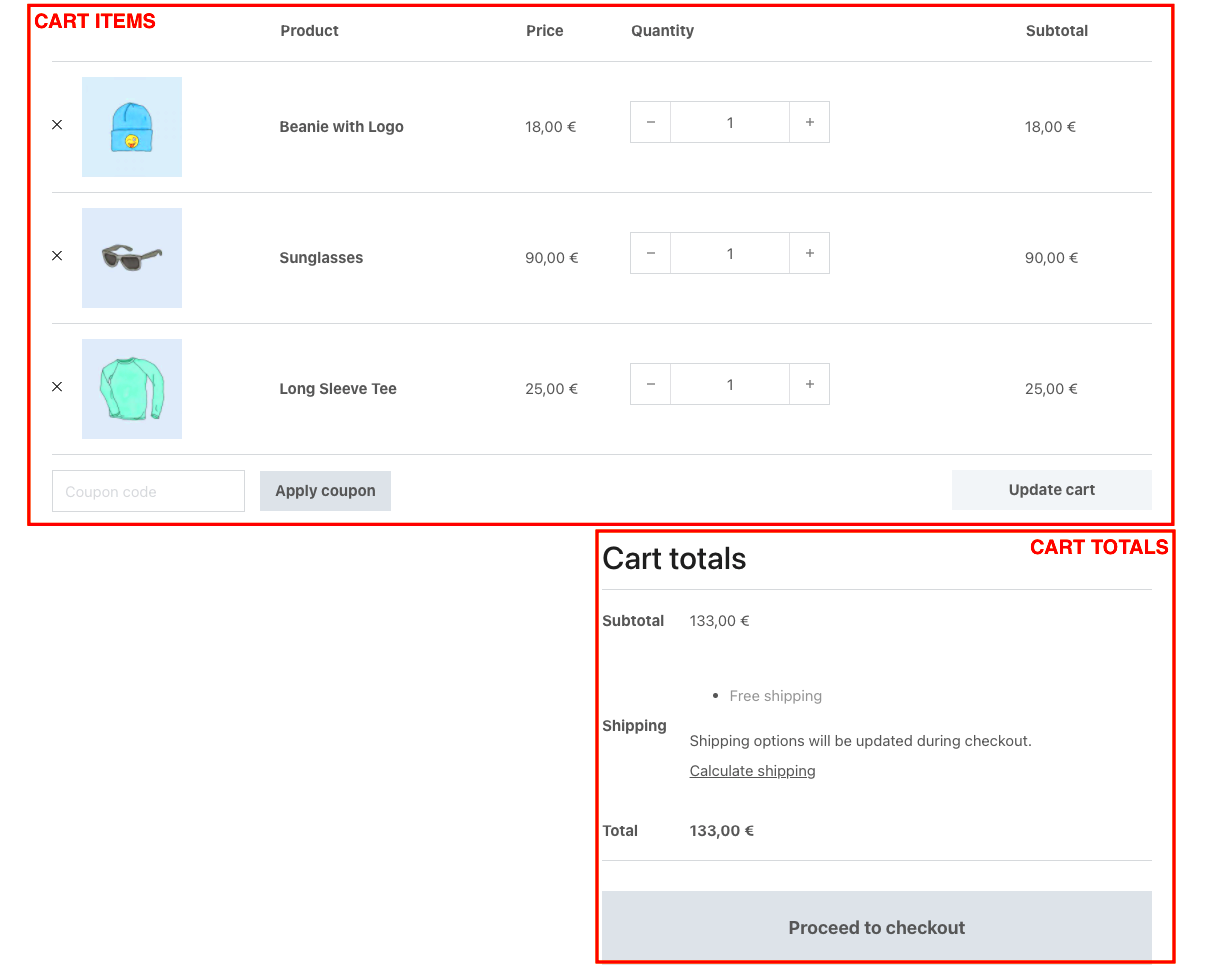
The default Cart Page layout in WooCommerce plays a critical role in the online shopping experience. This page is where customers review their selected items before proceeding to checkout, so it should be clear, concise, and user-friendly. It typically includes several components, each serving a specific purpose:
- Product Details: Each product is displayed with essential information, including the product name, thumbnail image, quantity selector, and price. This helps customers easily identify their selected items.
- Subtotal: The subtotal section shows the total cost of items before any potential discounts or shipping fees. This gives customers a quick overview of their expenditure.
- Discount Codes: Many stores offer promo codes to entice customers. The default layout often includes a space for customers to apply these codes, encouraging them to finalize their purchase.
- Shipping Calculator: A live shipping calculator is useful, allowing users to estimate shipping costs based on their location, which can influence their buying decision.
- Total: This is where the grand total amount is displayed, including taxes and shipping costs, ensuring customers know precisely what they’ll be charged.
- Proceed to Checkout Button: This prominent button guides users to the next step of their purchase, making navigation intuitive.
Understanding the default layout is key to customizing your Cart Page effectively. By knowing what elements are there and how they function, you can make informed choices on what to keep, modify, or remove to enhance the user experience and improve conversions.
Accessing the BricksBuilder Editor
Once you’ve grasped the default Cart Page layout, it’s time to dive into the customization process using BricksBuilder. This powerful page builder simplifies the editing process and allows incredible flexibility in designing pages. Accessing the BricksBuilder editor is straightforward:
- Login to Your WordPress Dashboard: Start by logging into your WordPress admin panel. This is your central hub for managing your website.
- Navigate to Pages: In the left-hand menu, click on “Pages” to view all the pages on your site. You can search for “Cart” to find the specific Cart Page.
- Edit with BricksBuilder: Hover over the Cart Page you want to customize and click the “Edit with Bricks” option. This opens the BricksBuilder interface, where the drag-and-drop editing magic happens!
Once you’re in the BricksBuilder editor, you’ll see a live preview of your Cart Page, alongside various design elements that you can drag into the page. Here, you can modify text, images, spacing, and much more. This visual interface makes it easy to experiment with different looks without any coding knowledge.
In summary, accessing the BricksBuilder editor is a breeze, and once you’re in, the possibilities for customizing your WooCommerce Cart Page are virtually endless. Happy building!
5. Customizing Cart Page Elements
Customizing your WooCommerce cart page with BricksBuilder doesn’t have to be a daunting task. In fact, tweaking the elements on your cart page can significantly enhance the user experience, making it more engaging and tailored to your brand’s aesthetics. Here are some key elements you can customize:
- Product Details: You can modify how products are displayed in the cart—add or remove columns, change how prices are shown, or even include product images for a more visual cart.
- Promo Codes: If you want to make it easy for customers to apply discount codes, you can adjust the positioning and design of the promo code entry field. Consider using a clear, inviting button.
- Checkout Button: Ensure that your checkout button stands out. Change its color, size, and position to drive more conversions!
- Shipping Calculator: If you want customers to see shipping costs upfront, you can customize this section, making it more prominent or easier to use via dropdown menus.
- Cross-Sells and Upsells: You can include related products in your cart page to enhance cross-selling opportunities. This can also be done through dynamic display options in BricksBuilder.
To implement these changes, navigate the BricksBuilder interface to find the Cart Page settings. The drag-and-drop functionality makes it easy to re-arrange elements or add new ones according to your specific needs. By personalizing these elements, you’re not just focusing on aesthetics but on creating a seamless shopping experience for your customers!
6. Styling the Cart Page with CSS
Once you’ve customized the core elements of your cart page, the next step is styling it using CSS to ensure it aligns with your brand. CSS allows you to take your cart page from basic to beautifully unique. Here’s how you can style your cart page:
- Add Custom Colors: Use CSS to change the background color, text overlay colors, or button colors. Ensure your color scheme resonates with your brand identity. Example:
.cart-button { background-color: #ff5722; color: #ffffff; } .cart-price { font-family: 'Arial', sans-serif; font-weight: bold; font-size: 18px; } .cart-item { border: 1px solid #ddd; box-shadow: 0px 4px 10px rgba(0,0,0,0.1); }@media (max-width: 768px) { .cart-item { flex-direction: column; /* Switch to column layout on smaller screens */ } }Using the BricksBuilder’s custom CSS feature, you can embed your styles right into the builder without needing a separate stylesheet. Remember to review your changes on different devices and browsers to ensure consistent performance. With these CSS styling tips, your WooCommerce cart page will not only look stunning but also enhance user engagement, driving more conversions.
7. Adding Custom Functionality with Hooks and Filters
When it comes to enhancing the functionality of your WooCommerce cart page with BricksBuilder, leveraging hooks and filters is a game-changer. Hooks allow you to insert additional code or modify existing features without altering the core files, which means you can maintain the integrity of your site and avoid future issues during updates.
Here’s a simple breakdown of how you can use hooks and filters:
- Action Hooks: These enable you to add your custom code at specific points in the cart page. For instance, you can insert a promotional banner or a coupon code section right before the cart totals.
- Filter Hooks: These allow you to modify data before it’s sent to the browser. This can be useful for changing text labels, adjusting prices, or altering the way shipping options are displayed.
To get started, here’s a basic example of how you can add a custom message above the cart items:
add_action('woocommerce_cart_before_cart_contents', 'custom_cart_message');function custom_cart_message() { echo '<p>Thank you for shopping with us! Enjoy free shipping on orders over $50!</p>';}Don’t forget to test your hooks thoroughly! The beauty of using hooks and filters is that they enable you to create a tailored shopping experience for your customers without the need for extensive coding knowledge.
8. Optimizing the Cart Page for Mobile Devices
In today’s digital landscape, ensuring your WooCommerce cart page is optimized for mobile devices is crucial. With a significant portion of shopping done on smartphones and tablets, a mobile-friendly cart page can dramatically improve user experience and potentially boost conversions.
Here are some handy tips to optimize your cart page:
- Responsive Design: Make sure your cart layout is fluid. This means elements should resize and rearrange seamlessly on smaller screens.
- Streamlined Checkout Process: Reduce the number of steps in the checkout process. Aim for a one-page checkout if possible, as it minimizes friction.
- Touch-Friendly Buttons: Ensure buttons are large enough for easy tapping. A good rule of thumb is to keep them at least 44px by 44px in size.
- Loading Speed: Optimize image sizes and reduce the use of heavy scripts. Fast-loading pages can significantly lower bounce rates.
- Clear Call-to-Action: Use bold colors and clear text to guide users to the next steps. Your “Proceed to Checkout” button should stand out.
To test your optimizations, use tools like Google’s Mobile-Friendly Test or simply check how the cart page looks on different devices. By focusing on mobile optimization, you’ll create a smoother shopping experience and likely see higher conversion rates.
9. Testing Your Customizations
When you’ve successfully customized your BricksBuilder WooCommerce cart page, the next crucial step is testing your changes. This step is vital to ensure that everything works as expected and provides a seamless experience for your users. Here’s how you can go about it:
- Check Functionality: Go through every button, link, and field to ensure they work correctly. For instance, click on the “Update Cart” button and ensure that it updates the quantities as intended.
- Mobile Responsiveness: With more users shopping on mobile devices, it’s essential to check how your cart page appears on various screen sizes. Use developer tools or try it on actual devices.
- Compatibility Testing: Make sure your customizations don’t conflict with any plugins or themes you are using. You can temporarily disable other plugins to see if your cart page functions correctly.
- Load Testing: As your website grows, it may experience more traffic. Test how the cart responds under pressure. Load testing tools can simulate many users accessing your cart page at once.
- User Experience: Consider asking friends or colleagues to navigate your customized cart page. Their feedback can help identify any confusing areas or bugs you might have missed.
By taking the time to thoroughly test your customizations, you’re not just ensuring they work; you’re also enhancing the overall user experience. A smooth, functional cart page can lead to higher conversions and happier customers!
10. Conclusion and Best Practices
Customizing the BricksBuilder WooCommerce cart page can significantly enhance user experience and boost sales. By tailoring your cart page to your brand and making it functional and attractive, you create a shopping experience that resonates with your customers. Here are some best practices to keep in mind:
- Stay Consistent: Ensure that the design and layout of the cart page align with your overall website theme. Consistency builds trust with customers.
- Prioritize Usability: Keep navigation clear and straightforward. Users should complete their purchases with as few clicks as possible.
- Provide Clear Information: Make sure product details, pricing, and shipping information are easy to find. Highlight any applicable discounts or offers.
- Implement Engaging CTA: Add clear and compelling call-to-action buttons that guide customers throughout the checkout process.
- Update and Optimize: Regularly revisit your cart customizations based on user feedback and analytics. Optimizing over time can lead to improved user satisfaction and increased sales.
In the world of eCommerce, every detail counts. By implementing these best practices and taking the time to customize your BricksBuilder WooCommerce cart page, you’re making a significant step toward creating a delightful shopping experience. Happy customizing!


