Creating a website for your business can feel like a daunting task, but with the right guidance, it can be an exciting journey! Your website serves as your digital storefront, making it crucial for attracting potential customers and showcasing your brand. In today’s digital age, having a professional online presence is more important than ever. Let’s dive into what you need to think about before you start building your unique online space.
Step 1: Define Your Website Goals

Before you put pen to paper or fingers to keyboard, you need to outline what you want to achieve with your website. Defining clear goals will not only guide the design and content but also ensure that the site serves its intended purpose. Here are some common goals for business websites:
- Increase Brand Awareness: Your website should reflect your brand identity and help users recognize your business.
- Generate Leads: If you want to capture potential customers, incorporating lead magnets and contact forms can be essential.
- Provide Information: Your website can act as a go-to resource for customers seeking information about your products or services.
- Enhance Customer Engagement: By integrating social media links or a blog, you can interact with your audience more effectively.
- Boost Sales: Ultimately, a significant goal for many businesses is to drive conversions, whether through e-commerce or inquiries.
To effectively define your goals, consider using the SMART criteria — ensure your goals are Specific, Measurable, Achievable, Relevant, and Time-bound. Here’s a simple table for clarity:
| Criteria | Description |
|---|---|
| Specific | Is the goal clear and specific? |
| Measurable | Can you measure the progress towards your goal? |
| Achievable | Is the goal realistic given your resources? |
| Relevant | Does the goal align with your business objectives? |
| Time-bound | Is there a deadline for accomplishing this goal? |
By taking the time to clearly define your website goals, you’ll set a solid foundation for the development process and ensure your site truly meets your business needs. Ready to take the next step? Let’s keep building!
Step 2: Choose Your Domain Name

Choosing a domain name for your business website is a crucial step that can’t be overlooked. Your domain name is essentially your online identity; it’s how potential customers will find you on the internet. Therefore, it’s essential to select a name that is memorable, relevant, and easy to spell.
Here are some tips for picking the perfect domain name:
- Keep It Short and Simple: Aim for a name that is concise. Longer names can be confusing and harder to remember.
- Include Keywords: Consider incorporating keywords relevant to your business. For example, if you’re a bakery, something like “BestBakery.com” could work wonders.
- Check Availability: Use domain registration websites to check if your desired name is available. There’s nothing worse than falling in love with a name only to find it taken!
- Choose the Right Extension: The most popular extension is .com, but there are many others like .net, .biz, and even .co. Choose one that fits your brand and audience.
- Avoid Special Characters: Stick to letters and numbers. Hyphens and numbers can lead to confusion.
Once you’ve brainstormed a few options, consider running them by friends or family to get some feedback. A good domain name should roll off the tongue easily. Once you’ve settled on a name, register it as soon as possible to secure it for your business!
Step 3: Select a Website Hosting Service
After choosing your domain name, the next step is to select a website hosting service. This is the platform where your website will live, and it plays an essential role in performance and accessibility. A good hosting service ensures that your website is always up, loads quickly, and provides adequate storage and bandwidth for your company’s needs.
Here are some factors to consider while choosing a hosting provider:
- Types of Hosting: Decide which type of hosting fits your business best. The common options are:
- Scalability: Your needs may change as your business grows. Choose a host that allows you to upgrade easily.
- Customer Support: Look for a provider that offers 24/7 support. You never know when you might run into a problem!
- Security Features: Ensure the service offers SSL certificates and regular backups to keep your data and user information safe.
| Type | Description |
|---|---|
| Shared Hosting | Cost-effective, suitable for small businesses with low traffic. |
| VPS Hosting | Offers more resources and flexibility; good for growing businesses. |
| Dedicated Hosting | Provides an entire server for your use; ideal for high-traffic sites. |
| Managed Hosting | Providers handle all server management; great for less tech-savvy owners. |
Doing a bit of research is key. Read reviews, compare pricing, and assess the features offered by different hosting services. Once you find the right fit, you’ll feel more confident about launching your website!
Step 4: Choose a Website Building Platform
When it comes to creating a website for your business, one of the most crucial steps is selecting the right website building platform. With so many options available today, it can feel a bit overwhelming. But don’t worry, we’ll break it down!
First, assess your needs. Are you looking for something simple, or do you need advanced features? Here’s a quick list of popular website building platforms:
- Wix: Great for beginners, offers drag-and-drop features, and a variety of templates.
- WordPress: Highly customizable with plugins; perfect for blogs and complex sites.
- Squarespace: Known for stunning designs and templates, ideal for portfolios and creative sites.
- Shopify: The go-to choice if you’re planning to run an e-commerce store.
- Weebly: Another user-friendly option with built-in e-commerce capabilities.
Each platform has its unique strengths and weaknesses. Here are a few factors you should consider:
| Factor | Wix | WordPress | Squarespace | Shopify |
|---|---|---|---|---|
| Ease of Use | Very user-friendly | Steep learning curve | Moderately easy | User-friendly |
| Customization | Limited | Highly customizable | Moderately customizable | Customizable |
| Cost | Affordable | Varies (free + hosting cost) | Moderate | Higher (transaction fees) |
Once you weigh your options, you’ll be better equipped to choose a platform that aligns with your business goals!
Step 5: Design Your Website Layout
Alright, you’ve chosen the perfect platform, and now it’s time to bring your vision to life by designing your website layout. This step is where creativity meets functionality!
Think about your website’s purpose. Is it to sell products, share information, or showcase your portfolio? The layout plays a significant role in how effectively you achieve that. Here are a few essential elements to consider:
- Navigation: Ensure it’s intuitive. A user should find what they’re looking for in just a few clicks. Use clear labels for each section.
- Length of Scroll: Aim for a balance. Too long can lose a visitor’s interest, while too short can leave them hungry for more information.
- Visual Hierarchy: Arrange your content so that the most critical information stands out. Use larger fonts, bold colors, and images effectively!
- Responsive Design: Make sure your website looks great on all devices, especially mobile phones. A significant amount of traffic is from mobile users these days.
As you design, don’t forget to keep your brand in mind! Use your brand colors, logo, and messaging consistently throughout the site. Take inspiration from your competitors, but always strive to make your design unique.
Once you have a layout in mind, you can start creating it using your chosen platform’s tools. Most platforms offer templates that serve as a great baseline. Don’t hesitate to experiment until you find what resonates with your audience!
Step 6: Create Compelling Content
Creating compelling content is the heart and soul of your website. It’s not just about filling up space; it’s about providing value to your visitors. Great content engages, informs, and connects with your audience. Here’s how you can do it:
- Know Your Audience: Before you start typing away, take a moment to understand who your audience is. What are their needs, preferences, and pain points? Tailor your content to address these aspects.
- Choose the Right Format: Different formats work better for different types of content. You can opt for articles, videos, infographics, or podcasts. Mix it up to keep things interesting!
- Focus on Quality: Quality is key. Offers in-depth, well-researched, and well-written pieces that are error-free. High-quality content builds trust with your audience.
- Use Engaging Headlines: Catchy headlines grab attention. Use power words and angles that create curiosity to draw your readers in.
- Include Calls to Action: Don’t leave your audience hanging! Make sure to include clear calls to action (CTAs) that guide your visitors on what to do next, whether that’s signing up for a newsletter or making a purchase.
Remember, your content should not only be compelling but also serve a purpose. Whether it’s to inform, entertain, or convert, having a clear goal can make all the difference. So, roll up your sleeves and start crafting that killer content!
Step 7: Optimize for Search Engines
Now that you’ve created compelling content, it’s time to get it in front of the right people. Enter the world of Search Engine Optimization (SEO)! SEO is all about ensuring your website ranks well on search engines like Google, making it easier for potential customers to find you. Here are some essential SEO tips:
- Keyword Research: Identify keywords that your target audience is searching for. Use tools like Google Keyword Planner or SEMrush to find relevant keywords.
- On-Page SEO: Optimize each page of your site. Use your main keyword in key areas like the title, headings, and throughout your content, but avoid keyword stuffing.
- Meta Tags: Don’t overlook meta tags! Write compelling meta titles and descriptions that include your target keywords. These are what appear in search results, so make them enticing!
- Internal Linking: Link to other pages or posts on your website. This not only helps with navigation but also keeps visitors on your site longer.
- Mobile Optimization: Ensure your website is mobile-friendly. A significant amount of search traffic comes from mobile devices, so it’s vital to cater to that audience.
SEO can be quite the whirlwind, but with these steps, you’re on your way to making your website more discoverable. Keep learning and adapting, and soon you’ll see your site climbing the search engine ranks!
Step 8: Ensure Mobile Responsiveness
In today’s digital age, having a mobile-friendly website isn’t just a bonus; it’s essential. With more than half of global internet traffic coming from mobile devices, ensuring your website looks great and functions well on smartphones and tablets is crucial. If your site isn’t mobile-responsive, you risk losing a substantial number of potential customers who might bounce off your site due to poor user experience.
So, how do you make your website mobile-responsive? Here are some steps you can take:
- Use a Responsive Design: Opt for a design that automatically adjusts to different screen sizes. Frameworks like Bootstrap or CSS Grid can be fantastic for this.
- Test Your Layout: Regularly check how your website looks on multiple devices. Emulators can help, but nothing beats actual devices for testing.
- Optimize Images: Use scalable vector graphics (SVGs) or make sure images resize appropriately. This ensures your site loads faster on mobile, improving user experience.
- Prioritize Content: Arrange your main content at the top when viewed on mobile. Users should see the most critical information immediately without excessive scrolling.
- Limit Pop-ups: While pop-ups can be effective, they can also frustrate users on mobile devices. Keep them to a minimum or make them easy to close.
Remember, a mobile-responsive site not only enhances user experience but also impacts your SEO ranking, as search engines favor sites that cater to mobile users. So, invest the time and effort to make your website accessible and enjoyable for everyone!
Step 9: Set Up Analytics and Tracking
Setting up analytics and tracking on your website is like giving yourself a map to navigate through the vast digital landscape. You might think you know your audience, but data helps you understand their behavior, preferences, and needs in deep and meaningful ways. By collecting data, you can make informed decisions to optimize your website and ramp up your business strategies.
Here’s what to consider when setting up analytics and tracking:
- Choose Your Analytics Tool: Google Analytics is the most popular choice; it’s free and offers a wealth of insights. Other options include Adobe Analytics and Matomo.
- Set Up Goals: Define what success looks like for your site. This could be form submissions, product purchases, or newsletter sign-ups. Setting up goals helps you track conversions effectively.
- Link to Google Search Console: This tool helps improve your SEO by giving you insights into how your site performs in Google searches and how users interact with it.
- Utilize UTM Parameters: When sharing links, especially in marketing campaigns, utilize UTM parameters to track performance on specific channels or campaigns.
- Regularly Review Your Data: Consistently analyze the data you collect. Look for trends, pages that aren’t performing as expected, and audience demographics to tailor your content and marketing strategies.
In short, analytics and tracking are your allies in understanding and enhancing your website’s performance. With the right tools and the willingness to adapt based on what the data shows, you’re well on your way to boosting your business’s online presence!
Step 10: Launch Your Website
Congratulations! You’ve put in all the hard work, and now it’s time to unveil your masterpiece: your brand new website! Launching your website is one of the most exhilarating steps in this entire process, but it’s important to tie up some loose ends before you hit that big “Launch” button.
Before going live, consider the following checklist:
- Testing: Make sure to test your website on different devices and browsers. Is it responsive? Does it load quickly? Catch any bugs before your audience does!
- SEO Optimization: Have you added meta titles, descriptions, and alt tags? Optimize your content for search engines to increase visibility.
- Analytics Setup: Set up tools like Google Analytics to track your website’s performance and understand your audience better.
- Domain Verification: Ensure your domain is correctly linked to your hosting service, and that it’s pointing to your newly created site.
- Backup: Take a backup of your site. A launch is exciting, but you don’t want to lose your hard work!
Once you’ve checked everything off your list, it’s time to announce your launch! Utilize email marketing, social media, and other channels to let your audience know your new site is live. Don’t forget: the launch is just the beginning. Engage with your visitors, gather feedback, and continue to improve your site on the go!
Ongoing Maintenance and Updates
Now that your website is live, the journey doesn’t end here. Maintaining and updating your website is crucial to ensure it runs smoothly and stays relevant. Ongoing maintenance helps prevent issues, keeps your content fresh, and enhances user experience.
Here are some essential maintenance tasks you should schedule regularly:
- Content Updates: Regularly review your website content to keep it up-to-date. This could be blog posts, product descriptions, or company information.
- Software and Plugin Updates: If you’re using a CMS like WordPress, ensure your themes, plugins, and the CMS itself are updated to the latest versions for security and functionality.
- Backups: Schedule regular backups. Weekly or monthly backups can save you a lot of headaches if things go awry.
- Performance Monitoring: Keep an eye on your website’s loading speed and performance. Use tools like Google PageSpeed Insights for insights and suggestions.
- Security Checks: Regularly check for vulnerabilities and ensure your site’s security features are intact. Consider using an SSL certificate for increased security.
Finally, engage with your audience by responding to comments and feedback. An active website is more likely to retain visitors and build a loyal customer base. Remember, a website is never truly finished; it evolves alongside your business!
Conclusion and Next Steps
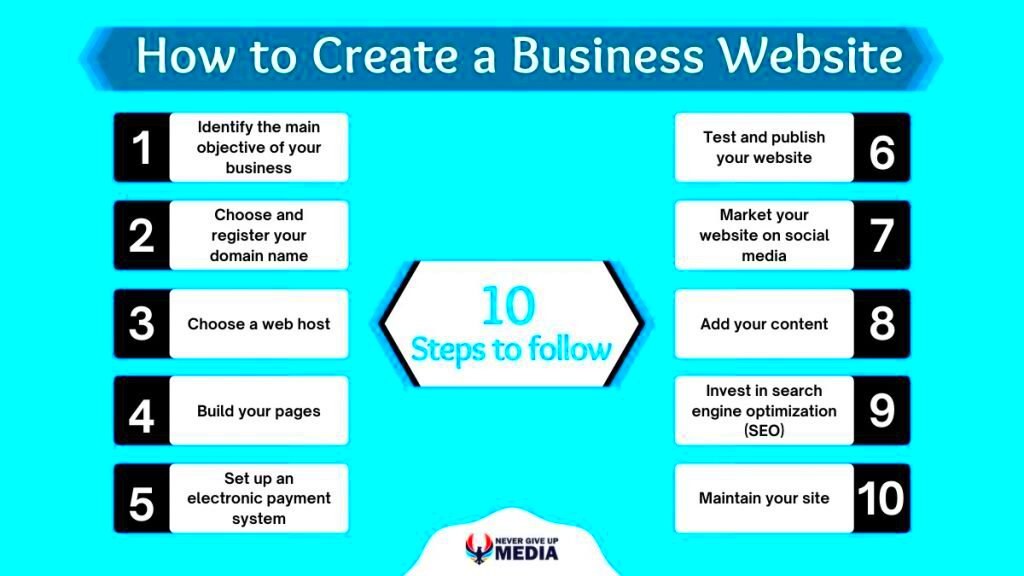
Creating a website for your business is an essential step in establishing a strong online presence. With the right planning and execution, your website can serve as a powerful marketing tool, helping you reach a broader audience and increase sales. Here are some key takeaways and actionable next steps to ensure your website is effective:
- Define Your Goals: Understand what you aim to achieve with your website—be it brand awareness, lead generation, or direct sales.
- Select a Domain Name: Choose a catchy and relevant domain name that reflects your brand.
- Choose a Hosting Provider: Invest in reliable web hosting to ensure your site is always accessible.
- Design and Development: Create a user-friendly layout and consider hiring professional designers or using templates.
- Optimize for SEO: Research keywords and integrate them into your site’s content to improve search engine rankings.
- Utilize Analytics: Install tools like Google Analytics to track visitor behavior and make data-driven decisions.
Additionally, remember to regularly update your website’s content and stay informed about the latest web design trends and SEO practices. Engage with your audience through blogs or newsletters to maintain interest in your business and its offerings.
In conclusion, setting up a website for your business may seem daunting initially, but by breaking it down into manageable steps and continuously iterating based on feedback and analytics, you’ll create a vibrant online space that serves your customers well and drives your business forward.


