When you’re diving into the world of selling your photos on platforms like Shutterstock, it’s super important to understand how copyright laws work. Basically, copyright protects your original photographs from being used without your permission. As the creator, you automatically hold the rights to your work as soon as you take a photo—no formal registration needed initially. However, knowing the ins and outs of copyright laws can help you defend your rights, understand what rights you’re sharing when you upload, and ensure your photos are protected, especially if someone tries to use them without permission.
Think of copyright as your legal shield. It grants you exclusive rights such as reproducing, distributing, displaying, and creating derivative works based on your photos. When you submit images to Shutterstock, you typically license them out, meaning you’re allowing others to use your photos under specific terms. But this doesn’t mean you give up your copyright—you’re just licensing usage rights. Understanding whether your photos are considered “public domain,” or if you hold the copyright is crucial. Also, keep in mind that copyright laws can vary slightly by country, but most follow international standards set by treaties like the Berne Convention.
One common misconception is that if you take a photo of a person or a property, you don’t have copyright or need permission. That’s not entirely true. You usually need model or property releases to sell commercial images, but the copyright still belongs to you as the photographer. Also, be aware of copyright infringement risks—using someone else’s work without permission can lead to legal trouble. So, always ensure your photos are original or properly licensed, and understand how copyright applies to your work before you start selling on Shutterstock or any other platform.
Steps to Register Your Photos for Copyright Protection
While your photos are automatically protected by copyright as soon as you take them, formally registering your work can provide added legal benefits, especially if you ever need to defend your rights in court. Registration isn’t mandatory, but it’s a smart move if you’re serious about protecting your photography. Here’s a simple step-by-step guide to registering your photos for copyright protection:
- Organize Your Photos – Before registering, gather all your images you want protected. Keep digital copies, metadata, and any relevant documentation. It’s helpful to have a clear record of when and where you took each photo.
- Choose the Registration Method – Most countries have a government office responsible for copyright registration. In the U.S., it’s the U.S. Copyright Office, which offers an online portal. Many countries have similar agencies. Check your local copyright office’s website for details.
- Complete the Application – Fill out the registration form, providing details about yourself and your photos. Be specific about the works you want to register. For multiple images, some offices allow batch registration, which can save time and money.
- Pay the Registration Fee – There is usually a fee involved, which varies depending on the number of works and registration method. Online registration is typically cheaper and faster than mailing in paper forms.
- Submit Your Photos – Upload digital copies of your images or send physical copies if required. Some offices ask for a deposit copy, which is a high-quality version of your work stored in their files.
Once your registration is processed and approved, you’ll receive a certificate of registration. Keep this document safe—it’s proof of your copyright claim and can be invaluable if someone infringes on your rights. Remember, registering your photos also establishes a public record of your ownership, which can be helpful in legal disputes or licensing negotiations. So, even if it’s not required, taking the time to officially register your work is a wise step in protecting your creative efforts and making sure you get the credit—and compensation—you deserve when submitting to Shutterstock or other platforms.
Preparing Your Photos for Shutterstock Submission
Before you hit that upload button, it’s essential to make sure your photos are properly prepared. Shutterstock has specific guidelines to ensure your images are suitable for their platform, and following these will help you get approved faster and increase your chances of earning royalties. Here’s a quick rundown of what you should do:
- Choose the Best Shots: Select photos that are sharp, well-composed, and high-quality. Blurry, poorly lit, or overexposed images won’t make the cut. Aim for clarity and visual appeal.
- Crop and Resize: Make sure your images are correctly cropped to highlight the main subject. Shutterstock recommends a minimum of 4 megapixels (for example, 4200 x 3000 pixels), but higher resolution images are always better for licensing purposes.
- Remove Watermarks and Logos: Ensure your images are free of any watermarks, logos, or branding that isn’t yours. Shutterstock only accepts original, unmarked images.
- Adjust for Color and Exposure: Use photo editing tools to correct color balance, brightness, and contrast. Natural-looking images are preferred, but some creative edits are okay if they improve the overall quality.
- Check for Noise and Artifacts: Remove any digital noise or compression artifacts that might detract from image quality. Clean images are more likely to pass review and attract buyers.
Once your photos are polished, it’s time to organize them. Create a clear folder structure on your computer—perhaps by theme or shoot date—to keep track of your submissions. When uploading, ensure each file is named descriptively, avoiding generic names like “IMG_001.jpg” and instead using relevant keywords, such as “sunset-beach-California.jpg.”
Ensuring Your Photos Meet Shutterstock’s Copyright Requirements
Even if your photos look stunning, they won’t make it onto Shutterstock if they violate copyright rules. Shutterstock has strict standards to protect both creators and buyers, so it’s crucial to ensure your images are original and legally compliant. Here’s what you need to keep in mind:
Original Content is Key
Shutterstock only accepts images that you own the rights to. That means the photos must be your original work, taken by you, and not infringing on someone else’s copyright. If your photo includes elements like artwork, logos, or other protected content, you need to have permission or a license to use those elements.
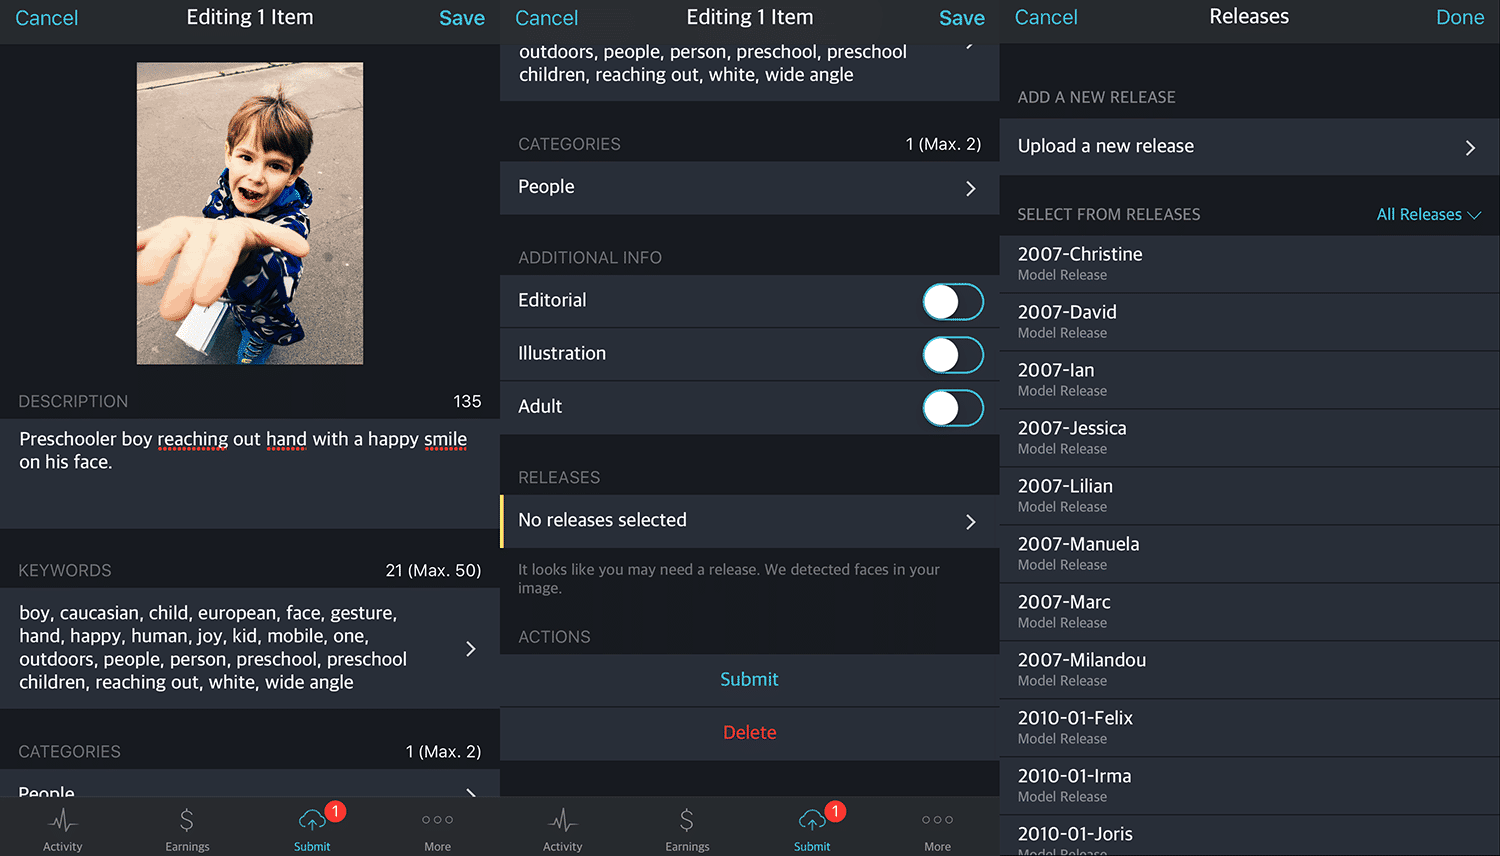
Model and Property Releases
If your images feature recognizable people or private property, you may need to provide model or property releases. This legal document grants you permission to use and sell images containing these elements. Shutterstock requires these releases during the submission process for such images to be accepted.
Avoid Copyright Violations
Here are some common pitfalls to watch out for:
- Using copyrighted artwork or logos: Don’t include copyrighted logos, trademarks, or artwork unless you have explicit permission.
- Incorporating branded products: If your photo features branded items, ensure you have the rights or releases. Otherwise, it could be rejected.
- Including recognizable private property: Private buildings or artworks might require a release.
Know When to Seek Releases
For images with identifiable people or private property, obtaining releases is a must. You can find templates online for model and property releases. Remember, even if your image is stunning, Shutterstock won’t accept it if legal rights aren’t secured.
Use Proper Attribution When Necessary
While Shutterstock generally doesn’t require attribution for purchased images, if you’re using third-party content or elements, always give credit where it’s due and secure the appropriate licenses.
In summary, making sure your photos are original, free of copyright infringement, and legally compliant is the foundation of a successful Shutterstock portfolio. Taking the time to verify rights and obtain necessary releases not only keeps you safe legally but also boosts your credibility as a contributor. Happy shooting—and submitting!
How to Submit Your Photos to Shutterstock with Copyright Notice
You’re excited to share your photography with the world, and Shutterstock is a great platform to do that! But before you hit that upload button, it’s important to know how to properly submit your photos with a clear copyright notice. This helps protect your work and ensures you get the credit—and potential earnings—you deserve.
First things first, make sure your images are high quality, properly edited, and meet Shutterstock’s submission guidelines. Once you’re ready, follow these simple steps to submit your photos:
- Create or log into your Shutterstock Contributor account. If you haven’t signed up yet, it’s quick and free. Just provide your details, agree to the terms, and you’re in!
- Upload your images. Use the upload tool to select your photos. You can upload multiple images at once, which is a real time-saver.
- Add accurate metadata. Fill in titles, descriptions, and keywords that accurately describe your photo. This increases the chances of your image being discovered.
- Include a copyright notice. While Shutterstock’s platform already protects your rights, adding a copyright notice directly in your photo’s metadata can serve as a reminder and reinforce your ownership. To do this:
- Open your photo in an image editing software (like Photoshop or even free tools like GIMP).
- Add a small, discreet copyright notice, such as © Your Name Year, in a corner of the image. Keep it subtle so it doesn’t distract from the main content.
- Save the image with the copyright notice embedded.
Once you’ve added the copyright notice, upload the image file with the embedded watermark and fill out all the required information on Shutterstock. Remember, the platform’s terms automatically grant Shutterstock a license to distribute your work, but your copyright remains intact. Including your copyright notice in the image helps clarify your ownership, especially if disputes arise later.
After uploading, review your submission carefully. Make sure all details are correct, and then hit “Submit.” Your photo will go through Shutterstock’s review process, which typically takes a few days. Once approved, it will be available for licensing worldwide!
Tips for Protecting Your Photography Rights Online
Sharing your photos online is exciting, but it also opens the door to potential misuse. Protecting your photography rights is essential to ensure you maintain control over your work and receive proper credit. Here are some practical tips to keep your images safe in the digital world:
1. Watermark Your Images
Adding a subtle watermark with your name or website URL can deter unauthorized use. Place it in a corner or across the image in a way that’s difficult to crop out but doesn’t ruin the viewing experience. Remember, watermarks aren’t foolproof, but they’re a good deterrent.
2. Use Metadata Wisely
Embed your copyright information, contact details, and licensing terms into your photo’s metadata. This information can be viewed by anyone who examines your image’s properties, helping establish your ownership even if the image gets shared without permission.
3. Keep Original Files Secure
Store your original, high-resolution files in a secure location. Only share lower-resolution versions publicly, and keep your originals safe from theft or unauthorized access.
4. Register Your Work
Consider registering your photos with copyright offices or online registration services. Official registration can provide legal benefits if you need to take action against infringement.
5. Monitor the Internet
Regularly search for your images using tools like Google Reverse Image Search or TinEye. This helps you spot unauthorized use and take action if needed.
6. License Your Photos Clearly
Specify the licensing terms when sharing your images online. Use clear licensing options, such as Creative Commons licenses, or specify that your images are for licensing through platforms like Shutterstock only.
7. Enforce Your Rights
If you discover someone using your work without permission, don’t hesitate to reach out with a polite takedown request or a legal notice if necessary. Many platforms have procedures to handle copyright infringement—use them to protect your rights.
Protecting your photography online is an ongoing process, but taking these steps can significantly reduce the risk of misuse and help you maintain control over your creative work. Remember, your images are valuable assets—treat them with the respect they deserve!
Additional Resources for Copyrighting Your Photography Work
Protecting your photography work is essential to ensure you retain control over your creative assets. Fortunately, there are numerous resources available to help you understand and navigate the copyright process effectively. First and foremost, the U.S. Copyright Office website offers comprehensive information about registering your photos, including step-by-step guides and FAQs. Visiting their official site can clarify the registration process, fees, and legal protections available to you.
Another valuable resource is Creative Commons, which provides licensing options that allow you to specify how others can use your images. Their licenses range from allowing free use with attribution to more restrictive terms, giving you flexibility based on your preferences. You can learn more about these licenses at Creative Commons Licenses.
Joining professional photography organizations, such as the American Society of Media Photographers (ASMP) or National Press Photographers Association (NPPA), can also be beneficial. These groups offer legal advice, resources, and networking opportunities to help you understand your rights and best practices for copyright.
| Resource | Description | Link |
|---|---|---|
| U.S. Copyright Office | Official registration and legal info about copyright | copyright.gov |
| Creative Commons | Licensing options for sharing your work | creativecommons.org/licenses/ |
| ASMP | Legal advice and industry resources for photographers | asmp.org |
| NPPA | Resources and advocacy for press photographers | nppa.org |
Utilizing these resources can significantly enhance your understanding of copyright laws, licensing options, and best practices for protecting your photography. Staying informed and proactive is key to safeguarding your creative work in the competitive world of stock photography and beyond.