If you’re managing a large library of images or videos on Shutterstock and want a more streamlined way to upload your content, connecting FileZilla can be a game-changer. FileZilla is a popular FTP client that allows you to transfer files quickly and securely, bypassing the need to upload through a web interface. While Shutterstock doesn’t officially promote FTP uploads, some contributors and agencies find that setting up an FTP connection helps speed up their workflow, especially when dealing with bulk uploads. In this guide, we’ll walk you through how to establish that connection smoothly, so you can focus more on creating and less on uploading.
Prerequisites Needed for the Connection
Before you dive into setting up FileZilla to connect with Shutterstock, there are a few essential things you’ll need to gather and prepare. Having these in place will make the process much smoother and help avoid frustrating delays.
- FTP Server Details: You’ll need the specific FTP server address provided by Shutterstock. This usually includes the hostname (like ftp.shutterstock.com) and sometimes a port number.
- Username and Password: A dedicated FTP login for your Shutterstock account. Sometimes, Shutterstock provides these credentials directly; other times, you might need to request FTP access or create credentials through your contributor dashboard.
- FTP Client Software: Download and install FileZilla or your preferred FTP client. It’s free and user-friendly, but make sure you’re using the latest version for security and compatibility reasons.
- Internet Connection: A stable, high-speed internet connection is vital, especially when uploading large media files, to prevent interruptions or timeouts during transfers.
- Understanding Upload Limits and Guidelines: Check Shutterstock’s latest guidelines on file sizes, formats, and naming conventions to ensure your uploads meet their standards, reducing the chances of rejection or delays.
Once you’ve gathered these prerequisites, you’re almost ready to configure your FTP client. Having everything prepared beforehand will save you time and prevent unnecessary back-and-forth with Shutterstock support. Next, we’ll explore how to set up your FileZilla connection step-by-step to get you uploading seamlessly.
Step-by-Step Guide to Setting Up FileZilla for Shutterstock Uploads
If you’re looking to streamline your image uploads to Shutterstock, using an FTP client like FileZilla can make the process much smoother. It might seem a bit technical at first, but don’t worry — I’ll walk you through each step so you can get everything set up with confidence.
Step 1: Download and Install FileZilla
- Head over to the official FileZilla website and download the version compatible with your operating system (Windows, Mac, Linux).
- Follow the installation prompts — it’s straightforward! Once installed, open FileZilla.
Step 2: Obtain Your Shutterstock FTP Details
Before configuring FileZilla, you’ll need some specific credentials from Shutterstock:
- FTP Host: The server address provided by Shutterstock.
- Username and Password: Your unique login details for the FTP server.
- Port: Usually 21 for FTP, unless specified otherwise.
If you haven’t received these details yet, log into your Shutterstock contributor account or contact their support. They typically send this info once your account is set up for FTP uploads.
Step 3: Set Up a New Site in FileZilla
- In FileZilla, go to File > Site Manager.
- Click New Site and give it a name like “Shutterstock FTP”.
- In the right panel, input your FTP details:
- Host: Paste the FTP server address.
- Port: Enter the port number (usually 21).
- Protocol: Select FTP – File Transfer Protocol.
- Encryption: Choose Only use plain FTP (insecure) unless Shutterstock specifies otherwise.
- Logon Type: Select Normal.
- User: Your FTP username.
- Password: Your FTP password.
Step 4: Connect and Test
- Click Connect. If everything is correct, FileZilla will establish a connection to Shutterstock’s FTP server.
- You should see a list of folders on the right side. If you see your upload directory, you’re all set to start transferring files!
Configuring FTP Settings for Shutterstock
Once you’ve connected FileZilla to Shutterstock, it’s a good idea to fine-tune some settings to ensure smooth uploads and security. Let’s go through some key configurations:
Transfer Type and Mode
For most Shutterstock uploads, using Binary transfer mode is best. It ensures that image files are transferred exactly as they are, without any corruption or alteration.
- In FileZilla, go to Edit > Settings > Transfers > File Types.
- Select Default transfer type as Binary.
Passive vs. Active Mode
FTP can work in passive or active mode. Shutterstock recommends using Passive Mode because it tends to be more firewall-friendly, especially if you’re behind a router or corporate firewall.
- Navigate to Edit > Settings > FTP > Passive Mode.
- Ensure Use the server’s external IP address option is selected if available.
Timeout Settings
To prevent disruptions during large uploads, consider increasing the timeout duration:
- Go to Edit > Settings > Transfers.
- Set Timeout in seconds to a higher value, such as 120 or 300, depending on your upload size.
Security Considerations
FTP transmits data in plain text, which isn’t the most secure method. If Shutterstock supports it, you might want to switch to SFTP (Secure FTP) for enhanced security. However, if only FTP is available, ensure your connection is as secure as possible by:
- Using strong, unique passwords.
- Enabling any available encryption options.
- Monitoring transfer logs for suspicious activity.
Final Checks Before Upload
Before starting your uploads, double-check the following:
- Your FTP credentials are accurate.
- You’re connected to the correct directory for uploads.
- File types and sizes conform to Shutterstock’s guidelines.
- Firewall or antivirus software isn’t blocking FileZilla.
With these settings configured, your FileZilla setup will be optimized for Shutterstock uploads, making your workflow more efficient and less stressful. Happy uploading!
Verifying the Connection and Uploading Files
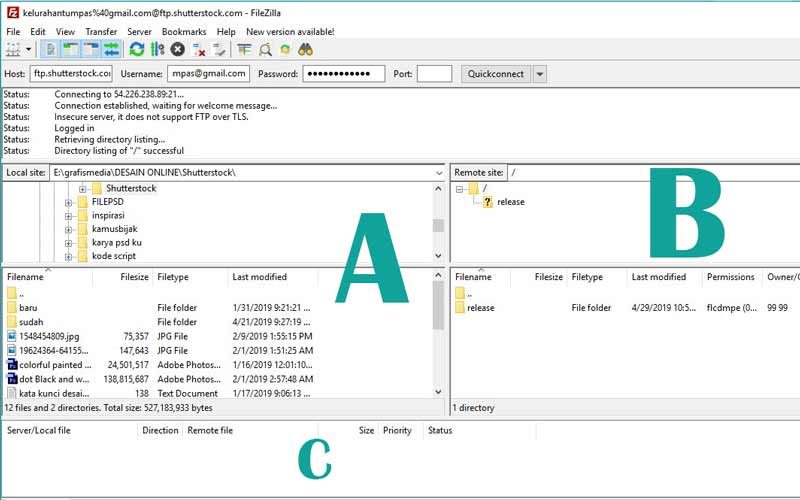
Once you’ve set up your connection between FileZilla and Shutterstock, it’s time to make sure everything’s working smoothly. The first step is to verify that your connection is active and ready for uploads. To do this, open FileZilla and look at the top toolbar—if your connection details are correctly entered, you’ll see the status change from “Not connected” to “Connected” with your server’s info displayed.
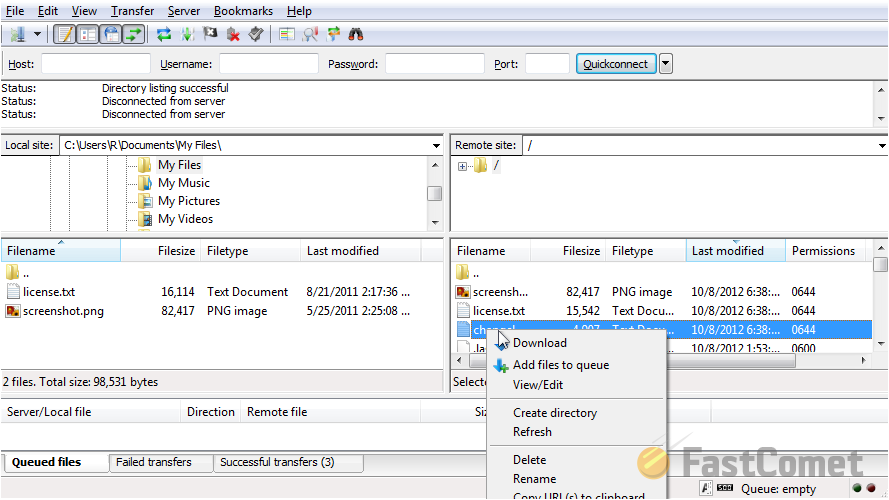
Next, let’s test the connection by navigating to your target folder on Shutterstock through FileZilla’s interface. If you see your folder structure load correctly, that’s a good sign! Now, try uploading a small test file—perhaps an image or a document—by dragging it from your local folder into the Shutterstock folder in FileZilla. Keep an eye on the transfer queue at the bottom. If the file uploads successfully without errors, you’re all set for seamless uploads.
To make the process even smoother, consider creating a dedicated folder for your uploads within Shutterstock. This way, you can quickly organize and locate your files later. Remember, consistent verification ensures your connection remains stable and ready for bulk uploads or regular updates.
Tips for Troubleshooting Common Connection Issues
Even with everything set up correctly, you might sometimes face connection hiccups. Don’t worry—most issues are straightforward to troubleshoot. Here are some common problems and how to fix them:
- Incorrect Login Credentials: Double-check your username, password, and server address. Sometimes, a small typo can cause connection failures. Reset your password if needed and update your FileZilla settings.
- Firewall or Antivirus Blocking: Your security software might block FileZilla from accessing the internet. Try temporarily disabling your firewall or antivirus to see if that resolves the issue. If it does, add an exception for FileZilla.
- Passive vs. Active Mode: Switch between passive and active transfer modes in FileZilla’s settings. Sometimes, one mode works better depending on your network configuration.
- Server Timeout or Limitations: Shutterstock servers might have timeout settings or restrictions. If your connection drops frequently, try reducing the number of simultaneous connections in FileZilla’s settings.
- Network Issues: Ensure your internet connection is stable. Restart your router if needed, and try connecting from a different network to rule out local network problems.
Remember, when troubleshooting, it’s helpful to check the error messages displayed in FileZilla. They often give clear hints about what’s going wrong. If you’re still stuck, consulting Shutterstock’s support documentation or reaching out to their support team can provide tailored assistance. With a little patience, most connection issues can be resolved quickly, ensuring your file uploads are smooth and hassle-free.
Best Practices for Managing Uploads via FileZilla
Now that you’re all set up to connect FileZilla with Shutterstock, it’s time to talk about some best practices to make your uploads smooth, efficient, and organized. Managing large volumes of files can get tricky, but with a few simple tips, you can keep everything running seamlessly.
Organize Your Files Before Uploads: Before you even open FileZilla, take a moment to organize your files on your local machine. Group similar images, videos, or assets into clearly labeled folders. This way, when you’re uploading to Shutterstock, you know exactly where everything is, saving you time and reducing errors.
Use Consistent Naming Conventions: Naming your files consistently makes it easier to locate and manage them later. For example, use descriptive names with dates or keywords, like sunset_beach_2024.jpg. Avoid spaces or special characters that might cause issues during transfers.
Set Up Transfer Queues: FileZilla allows you to queue multiple files for upload. Use this feature to prioritize and control the upload process. This helps prevent overloads and ensures that critical files are uploaded first.
Monitor Your Transfers: Keep an eye on the transfer queue to watch for errors or interrupted uploads. If a file fails to upload, FileZilla will notify you, allowing you to retry without losing progress.
Schedule Regular Uploads: Instead of doing all uploads in one go, consider scheduling regular sessions. This helps you stay organized and prevents system overloads, especially if you handle a high volume of assets.
Maintain Connection Stability: Ensure your internet connection is stable during uploads. If your connection drops, FileZilla can resume interrupted transfers, but prolonged instability can cause headaches. Consider using wired connections for large batches.
Secure Your Transfers: Use SFTP or FTPS protocols for secure file transfers. Shutterstock appreciates secure uploads, and this practice protects your assets from potential interception.
By following these best practices, you’ll streamline your workflow, reduce errors, and make managing your Shutterstock uploads via FileZilla a breeze. Happy uploading!
Conclusion and Additional Resources
Connecting FileZilla to Shutterstock might seem daunting at first, but once you get the hang of the setup process and adopt some best practices, it becomes a powerful tool in your creative toolkit. Seamless uploads mean you spend less time worrying about technical hiccups and more time focusing on creating stunning content.
Remember, the key steps include configuring your FTP settings, ensuring secure connections, and organizing your files effectively. Don’t forget to keep your software up to date and regularly back up your assets to avoid any data loss.
If you want to dive deeper into optimizing your upload process or troubleshooting common issues, here are some additional resources:
- FileZilla Documentation: Official guides and tutorials to master FileZilla features.
- Shutterstock Help Center: Tips on managing your assets and upload best practices for Shutterstock.
- Understanding FTP/SFTP Protocols: A beginner-friendly overview of secure file transfer methods.
- Effective File Management Tips: Strategies for organizing digital assets efficiently.
With these resources at your fingertips, you’re well on your way to mastering seamless uploads to Shutterstock using FileZilla. Keep experimenting, stay organized, and enjoy a hassle-free experience!