Cleaning your uploads folders in WordPress may seem like a minor task, but it plays a crucial role in maintaining your website’s performance and storage management. Over time, these folders can accumulate a lot of unnecessary files that can slow down your site and create clutter. In this post, we’ll explore the reasons why cleaning your uploads folder is essential and how to do it safely, helping you keep your WordPress site running smoothly.
Understanding the Importance of Cleaning Uploads Folders

So, why does cleaning your uploads folder matter? Let’s break it down into a few key points:
- Improved Site Performance: The more files your server needs to process, the longer loading times may become. By removing outdated or unused files, you’re allowing your website to run more efficiently.
- Storage Management: Every WordPress upload consumes storage space. If you’re on a hosting plan with limited storage, cleaning out unnecessary images or files can save you from unexpected upgrades or extra fees.
- Better Organization: A tidy uploads folder makes finding files easier. When files are organized, it saves time and effort when you need to locate a specific image or document.
- Security Enhancement: Outdated files might pose security risks, especially if they’re tied to old themes or plugins. Keeping only the files that you actually use minimizes vulnerabilities.
Now that we understand why it’s essential to clean the uploads folder, let’s delve into best practices for doing it safely. Always consider backing up your website before making any significant changes. This way, if something goes wrong, you’ll have a way to recover your data.
Preparing for Deletion: Backup Your WordPress Site
Before you dive into the sometimes daunting task of cleaning out your uploads folder in WordPress, it’s absolutely crucial to take a step back and prepare. The best way to prepare is by backing up your WordPress site. Trust me; you’ll thank yourself later!
A backup ensures that you can restore your site if anything goes wrong during the cleanup process. It’s like having a safety net while you perform acrobatics in the air! Here’s a simple guide to help you with it:
- Choose a Backup Method: You can go the plugin route or manually back up your files and database. Popular WordPress backup plugins include:
- UpdraftPlus
- BackupBuddy
- VaultPress
TIP: Ensure your backup includes both your WordPress files (which contains your uploads) and the database – that’s where all your content and settings are stored. You can never be too safe!
Identifying Unused Media Files
Once you’ve got that backup in place, it’s time to focus on identifying unused media files in your uploads folder. This is a vital step in cleaning up your WordPress uploads folder and making your site more efficient.
But how do you tell which media files are collecting virtual dust? Here’s a straightforward approach:
- Media Library Inspection: Start by diving into your WordPress Media Library. You can sort media files by date uploaded to spot older files you may no longer need.
- Check for Unused Files: Some plugins can help with this. For instance, using a plugin like Media Cleaner will scan your library and identify media files that are not attached to any post or page.
- Review Your Content: Go through your posts and pages to compare the media they use. If you stumble upon images or documents that aren’t appearing anywhere, you might be looking at candidates for deletion.
| File Type | Considerations |
|---|---|
| Images | Consider deleting images that are not used in any recent posts. |
| PDFs/Docs | If they don’t link to any content or are outdated, they might need to go. |
By taking these steps, you’ll be well on your way to tidying up your uploads folder while keeping your WordPress site organized and efficient. Happy cleaning!
Using Plugins for Safe Cleanup
Cleaning up your uploads folder in WordPress can be a daunting task, especially if you’re not tech-savvy. But don’t worry, there’s a way to make it easier: using plugins! These nifty tools can automate many aspects of the cleanup process, ensuring it’s done safely and effectively. Here’s how you can leverage plugins for a smooth experience.
First up, let’s talk about some popular plugins designed for this specific task:
- WP-Optimize: This plugin not only helps clean your uploads folder but also optimizes your database, reduces revisions, and more.
- Media Cleaner: If you’re looking for something tailored specifically for media files, this plugin scans your uploads and identifies unused files.
- FileBird: While primarily a media management tool, FileBird allows you to organize and delete files in an intuitive folder structure, making cleanup less overwhelming.
Before you dive in, here are a few tips to ensure you use plugins safely:
- Always Back Up: Before running any cleanup operation, it’s crucial to back up your site. This way, if anything goes awry, you can restore your files without a hitch.
- Read Reviews: Not all plugins are created equal. Check user reviews and ratings to find one that’s reliable and effective.
- Test on Staging Site: If you have a staging environment, use it to test the plugin before applying changes to your live site.
Using the right plugin can not only save you time but can also protect your site’s integrity. So go ahead, explore your options, and make your WordPress uploads cleaner and more efficient!
Manual Cleanup: Step-by-Step Guide
If you’re the hands-on type or prefer total control, manual cleanup of your uploads folder can be tremendously effective. While it requires more effort and attention, it’s also a great way to get familiar with your site’s structure. Let’s take you through a step-by-step guide!
Step 1: Access the Uploads Folder
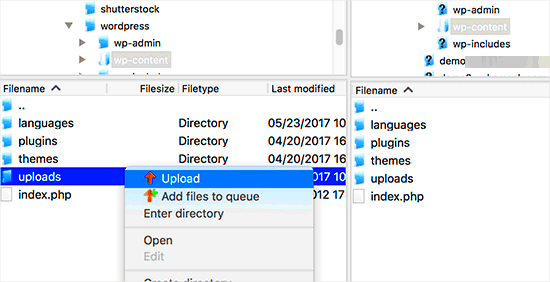
The first thing you’ll need to do is access your uploads folder. This folder is typically located in the wp-content/uploads directory of your WordPress installation. You can get there via an FTP client or your web host’s file manager.
Step 2: Review File Types
Once you’re in, take a look at the various file types present. Common types include images (JPEG, PNG, GIF), documents (PDF) and videos (MP4). Ask yourself:
- Are there duplicate images?
- Are there large files that can be compressed or removed?
Step 3: Identify Unused Files
This step is crucial! You need to determine which files are no longer in use. This can often be tricky, but a good rule of thumb is to delete files not linked in your posts or pages. This can be achieved with the help of:
- WordPress Media Library: Check the Media Library for any file that doesn’t have a corresponding post.
- Image Optimization Tools: These can help identify potentially unused images based on references.
Step 4: Backup Important Files
Before you dive into deletion, make sure to back up any files you might need later. Download them to your computer or use cloud storage for added safety.
Step 5: Delete Unnecessary Files
Once you are certain which files are outdated or unused, it’s time to delete them. Simply highlight the files and click delete! Make sure to double-check your selections, as deleting something accidentally can be a hassle.
Step 6: Organize the Remaining Files
Finally, it’s always a good idea to organize what you have left. Consider creating folders based on type or project. This will keep your uploads tidy and manageable.
And there you have it! A thorough yet straightforward guide to manually cleaning up your uploads folder. Whether you opt for a plugin or do it manually, keeping your WordPress uploads organized is essential for site performance and user experience.
Setting Up a Regular Maintenance Routine
Creating a regular maintenance routine for your WordPress site is crucial, especially when it comes to managing your uploads folder. The more frequently you touch base with your files, the more organized they remain. Here’s how you can set up a smooth and effective routine:
- Schedule Regular Check-Ins: Decide on a frequency that works best for you—weekly, bi-weekly, or monthly. Block out time on your calendar, just like any important meeting. Make it a routine that you stick to.
- Use Automation Tools: Consider utilizing plugins to automate some of the tedious tasks. For instance, plugins like Media Cleaner can help identify unused media files and remove them.
- Create a Checklist: Having a checklist can ensure you don’t overlook anything. Include items like checking for unused files, optimizing images for web, and backing up files before making any deletions.
- Backup Your Files: Always ensure you have a backup before making any significant changes. You can use backup plugins like UpdraftPlus or BackWPup to make sure all your media is safely stored.
Implementing these steps will not only save you time but also keep your uploads folder neat and easy to manage. Regular maintenance won’t feel like a chore; you’ll appreciate the clarity that comes with it!
Tips for Preventing Future Uploads Clutter
Now that you’ve tackled the current clutter in your uploads folder, let’s make sure it doesn’t happen again! Here are some practical tips to keep your uploads section organized over the long term:
- Implement a Naming Convention: Choose a clear and consistent naming system for your files. For example, you might identify files by their content and date, like “event-name_YYYYMMDD.jpg”. This makes it easier to search for and locate files in the future.
- Use FTP for Bulk Deletions: If you’re eyeing massive clean-up sessions, using FTP (File Transfer Protocol) tools can really speed things up. You can easily manage multiple files at once without going through your WordPress dashboard.
- Limit File Uploads: To minimize clutter, limit who can upload files. If you’re running a multi-author site, consider capping the upload permissions to avoid excessive file additions.
- Regularly Review and Delete: Make it a habit to review uploaded files every few months. If you see outdated or unused files, don’t hesitate to delete them right away.
By incorporating these tips into your WordPress routine, you’ll not only keep your uploads folder clutter-free, but also enhance the overall performance of your website. Staying proactive will pay off immensely!
Conclusion
Cleaning your uploads folders in WordPress is a vital step for maintaining your website’s performance, organization, and security. Regularly removing unused or unnecessary files can help reduce server space usage, improve backup times, and speed up media library access. By taking a cautious approach, you can ensure that your important media stays intact while clearing up clutter.
To summarize the steps for safely cleaning your WordPress uploads folders:
- Backup Your Site: Always create a complete backup before making any changes.
- Identify Unused Files: Use plugins or your media library to locate files that are no longer in use.
- Delete with Caution: Consider deleting files in bulk or individually, ensuring that they are indeed unnecessary.
- Use Plugins: Consider using reliable plugins like “Media Cleaner” or “WP-Optimize” to automate the process of finding and removing unused files safely.
- Regular Maintenance: Set a schedule for regular checks to keep your uploads folders organized.
| Action | Description |
|---|---|
| Backup | Always create a backup before cleaning your uploads folder. |
| Identify | Look for files that are not attached to any posts or pages. |
| Delete | Remove the identified files carefully and systematically. |
| Use Tools | Utilize plugins for efficient cleaning and organization. |
| Maintain | Implement a regular maintenance schedule for your uploads folder. |


