If you’ve ever downloaded an EPS file from Shutterstock, you might have noticed that sometimes they aren’t as clean or ready-to-use as you’d hope. EPS files are vector graphics, which makes them perfect for resizing without losing quality, but they can come with some quirks—like unwanted background elements, embedded fonts, or unnecessary layers—that make editing and using them a bit tricky. Whether you’re a designer, a marketer, or just someone working on a project, understanding common issues with Shutterstock EPS files is the first step toward making them work perfectly for your needs. Let’s explore what typical problems you might encounter and how to fix them to get your files looking professional and polished.
Tools Needed for Cleaning Up EPS Files
Cleaning up an EPS file doesn’t have to be complicated or require a bunch of expensive software. In fact, there are several tools—both free and paid—that can help you tidy up your files efficiently. Here’s what you’ll want to have on hand:
- Adobe Illustrator – The gold standard for working with vector graphics. It offers powerful tools to select, edit, and clean up your EPS files with precision.
- Inkscape – A free, open-source vector graphics editor that’s a great alternative to Illustrator. Inkscape can handle EPS files and allows you to remove unwanted elements, adjust layers, and optimize your graphics.
- CorelDRAW – Another professional vector editor that’s widely used in the industry, perfect for detailed cleanup and editing of EPS files.
- Online EPS Editors – Web-based tools like Vectr or Photopea can be handy for quick fixes without installing software, though they might have limited features compared to desktop apps.
Additionally, depending on the issues you’re facing, you might need:
- Image editing software – For rasterizing parts of your vector file or removing background elements.
- Plugins or Scripts – For batch cleaning or automating repetitive tasks in your editing software.
Having the right tools ready will make the cleanup process smoother, more efficient, and ultimately lead to a much better-looking final product. Whether you’re fixing a small problem or doing a complete overhaul, these tools will help you turn a messy EPS file into a clean, professional asset ready for use in your projects.
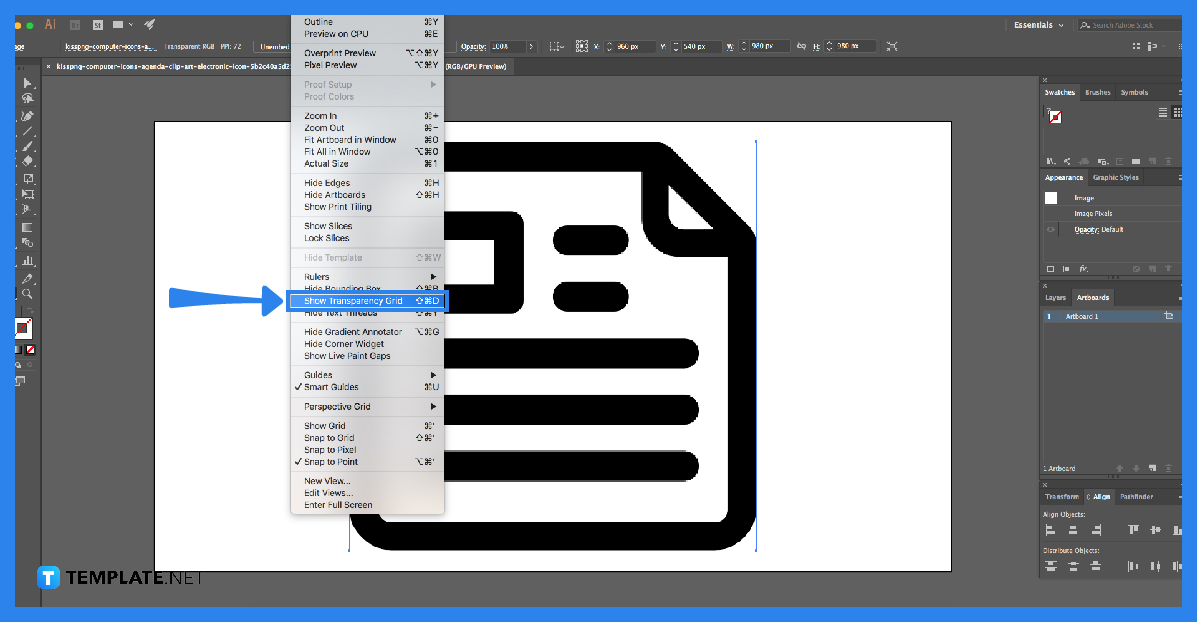
Step-by-Step Guide to Opening and Inspecting EPS Files
So, you’ve just downloaded a Shutterstock EPS file and you’re eager to use it for your project. But before diving in, it’s a good idea to open it up and give it a quick inspection. This helps you understand what’s inside and identifies any cleanup work needed.
First things first, you’ll need the right software. Common options include Adobe Illustrator, CorelDRAW, or even free tools like Inkscape. For this guide, I’ll focus on Adobe Illustrator since it’s widely used and user-friendly.
Step 1: Open the EPS file
- Launch Adobe Illustrator.
- Go to File > Open and select your EPS file.
- Click Open. The file should load into a new workspace.
Step 2: Inspect the artwork
Once opened, take a moment to look over the entire design. Zoom in and out to see how detailed it is and to spot any unwanted elements or artifacts. Pay attention to:
- Background areas that might be unnecessary or distracting.
- Unwanted objects, extra layers, or stray marks.
- Color inconsistencies or artifacts caused by compression or importing.
Use the selection tool (the black arrow) to click on different parts of the artwork. If some elements are grouped together, ungroup them by right-clicking and choosing Ungroup. This makes it easier to select and edit individual components.
Step 3: Check layers and groups
Open the Layers panel (Window > Layers). This helps you see how the artwork is organized. Sometimes, unwanted elements are hidden deep inside layers or groups, so expand all layers to get a full view. This step is crucial for identifying parts that need removal or editing.
By inspecting carefully, you’ll get a good sense of what’s necessary and what’s just clutter, saving you time during cleanup.
How to Remove Unwanted Elements and Artifacts
After inspecting your EPS file, it’s time to tidy it up. Removing unwanted elements and artifacts ensures your final graphic is clean, professional, and ready for use.
Step 1: Select and delete unwanted elements
- Use the Selection Tool (V) to click on the unwanted object.
- If it’s part of a group, you might need to ungroup first (Object > Ungroup).
- Press Delete or Backspace to remove it.
Tip: To select multiple elements at once, hold Shift and click each one, or drag a selection box around them. Then delete all at once.
Step 2: Clean up stray marks and artifacts
- Zoom in closely to see tiny artifacts or unwanted pixels.
- Use the Eraser Tool (Shift+E) or the Knife Tool to manually remove irregular marks.
- For small spots, the Blob Brush or the Direct Selection Tool (white arrow) can help tidy up edges.
Step 3: Remove hidden or unused layers
- Go to the Layers panel.
- Hide or delete any layers that contain no useful content.
- Right-click on a layer and choose Delete Layer to remove it.
Step 4: Simplify complex paths
If your artwork has overly complicated paths or unnecessary anchor points, simplifying can improve performance and appearance. Select the path, then go to Object > Path > Simplify. Adjust the sliders to reduce anchor points while maintaining the shape.
Always save a copy before making major changes, so you can revert if needed.
By following these steps, your EPS file will be much cleaner, making it easier to customize further or export in the desired format. Remember, taking a little extra time to clean up now pays off with a polished final product!
Optimizing EPS Files for Better Performance and Compatibility

Once you’ve cleaned up your Shutterstock EPS files—removing unnecessary elements, fixing issues, and tidying up layers—it’s time to optimize them. Optimization ensures your files are not only smaller in size but also work smoothly across different platforms and software. No one wants to deal with sluggish files or compatibility hiccups, right?
Here are some handy tips to optimize your EPS files:
- Flatten complex elements: If your design has many overlapping objects or complex patterns, consider flattening them. This reduces the processing load and helps prevent issues in older or less capable software.
- Convert text to outlines: To avoid font compatibility problems, convert all text to outlines. This makes your text look consistent everywhere, but remember, it’s no longer editable as text afterward.
- Remove unused swatches and symbols: Clean out any unused color swatches, symbols, or patterns. This tidies up your file and reduces its size.
- Optimize color modes: Save your EPS files in the appropriate color mode—CMYK for print, RGB for digital use. Consistency here helps prevent color mismatches.
- Embed or link images carefully: If your EPS contains linked images, embed them if you want everything in one file, or keep links if you need to update images separately. Embedding increases file size but improves portability.
Another trick is to save your EPS with compression options enabled, if available. This can significantly reduce file size without sacrificing quality. Also, consider saving a backup copy before making major optimizations—just in case you need to revert.
Lastly, test your optimized EPS files in different programs—like Adobe Illustrator, Photoshop, or even third-party apps—to ensure they work seamlessly. This way, you’ll catch any unexpected issues early on.
Saving and Exporting Cleaned EPS Files
After you’ve cleaned and optimized your Shutterstock EPS files, it’s time to save and export them properly. Proper saving ensures that your hard work isn’t lost and that your files are ready for use across various projects and platforms.
Here’s a step-by-step guide to saving and exporting your cleaned EPS files:
- Save as a new version: Always save your cleaned file as a new version—something like filename_cleaned.eps. This preserves the original untouched file and keeps your workflow organized.
- Select the right EPS options: When saving, check the options dialog. Make sure to:
- Choose the correct version of EPS (e.g., EPS 10 or EPS 8) based on where you’ll use it.
- Enable embedding fonts or converting text to outlines, depending on your needs.
- Decide whether to include linked images or embed them.
- Enable compression if available.
- Consider exporting for specific uses: Sometimes, you might need a different format for a particular purpose. For instance, exporting to high-resolution PDF or SVG can be helpful for web or print. Use the export options to tailor your file accordingly.
- Test your saved files: Before handing over your EPS to a client or importing into another project, open the saved file in different programs to verify all elements look correct and are functioning as expected.
- Keep organized backups: Save your cleaned and optimized EPS files in a dedicated folder with clear naming conventions. This makes it easier to find the right version later and avoids confusion.
By following these steps, you ensure that your EPS files are not only clean and optimized but also reliably ready for print, digital use, or further editing. Proper saving and exporting are the final touches that make your workflow professional and hassle-free.
Tips for Maintaining High-Quality EPS Files
Keeping your Shutterstock EPS files looking sharp and professional isn’t just about how you download them—it’s also about how you handle and maintain them over time. Here are some practical tips to ensure your EPS files stay high-quality and ready for any project:
- Use Reliable Software: Always open and edit EPS files with trusted design programs like Adobe Illustrator, CorelDRAW, or Affinity Designer. These tools preserve the file’s vector data and prevent unwanted compression or quality loss.
- Avoid Excessive Editing: While editing EPS files, try to keep changes minimal. Over-editing or repeatedly saving in incompatible formats can cause unintended degradation of quality.
- Maintain Consistent File Organization: Save your EPS files in clearly labeled folders and keep backups. This helps prevent accidental overwrites and makes it easier to locate the right version when needed.
- Update Software Regularly: Keep your design software up to date. Newer versions often include bug fixes and improvements that help preserve file integrity and compatibility.
- Be Careful with Resizing: Since EPS files are vectors, they can be scaled infinitely without losing quality. However, avoid unnecessary resizing that might lead to alignment issues or rendering problems—especially if the EPS was originally created with specific dimensions in mind.
- Embed Fonts and Images Properly: When saving EPS files, ensure fonts are embedded or converted to outlines, and linked images are embedded if possible. This prevents missing elements when sharing files across different systems.
- Regularly Validate Files: Open your EPS files periodically to verify they display correctly. This quick check can help catch potential issues early before they affect your final project.
By following these tips, you’ll extend the life of your EPS files and keep them looking professional no matter how many times you use them. Proper management and careful handling are key to ensuring your vector graphics always shine!
Conclusion and Best Practices for Using Shutterstock EPS Files
Using EPS files from Shutterstock can be a game-changer for your design projects—they’re versatile, scalable, and ready to enhance your creative work. But to get the most out of these files, it’s essential to follow some best practices, especially when it comes to cleaning, editing, and maintaining their quality.
Here’s a quick recap of the key takeaways:
- Download the highest quality version available to ensure you start with the best possible file.
- Always open EPS files with compatible, professional vector software like Adobe Illustrator to preserve their quality and editability.
- Clean up your EPS files carefully, removing unnecessary elements, fixing artifacts, and ensuring they’re optimized for your intended use.
- Maintain organization and backups so you can easily access and preserve the integrity of your files over time.
- Use vector editing tools wisely—rescale and modify elements as needed without sacrificing quality.
- Stay updated on software and file standards to prevent compatibility issues and ensure your files remain usable across different platforms.
In the end, the key to making the most of Shutterstock EPS files is a combination of careful download practices, diligent cleaning, and good file management. When you handle your vector assets thoughtfully, you’ll produce stunning, professional results every time. Happy designing!