The footer of your WordPress site is like the last page of a book. It’s where you summarize your content, showcase essential links, and provide information about your site. But it’s not just a boring copy-paste section! This area can significantly enhance user experience and contribute to your overall site aesthetics. So, let’s dive into what makes the footer an essential part of your website.
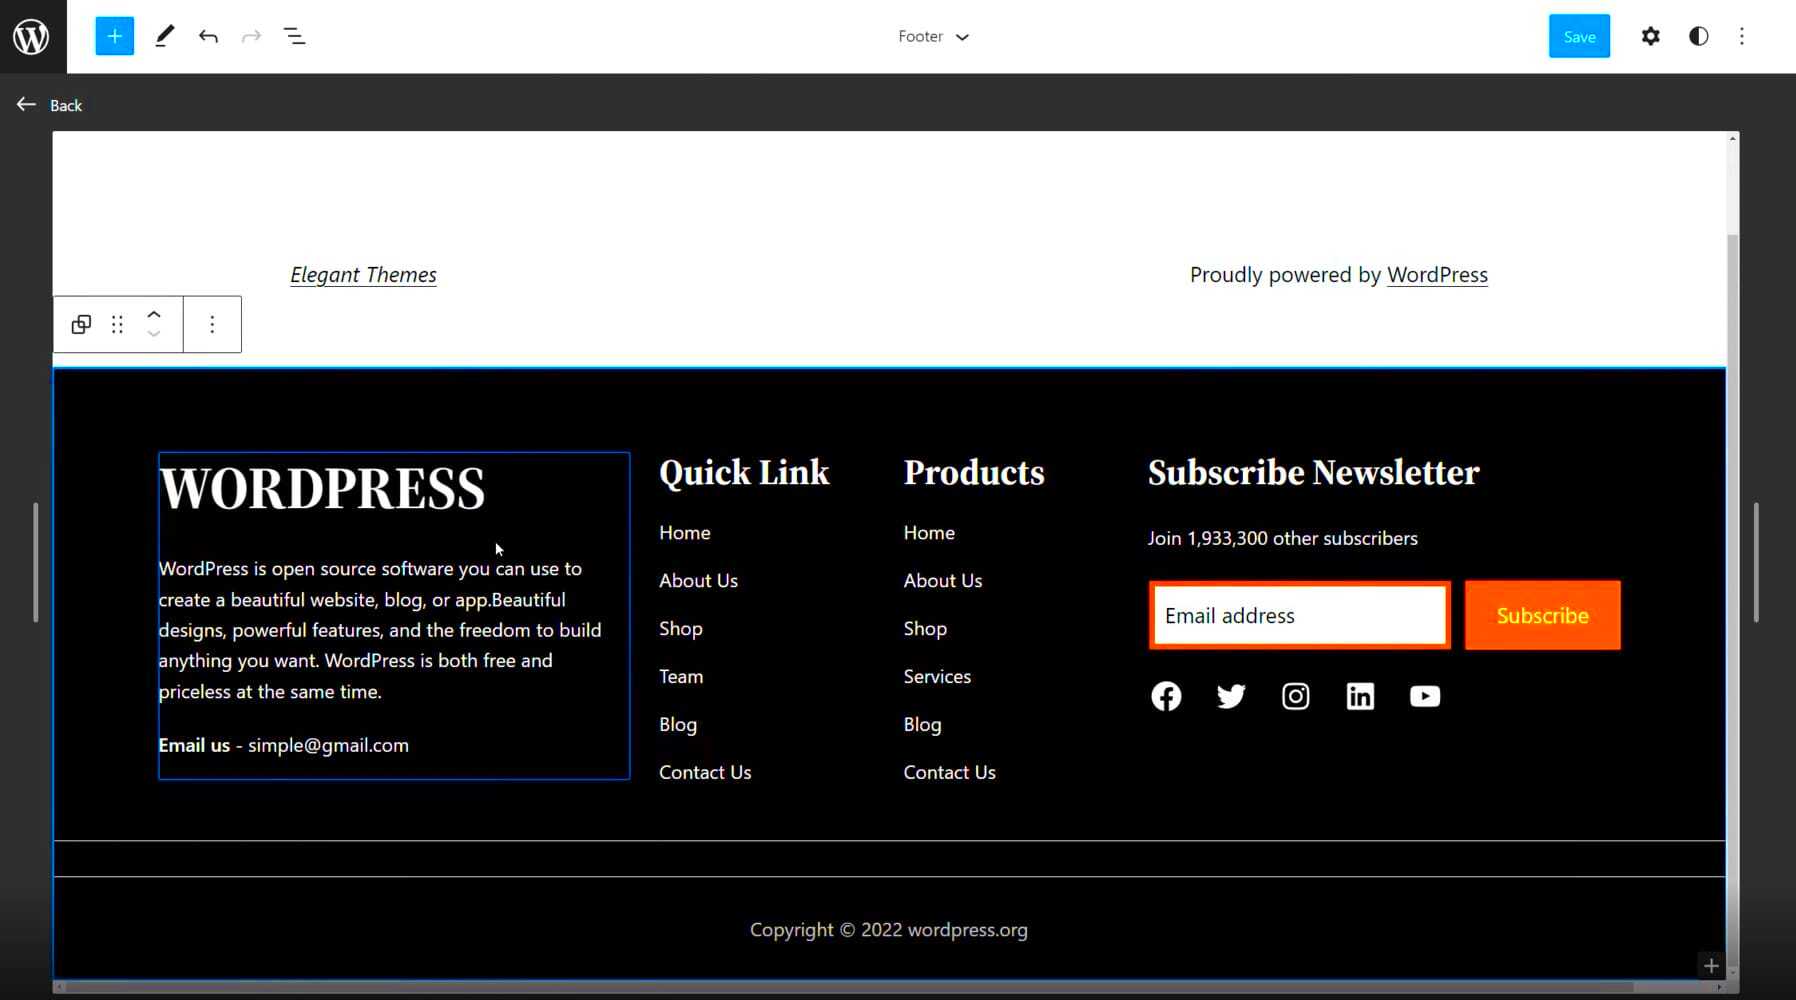
Typically, you can find the footer at the bottom of your web pages. Here are some common elements you might see:
- Copyright Information: This usually includes the copyright notice and the year.
- Contact Details: A way for visitors to reach you, such as an email or phone number.
- Social Media Links: Icons linking to your social media profiles to encourage engagement.
- Navigation Links: Links to important pages, like your privacy policy or terms of service.
- Newsletter Signup: A section where visitors can subscribe for updates.
Having a well-designed footer can guide your visitors and keep them engaged even after they’ve finished reading your content. So, before you change anything, take a moment to consider your footer’s purpose and how it can add value to your site!
Accessing the WordPress Customizer
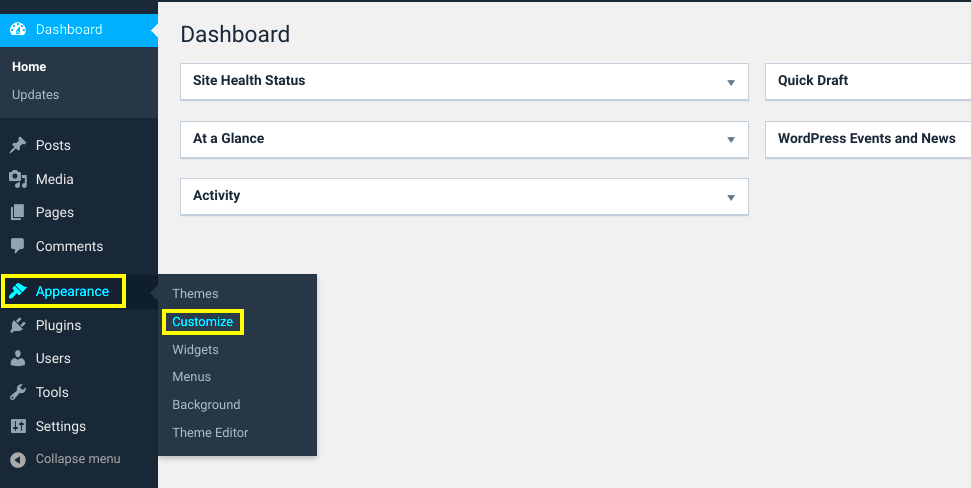
Now that you understand what the footer is and why it matters, let’s talk about how to change it! The first step is to access the WordPress Customizer, a powerful tool that allows you to make alterations to your site’s appearance in real time.
Here’s how you can access the WordPress Customizer:
- Log into your WordPress Dashboard.
- Navigate to Appearance in the left-hand menu.
- Click on Customize. This will open the Customizer interface.
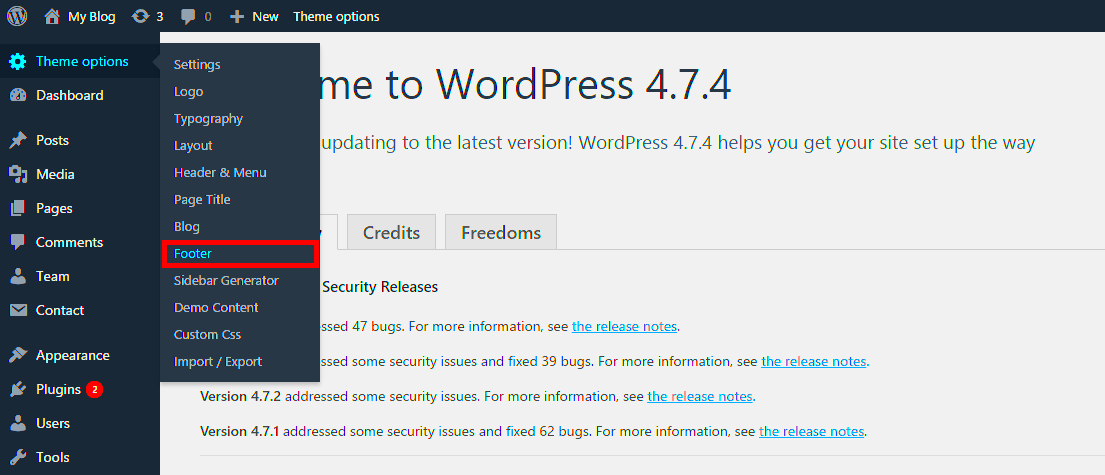
Once you’re in the Customizer, you’ll see a live preview of your site along with several options on the left. Depending on your theme, the Customizer may offer different sections for editing, but you’ll typically find a section labeled Footer or something similar. Click on it to get started!
Here, you can modify:
- Text and links
- Layout and style
- Widgets used in the footer area
Don’t forget to hit Publish once you’re satisfied with your changes. This will make your new footer live for all your visitors to see! It’s as easy as pie!
Using Widgets to Modify the Footer
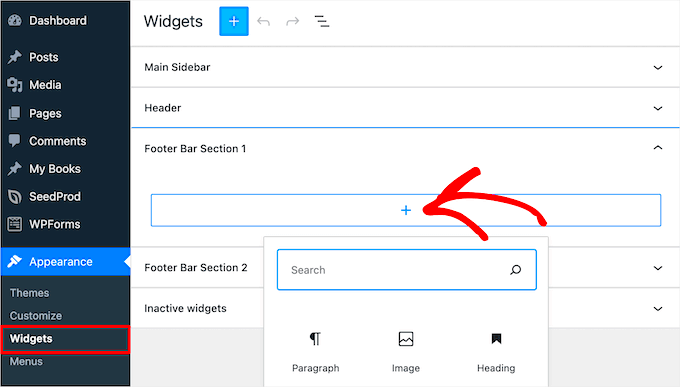
When you think of customizing your WordPress footer, one of the easiest methods is through widgets. Most WordPress themes come equipped with widget-ready areas in the footer, allowing you to add content without dabbling too much into code. This is especially handy for users who prefer a more visual approach to web design.
Here’s how you can get started:
- Navigate to the Widgets Section: Go to your WordPress Dashboard. From there, head to Appearance and click on Widgets. Here, you’ll see all the available widgets that you can add to your footer.
- Select the Footer Area: Find the footer widget area, which is typically labeled as “Footer” or “Footer Area.” Click on it to open it up.
- Drag and Drop Widgets: Grab any widget you’d like to add from the available options and simply drag it to your footer area. Common options include text, images, or even custom HTML for a more personalized touch.
- Customize the Widget: Each widget will have its own settings. Customize it to your liking, whether it’s adding links, changing text size, or even integrating social media feeds.
- Preview and Save: Always preview your changes to see how they look on your actual site. Once satisfied, don’t forget to hit the Save button.
Using widgets allows for a flexible way to incorporate updates without the hassle of coding. Plus, it gives your footer a touch of personality that can really enhance your website’s overall aesthetic!
Editing Footer.php File for Advanced Customization
If you’re feeling adventurous and want to push the limits of your WordPress site’s footer, diving into the footer.php file might be the way to go. This approach allows for advanced customization that widgets just can’t achieve. However, be cautious: editing core theme files can lead to issues if you aren’t careful.
Before you start, make sure to backup your site—this is crucial. Here’s a step-by-step guide to safely modify your footer.php file:
- Access Theme Editor: From your WordPress Dashboard, go to Appearance and click on Theme Editor. You’ll see a list of template files on the right side.
- Locate footer.php: Find
footer.phpamong the listed files. It’s usually towards the bottom. Click on it to open the code editor. - Edit Carefully: Here’s where you can make custom changes. You can add HTML, CSS, or even PHP code. If you’re looking to incorporate elements like copyright text, social media links, or custom scripts, this is the space to do it.
- Save Changes: After making edits, make sure to click the Update File button to save your changes. Always recheck your site to see if everything is functioning smoothly.
Keep in mind, if your theme updates, it may overwrite your changes. Consider using a child theme for these modifications. That way, your custom code remains intact, regardless of theme updates. Editing the footer.php file opens up a world of possibilities for fine-tuning your website’s look and functionality!
Using Page Builders for Footer Customization
Page builders have changed the way we approach web design, making it incredibly easy for anyone, regardless of their technical background, to customize their WordPress sites. When it comes to footers, page builders offer a flexible and user-friendly way to tweak your footer layout and styling. Popular options like Elementor, Beaver Builder, and WPBakery allow you to create custom footers that match your overall site design seamlessly.
Here’s how you can use a page builder to change your footer:
- Choose Your Page Builder: If you haven’t already installed a page builder, choose one that meets your needs. Elementor is a favorite among many, thanks to its drag-and-drop functionality.
- Create a New Footer Template: Navigate to the template section of your page builder. Most page builders allow you to create a specific footer template that can be reused across multiple pages.
- Add Elements to Your Footer: Utilize the drag-and-drop interface to add text, images, social media icons, or custom menus into your footer. You can adjust the alignment, spacing, and design for each element to ensure a cohesive look.
- Responsive Design: Don’t forget to check how your footer looks on mobile devices. Most page builders offer a responsive preview option, letting you tweak settings as needed.
Once you’re happy with your design, save it and set it as your active footer template! Using a page builder not only amps up the aesthetic appeal of your website but also makes maintenance a breeze.
Adding Custom Footer Scripts
If you’re looking to add specific functionalities to your WordPress footer, custom scripts can be a powerful tool. Whether it’s integrating Google Analytics, adding custom tracking scripts, or even embedding widgets, adding footer scripts leads to an enhanced user experience and better data analytics.
Here’s a simple guide on how to add custom scripts to your footer:
- Locate the Correct File: If you’re comfortable with coding, you can directly access your theme’s
footer.phpfile. However, it is highly recommended to use a child theme to prevent your changes from being overwritten during theme updates. - Using the Theme Customizer: Navigate to Appearance > Customize > Additional CSS/JavaScript. Some themes provide an option to add custom scripts right from the customizer.
- Utilizing Plugins: If coding isn’t your strong suit, consider using plugins such as “Insert Headers and Footers” or “Header Footer Code Manager.” These plugins create a user-friendly interface where you can add your scripts with ease.
- Testing Your Scripts: Always preview your changes. Script errors can disrupt site functionality. Use tools like Google Tag Assistant to ensure your scripts are working correctly.
By following these steps, you’ll be able to enrich your footer with powerful scripts that enhance the overall functionality of your website while keeping it visually appealing.
7. Testing Your Footer Changes
So, you’ve made some fantastic changes to your WordPress footer—great job! But before you start celebrating, let’s make sure everything is working smoothly. Testing your footer changes is just as important as making them. After all, the footer is the last thing visitors see on your site, and it should be just as polished as the rest!
Here’s a simple checklist to ensure your footer changes are up to par:
- Refresh Your Page: Start by refreshing your website. Sometimes caching can lead to old versions lingering around.
- Check Responsiveness: Open your website on different devices—mobile, tablet, and desktop—to see if your footer looks good everywhere.
- Inspect for Broken Links: If you added any links, click on them to make sure they lead to the right pages. You don’t want old links presenting 404 errors!
- Verify Social Media Icons: If you’ve updated social media links, ensure they link correctly by clicking through.
- Look for Style Consistency: Check if the font size, colors, and alignment match the rest of your site. Consistency is key!
Once you’ve checked everything, ask a friend or colleague to look at your site too. Fresh eyes might catch something you missed. If everything checks out, congratulations! You’ve successfully updated your footer. Just remember, website maintenance is an ongoing process. Regularly revisit your footer to keep things fresh and functional!
8. Troubleshooting Common Footer Issues
Even the best-laid plans can hit a snag. If you’re encountering issues with your footer after making changes, don’t panic! Below are some common footer problems and their solutions to help you get back on track.
| Issue | Solution |
|---|---|
| Footer Not Updating | Clear your cache. If you’re using a caching plugin, make sure to purge the cache. Alternatively, try a hard refresh (Ctrl + F5). |
| Links are Broken | Double-check your URL entries. Ensure there are no typos and that links lead to the right pages. |
| Footer is Misaligned | Inspect your CSS rules. Look for conflicting styles that could disrupt the layout. Adjust margins and padding to fit properly. |
| Missing Icons or Images | Ensure the image URLs are correct and the files are uploaded properly in your media library. |
If you’re still facing issues after trying these fixes, consider reaching out to the WordPress community forums or consulting the support documentation. With a little patience and perseverance, you’ll have that footer looking perfect in no time!

