Have you ever downloaded a stunning Shutterstock image but wished the background color was different to better match your project? Whether you’re creating a website, designing a flyer, or just customizing an image for personal use, changing the background color can make a huge difference. Luckily, with the right tools and a bit of know-how, you can easily modify the background color of Shutterstock images to fit your needs. In this guide, we’ll walk through the essentials of background color editing, so you can transform your images effortlessly and professionally.
Tools and Software Needed for Background Color Editing
Before diving into changing your Shutterstock image backgrounds, it’s important to have the right tools at your fingertips. Here’s a quick rundown of popular options, each suited for different levels of experience and specific needs:
- Adobe Photoshop – The industry standard for image editing. Photoshop offers powerful tools for removing and changing backgrounds, including the Magic Wand, Quick Selection Tool, and advanced masking features. Perfect if you want professional, precise results.
- Canva – Great for beginners and quick edits. Canva has a background remover feature (available in the Pro version) and an easy interface to change background colors with just a few clicks.
- GIMP – A free, open-source alternative to Photoshop. GIMP provides many advanced editing features, including background removal and color adjustments, making it a good choice if you’re on a budget.
- Online Background Removal Tools – Websites like remove.bg or Photopea allow you to quickly remove backgrounds without installing software. After removing the background, you can use simple tools to add a new background color.
Choosing the right software depends on your comfort level and the complexity of the image. For professional results, Adobe Photoshop is the top choice, but for quick and easy edits, Canva or online tools might be all you need. Remember, having the right tools is the first step toward achieving a clean, vibrant background color change that makes your Shutterstock images stand out!
Step-by-Step Guide to Changing Background Color in Shutterstock Images
Alright, so you’ve got a Shutterstock image and you want to give its background a fresh new look. No worries! Changing the background color might sound complicated, but with the right tools and some simple steps, you’ll be able to do it like a pro. Let’s walk through this process together.
Step 1: Choose Your Image
Start by selecting the Shutterstock image you want to modify. Download it in a high-resolution format to ensure the best quality when editing. Save it to a convenient folder on your computer so you can easily find it later.
Step 2: Open the Image in Editing Software
Use an image editing program that allows you to work with layers and has color editing features. Adobe Photoshop is a popular choice, but free options like GIMP or online editors such as Photopea work well too.
Step 3: Isolate the Subject
This is the trickiest part—removing or isolating the subject from the background. Use tools like the Magic Wand, Quick Selection, or the Pen Tool to carefully select the subject. Take your time here; clean edges will make your final result look more professional.
Step 4: Remove or Hide the Original Background
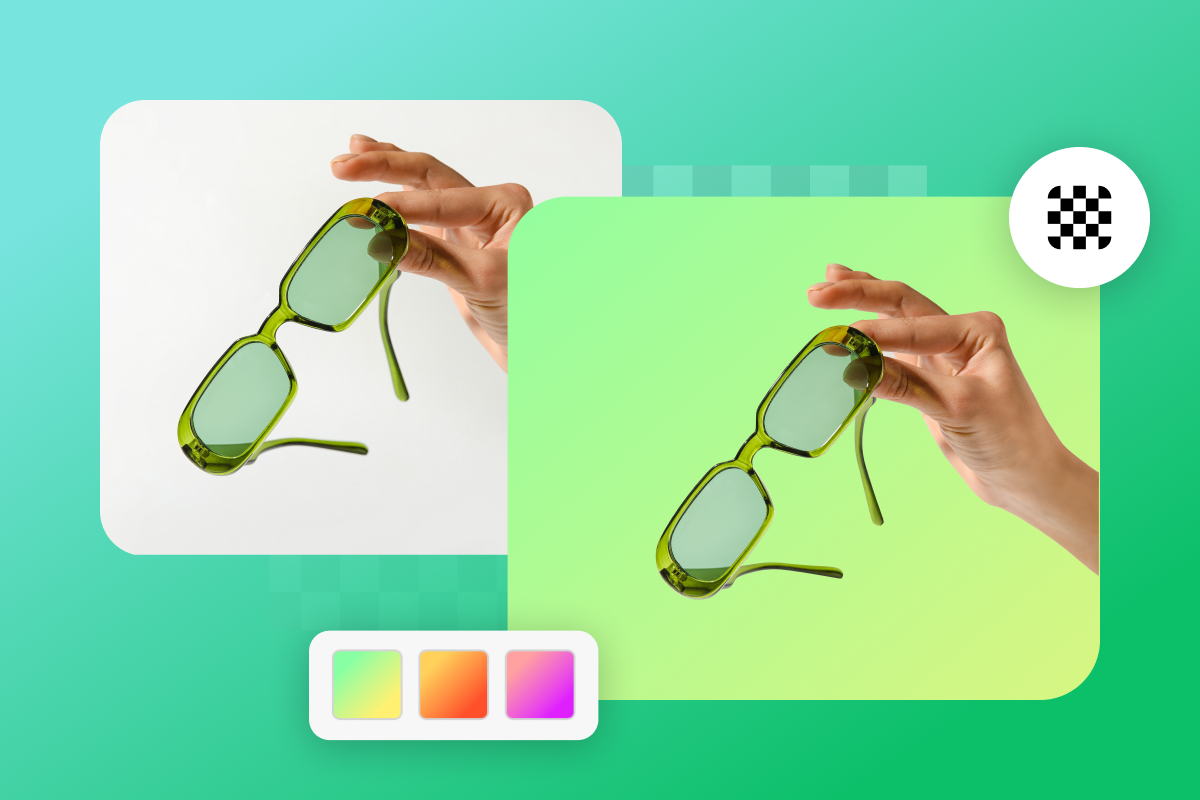
Once your subject is selected, create a new layer mask or delete the background layer. This step leaves you with just the isolated subject on a transparent background.
Step 5: Add a New Background Layer
Create a new layer beneath your subject. Fill this layer with the color of your choice. You can do this quickly using the Paint Bucket Tool or by creating a rectangle shape filled with the color you want.
Step 6: Adjust and Refine
Now, check how the subject blends with the new background. Use tools like the Eraser or Smudge Tool to tidy up any rough edges. Adjust the color, brightness, and contrast if needed to make everything look cohesive.
Step 7: Save Your Edited Image
Once you’re happy with the look, save your image in the desired format—JPEG for most uses or PNG if you want to keep transparency. That’s it! Your Shutterstock image now sports a fresh background color.
Tips for Achieving a Professional Look When Modifying Background Colors
Changing the background color is a great way to customize images, but to make sure your final result looks polished, keep these professional tips in mind:
- Choose Complementary Colors: Select background colors that complement your subject. Use color theory basics to pick hues that enhance rather than clash.
- Maintain Consistent Lighting and Shadows: If your subject has shadows or highlights, replicate similar lighting in the new background to keep everything looking natural.
- Focus on Edges and Details: Pay close attention to the edges of your subject. Use feathering or refine edge tools to smooth out jagged or rough areas, making the cutout look seamless.
- Use Subtle Gradients or Textures: Instead of a flat color, consider adding subtle gradients or textures to the background for a more dynamic and professional appearance.
- Keep It Simple: Sometimes, less is more. A clean, solid background color often looks more professional than overly busy or saturated backgrounds.
- Consistent Color Balance: After changing the background, adjust the overall color balance, contrast, and brightness of the entire image to ensure harmony between the subject and background.
- Preview on Different Devices: Check how your image looks on various screens—computers, tablets, smartphones—to ensure it appears professional everywhere.
Remember, patience and attention to detail are key. With a little practice, you’ll be able to modify Shutterstock images to look like they were professionally shot with a custom background. Happy editing!
Common Challenges and How to Overcome Them
When you’re in the process of changing a Shutterstock background color, it’s quite normal to run into a few hurdles. No worries — these challenges are common, and with a little patience, you can easily get past them. Let’s walk through some of the typical issues and how to tackle them.
Challenge 1: Difficult Edges or Hair Details
One of the most common problems is dealing with tricky edges, especially when the subject has fine hair or intricate details. Automatic background removal tools sometimes struggle here, leaving jagged edges or leftover background. To fix this, use a more precise editing tool like a feathered brush or refine edge feature. Zoom in closely, and take your time to manually clean up those edges for a natural look.
Challenge 2: Color Bleeding or Halo Effects
Sometimes, when you change the background color, a faint halo or color bleed appears around your subject. This is often caused by imperfect masking. To fix it, consider applying a slight feather or smoothing effect to the edges, or use a manual eraser tool to carefully blend the edges into your new background. Adjusting contrast and color levels can also help hide any residual artifacts.
Challenge 3: Inconsistent Lighting or Shadows
If your subject was shot with inconsistent lighting, changing the background color can look unnatural. Shadows might seem out of place, or the overall image may lack cohesion. To overcome this, try to match the background color to the lighting tone of your subject. For instance, if your subject has warm lighting, choose a warm background color. You can also add subtle shadows or highlights within your editing software to make everything blend seamlessly.
Challenge 4: Limited Editing Skills
If you’re new to photo editing, it can be intimidating. The good news is that many editing tools now offer user-friendly interfaces and tutorials. Start with simple adjustments, and don’t be afraid to experiment. Practice makes perfect, and most software has undo options so you can try different approaches without worry.
Remember, patience is key. Take your time with each step, and don’t rush through the edits. With a bit of effort, you’ll be able to overcome these common challenges and create a polished, professional-looking image.
Finalizing and Saving Your Edited Shutterstock Image
Congratulations! You’ve successfully changed the background color of your Shutterstock image. Now, it’s time to finalize your work and save your masterpiece in the best quality possible.
Step 1: Review Your Edits Carefully
Before saving, zoom in and review every part of your image. Look for any leftover artifacts, rough edges, or inconsistencies in the background color. Make small adjustments if needed — smoothing edges, fixing color mismatches, or refining details. Remember, a little extra attention now pays off with a clean, professional result.
Step 2: Choose the Correct File Format
Depending on how you plan to use your image, select the appropriate format:
- JPEG: Ideal for web use, social media, or general purposes. Keep in mind that JPEGs are compressed, so choose a high-quality setting to preserve details.
- PNG: Best if your image has transparency or you want to preserve crisp edges without compression artifacts.
- TIFF or PSD: Use these if you plan to do further editing or need the highest quality for print.
Step 3: Save a Master Copy
Always save a high-resolution master copy of your edited image. Use the highest quality settings available to ensure it looks great on all platforms. Name your file clearly, perhaps including the date or version, so you can easily find it later.
Step 4: Export and Backup
Export your image in the chosen format, and consider creating backups — save copies on an external drive or cloud storage. This way, you won’t lose your work if something unexpected happens.
Step 5: Use Your Image!
Now that your image is finalized and saved, you’re ready to upload it to your website, include it in a presentation, or print it out. Take pride in your work — you’ve just transformed your Shutterstock image into a customized visual masterpiece!
Additional Resources for Background Color Editing
If you’re looking to enhance your skills in background color editing, there are numerous resources available to help you master the process. Online tutorials and video courses can provide step-by-step guidance, making complex techniques easier to understand. Platforms like YouTube and Udemy host a variety of tutorials tailored for different skill levels, from beginners to advanced users.
Additionally, software-specific resources can be invaluable. Many editing tools offer comprehensive user guides and community forums where you can find tips, tricks, and troubleshooting advice. For instance, Adobe Photoshop and Canva both have extensive tutorials on background editing and color adjustments.
Here are some recommended resources to explore:
- Adobe Photoshop Tutorials: Official guides and community forums for advanced editing techniques
- Canva Design School: Easy-to-follow tutorials perfect for beginners and intermediate users
- YouTube Channels: Channels like “Piximperfect,” “Blue Lightning TV,” and “Tutvid” offer free video tutorials
- Online Courses: Platforms like Udemy, Skillshare, and LinkedIn Learning provide comprehensive courses on photo editing
For quick tips and inspiration, browsing design blogs and forums such as Behance and Dribbble can also be helpful. These resources can help you learn new techniques, stay updated on trends, and connect with other designers.
By utilizing these resources, you’ll be better equipped to customize your Shutterstock images with perfect background colors, elevating your creative projects to the next level.