If you’re running an online store with WooCommerce, you probably know how time-consuming it can be to edit product links individually. Whether you are changing URLs due to redesign, updating your SEO strategy, or consolidating your product listings, bulk editing can save you a ton of time and effort. In this guide, we’ll walk you through the ins and outs of bulk editing product links in WooCommerce. You’ll discover why it’s essential and how you can do it effectively and accurately.
Why Bulk Edit Product Links?
Bulk editing product links is more than just a convenience; it’s a necessity for any serious e-commerce entrepreneur. Let’s dive into some compelling reasons why bulk editing matters:
- Time Efficiency: Imagine trying to edit hundreds of product links one by one. It’s practically a full-time job! With bulk editing, you can make changes to many products in just a few clicks.
- Consistency: Maintaining uniform link structures improves user experience. You want your customers to navigate your site easily without running into broken links or inconsistencies.
- SEO Benefits: Search engines prefer clean, updated links. When you optimize your product links collectively, you’re setting the stage for better search engine rankings.
- Quick Updates: If you need to change links due to broken pages or redirecting products to new categories, bulk editing allows you to do this swiftly without disrupting your operations.
- Reduced Errors: Editing links in bulk minimizes the risk of human error. If you have a clear plan, you can ensure that all links are updated correctly.
In summary, bulk editing your product links in WooCommerce is not just about saving time; it’s a strategic move that enhances your store’s functionality and helps in maintaining a loyal customer base.
Prerequisites for Bulk Editing
Before you dive into bulk editing product links in WooCommerce, it’s essential to ensure you have everything in place. Starting without proper preparations can lead to confusion and potentially disrupt your online store’s functionality. Let’s go through some necessary prerequisites:
- Backup Your Site: Always start with a backup. This ensures that if anything goes wrong during the editing process, you can easily revert to the previous state of your site.
- Update WordPress and WooCommerce: Make sure your WordPress installation and WooCommerce plugins are up-to-date. Updates often bring new features and bug fixes that can enhance your editing process.
- Check User Permissions: Ensure you have the correct user role. You need to be logged in as an Administrator or someone with editing privileges to perform bulk edits.
- Familiarity with Bulk Edit Tools: It may be beneficial to familiarize yourself with any bulk editing plugins or built-in WooCommerce options that you plan to use.
- Prepare Your Product Links: Before you begin, gather and organize all the new product links you want to implement. Spreadsheets often help in maintaining clarity.
- Test Environment: If possible, use a staging site where you can practice the bulk editing process before making changes on your live site.
By taking these steps, you set a solid foundation for a successful bulk editing experience, minimizing risks and enhancing efficiency.
Accessing the WooCommerce Product Management Dashboard
Once you’ve ensured all prerequisites are in place, it’s time to access the WooCommerce Product Management Dashboard. This is your command center for all product-related actions, including bulk editing.
To access this essential dashboard, follow these steps:
- Log into Your WordPress Admin: Start by logging into your WordPress admin area. Depending on your settings, this is usually found at
yourwebsite.com/wp-admin. - Navigate to Products: On the left-hand sidebar, look for the
WooCommerceor simplyProductsmenu option. Click on it to expand the selection. - Select All Products: Click on
All Products. This will take you to a page showing all your listed products. - Familiarize Yourself with the Layout: Take a moment to understand the layout—you’ll notice options like filtering, sorting, and of course, a bulk actions dropdown menu at the top.
Once you’re on this dashboard, you’re ready to begin your bulk editing adventure! It’s a powerful feature that will make managing your products much simpler and faster. Keep in mind that having a clear and organized dashboard will significantly help in refining your approach to bulk edits.
Steps to Bulk Edit Product Links
Bulk editing product links in WooCommerce can save you a ton of time, especially if you have a large store with numerous products to manage. Let’s walk through the steps together, so you can streamline your process!
- Log Into Your WordPress Dashboard: To get started, simply log into the dashboard of your WordPress site. It’s the control center where all the magic happens!
- Navigate to Products: On the left-hand side, you’ll see a menu. Click on ‘Products’ to view all your listed items.
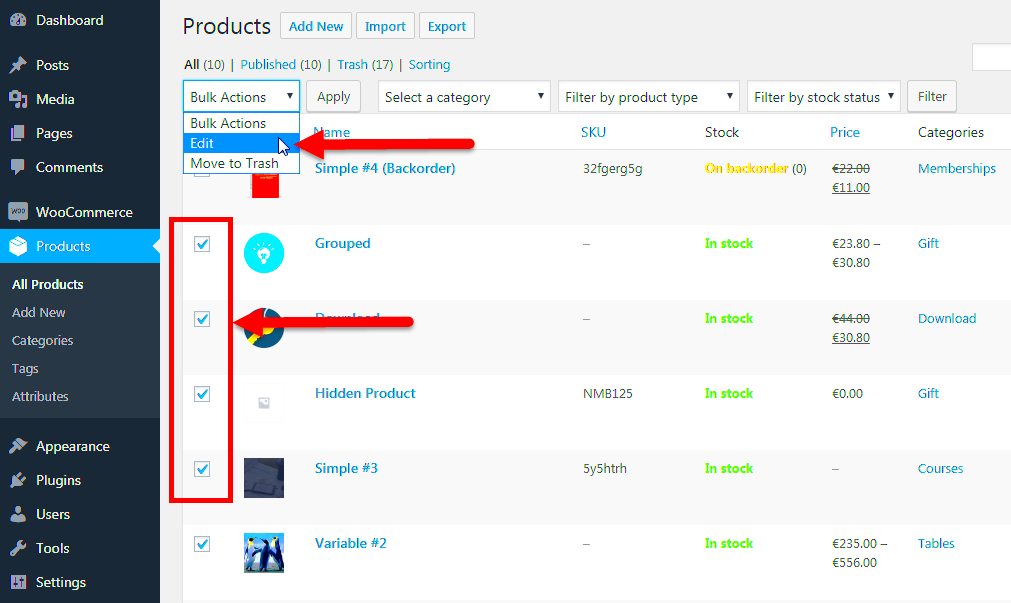
- Select Products for Bulk Editing: Browse through your products and tick the checkbox next to each one you want to edit. If you want to select all products on the page, just check the box at the top of the list.
- Choose Bulk Actions: After selecting your products, look for the ‘Bulk Actions’ dropdown menu. Click on it and select ‘Edit’, then press the ‘Apply’ button.
- Edit the Product Links: You’ll now find an edit screen for all the selected products. Here, you can change various attributes. If you want to update the product links, find the relevant field, and make your changes.
- Update Products: Once you’re satisfied with your edits, click on the ‘Update’ button to save your changes. Voila! Your product links are now bulk edited.
And just like that, you’ve efficiently updated multiple product links! Always remember to double-check your links after editing to ensure everything is working as intended.
Using Plugins for Bulk Editing
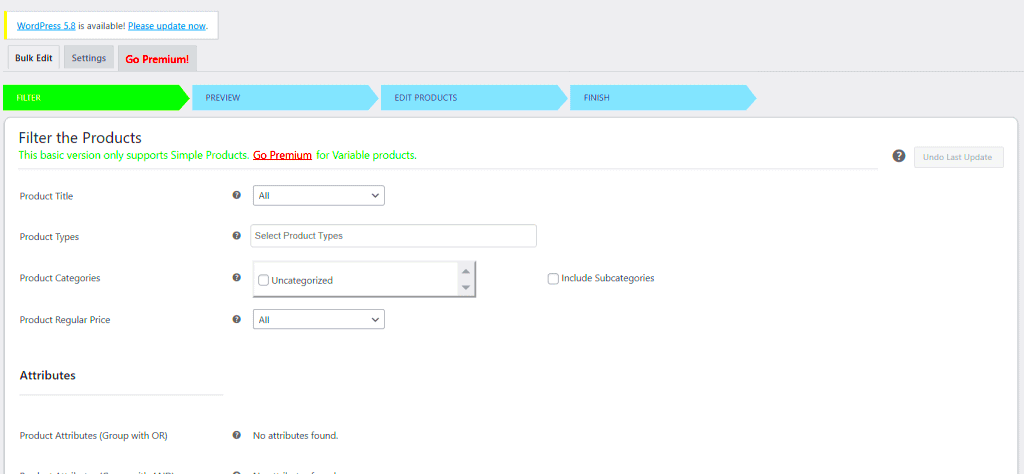
If you find that the built-in bulk editing feature isn’t meeting your needs, don’t fret! There are several plugins specifically designed for bulk editing in WooCommerce that can take your editing to the next level. Here’s how you can use them:
- Choose the Right Plugin: A good starting point is to investigate plugins like WooCommerce Bulk Editor, Bulk Table Editor, or WP All Import. Each offers unique features for different bulk editing tasks.
- Install and Activate: Once you’ve chosen a plugin, go to your WordPress dashboard and navigate to ‘Plugins’ > ‘Add New’. Upload your selected plugin, install it, and activate it.
- Familiarize Yourself with the Plugin: Spend a few minutes exploring the plugin’s interface. Most plugins come with helpful documentation or tutorials on how to master their features.
- Bulk Edit Your Product Links: Select the products you want to edit, just like before. However, with plugins, you may have additional fields and options for editing. This might include advanced conditions, link structures, or batch actions.
- Save Your Changes: After making your desired edits, make sure to save changes. Many plugins provide a preview option so you can see what the changes will look like before finalizing.
Using plugins can greatly simplify and enhance your bulk editing experience in WooCommerce, allowing for more customization and efficiency. The ease of use they bring could make a world of difference for large stores!
Best Practices for Bulk Editing Links
When it comes to bulk editing product links in WooCommerce, following some best practices can save you a lot of headaches and ensure a smooth process. Here are some tips to keep in mind:
- Backup Your Data: Before making any bulk changes, always back up your database. This way, if anything goes awry, you can restore your previous settings without losing valuable information.
- Test in a Staging Environment: If possible, make your changes in a staging environment first. This way, you can see how they affect your site without impacting the live version.
- Be Consistent: When bulk editing, maintain a consistent format for your links. Use the same style and structure to provide a uniform user experience.
- Use Descriptive Links: Make sure the product links are descriptive and give users an idea of what to expect. This can improve SEO and user engagement.
- Check Redirects: If you’re changing URLs, remember to set up 301 redirects from the old links to the new ones. This helps you maintain SEO rankings and ensures that users don’t encounter broken links.
- Review Your Changes: After bulk editing, take the time to review your changes. Check for any broken links or errors that may have occurred during the process.
By following these best practices, you can make the bulk editing process in WooCommerce much easier and efficient!
Troubleshooting Common Issues
Even with proper planning and execution, you may run into some issues while bulk editing product links in WooCommerce. Here are a few common problems and how to tackle them:
- Broken Links: After editing, check if any links lead to 404 errors. You can use online tools to crawl your site and find broken links.
- Data Loss: If your product information seems to be missing after the edit, it may be due to incorrect configurations during the bulk edit process. Always double-check your settings before committing any changes.
- Cache Problems: Sometimes your site may not reflect the changes immediately due to caching. Clear your site cache and browser cache to see your updates.
- SEO Implications: If the new links are not optimized, you might notice a drop in your traffic. Ensure that your new links are also SEO-friendly and relevant to your products.
- Incompatibility with Plugins: Certain plugins might conflict with the bulk editing process. Temporarily disable any non-essential plugins and see if the issue persists.
These troubleshooting tips can help you navigate common hiccups in bulk editing product links, making the process more manageable and effective.
How to Bulk Edit Product Links in WooCommerce
Managing an online store can be a daunting task, especially when it comes to keeping track of product links in WooCommerce. Bulk editing your product links can save you time and ensure consistency across your product listings. Here’s how to efficiently bulk edit product links in WooCommerce:
Follow these steps to streamline your WooCommerce store’s product links:
- Install a Bulk Edit Plugin:
Begin by installing a suitable bulk edit plugin from the WordPress repository. Some popular options include:
- WooCommerce Bulk Product Editing
- Bulk Edit Products, Prices & Attributes for WooCommerce
- WP All Import (with the WooCommerce Add-On)
- Export Your Product Data:
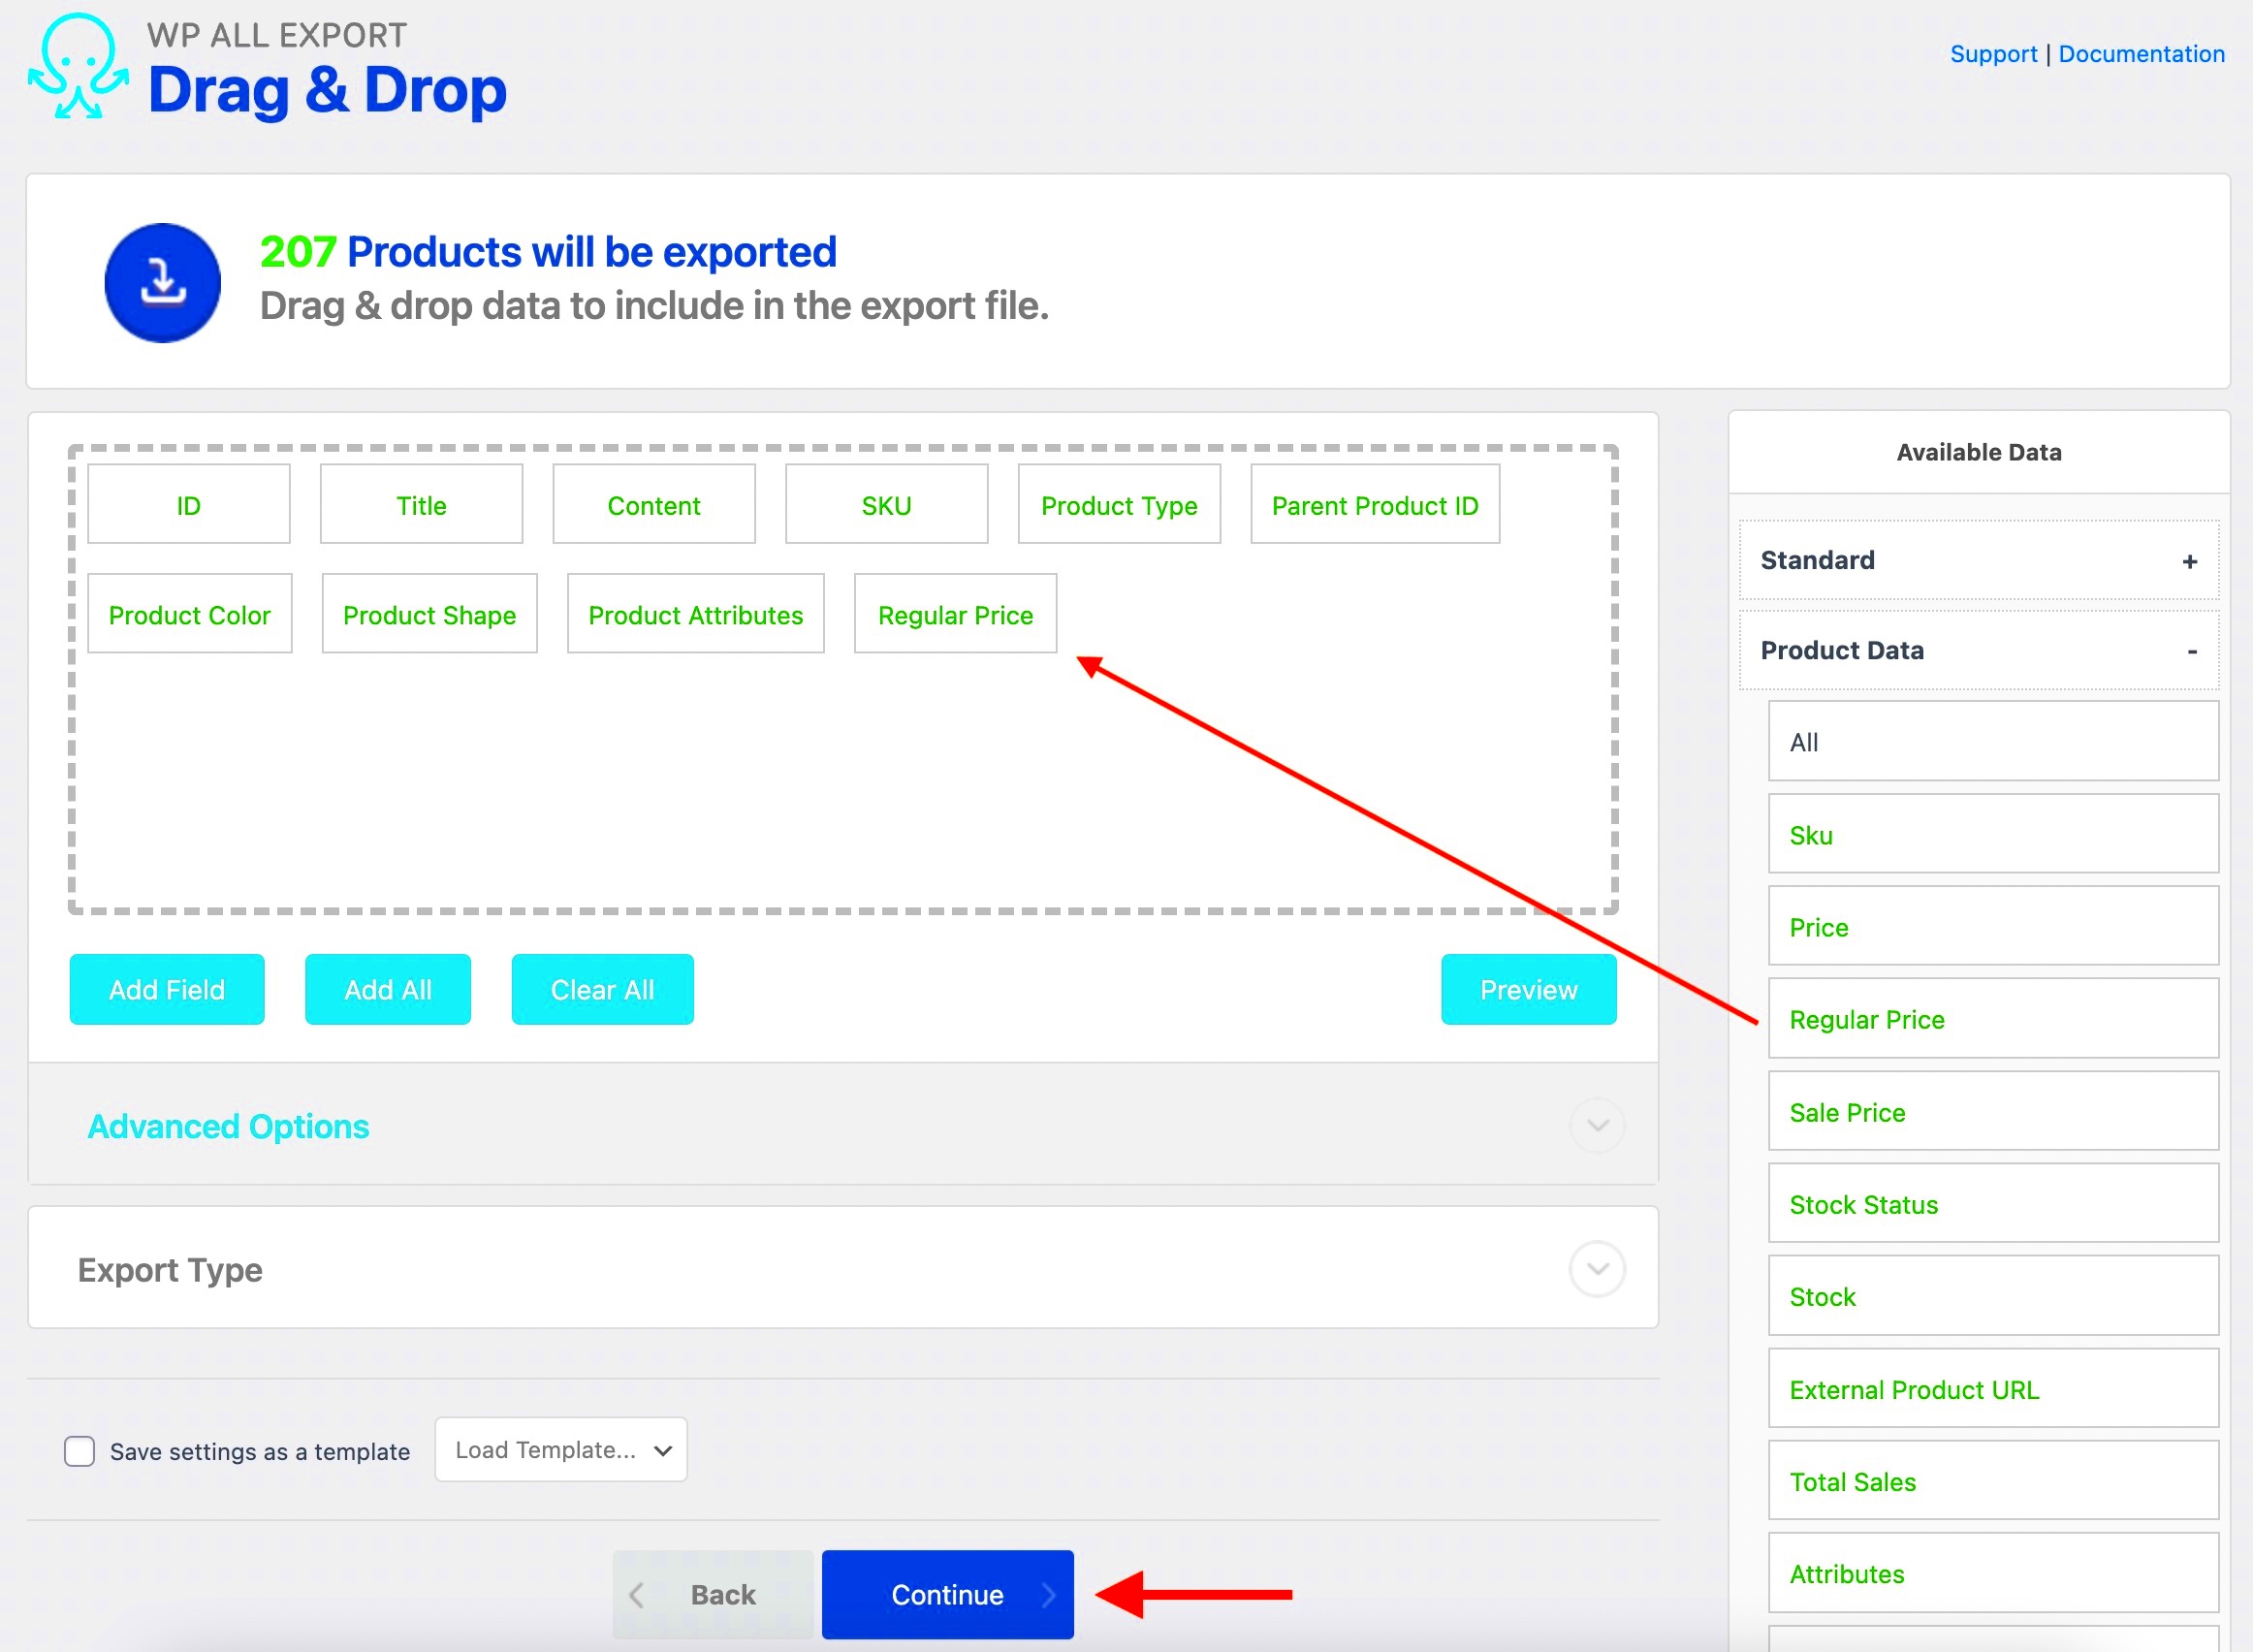
Use the built-in WooCommerce export tool or your bulk edit plugin to export your product data to a CSV file. This file will serve as the basis for your bulk edits.
- Edit Product Links:
Open the CSV file in a spreadsheet application like Microsoft Excel or Google Sheets. Locate the columns that contain product links and modify them as needed.
- Import the Edited CSV File:
Once your edits are complete, use the CSV import tool within WooCommerce or your plugin to upload the modified file back into your store.
- Confirm Changes:
Check your WooCommerce store to ensure all product links have been updated correctly and function as intended.
By following these steps, you can efficiently manage and update product links in bulk, saving time and maintaining a professional appearance in your WooCommerce store.
Conclusion: Streamlining your WooCommerce store by bulk editing product links not only enhances the user experience but also simplifies ongoing management. By leveraging the right tools and processes, you can maintain a seamless online shopping environment that keeps your customers satisfied.

