If you’re passionate about photography and eager to share your work with a global audience, Shutterstock is a fantastic platform to consider. But before you start uploading tons of photos, it’s essential to understand their submission guidelines. These rules aren’t just hoops to jump through—they’re designed to ensure your images meet quality standards and are suitable for licensing. Knowing what Shutterstock expects can save you time, frustration, and improve your chances of getting accepted. Think of it as the roadmap to getting your photos in front of millions of potential buyers. Let’s break down the key points you need to keep in mind!
Understanding Common Reasons for Photo Rejection on Shutterstock
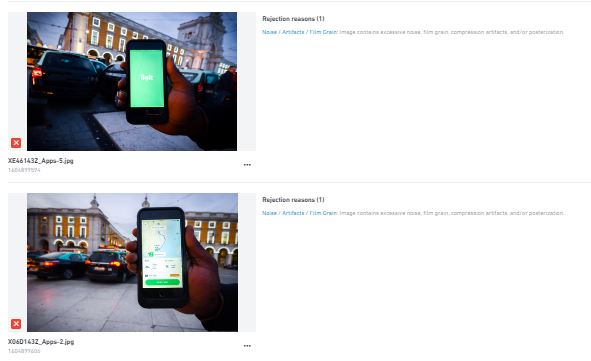
Even the most talented photographers face rejection sometimes, and Shutterstock is no exception. The good news? Most rejections happen because of common, fixable issues. Being aware of these pitfalls can help you avoid them in future submissions. Some typical reasons for rejection include:
- Technical issues: Blurry images, poor lighting, noise, or improper exposure can make your photos unsuitable for professional use.
- Model and property releases: If your photo features recognizable people or private property, you need the appropriate releases on file. Without them, Shutterstock will reject your image.
- Lack of commercial appeal: Photos that don’t have a clear subject, look cluttered, or lack visual impact often get rejected because they don’t meet market demand.
- Inappropriate content: Photos containing offensive, controversial, or copyrighted material without permission will not make the cut.
- Incorrect metadata: Missing or inaccurate keywords, titles, or descriptions can hinder your submission’s approval process, as they help buyers find your images.
Understanding these common issues is the first step toward creating images that stand out and get accepted. Remember, Shutterstock values quality, clarity, and legality. By paying close attention to these areas, you’ll boost your chances of having your photos approved and earning income from your creative efforts!
Preparing Your Photos for Submission to Increase Approval Chances
Getting your photos approved on Shutterstock can sometimes feel like a game of chance, but there are definitely ways to tilt the odds in your favor. One of the most important steps is making sure your images are thoroughly prepared before hitting the upload button. This not only shows professionalism but also aligns your work with Shutterstock‘s standards, increasing your chances of approval.
First off, always review Shutterstock’s content guidelines. They specify what’s acceptable in terms of subject matter, technical quality, and legal considerations. Make sure your photos are free from watermarks, logos, or any branding unless you have explicit permission to include them. Also, ensure that people featured in your photos have signed model releases if required, especially if the images are commercial in nature.
Next, focus on technical perfection. Here are some key points:
- Resolution: Upload images that are at least 4MP (megapixels), but higher resolution images are better. Shutterstock prefers images that are sharp and detailed.
- File Format: Save your photos in JPEG format with a high-quality setting (usually 8-12). Avoid overly compressed files that look pixelated or blurry.
- Color Profile: Use sRGB color space for consistency across devices and platforms.
- Exposure & Contrast: Make sure your photos are well-exposed, with balanced contrast and no blown-out highlights or crushed shadows.
- Sharpening: Apply subtle sharpening to enhance details without making the image look unnatural.
Another step is to carefully review your images for any imperfections. This might include dust spots, distracting backgrounds, or unwanted objects. Use editing tools to crop your images to improve composition, straighten horizons, and remove any distracting elements. Remember, simplicity often makes a photo more appealing and easier for buyers to use.
Finally, add relevant and descriptive metadata. Use clear, accurate titles, and detailed descriptions, including keywords that match the content of your photo. This helps Shutterstock’s review team understand your image and increases the likelihood of approval since they can more easily categorize and evaluate it.
Tips for Capturing High-Quality and Unique Photos
Great photos are the heart of a successful Shutterstock portfolio. The good news is, capturing high-quality and unique images isn’t just about fancy equipment; it’s about creativity, technique, and a keen eye. Here are some tips to help you stand out and produce photos that get approved and sell well.
1. Focus on Composition: Use the rule of thirds, leading lines, and framing to create visually engaging images. Pay attention to the background and foreground—eliminate clutter or distracting elements that can divert attention from your main subject.
2. Use Natural Light: Whenever possible, shoot during the golden hour (shortly after sunrise or before sunset). Natural light creates warm tones and soft shadows, making your photos more appealing. If shooting indoors, use diffused window light and avoid harsh shadows.
3. Experiment with Perspectives: Don’t just shoot from eye level. Try different angles—get low, shoot from above, or focus on close-ups. Unique perspectives can turn an ordinary scene into something compelling and original.
4. Incorporate Unique Subjects and Concepts: Think outside the box. Instead of cliché shots, look for interesting details, cultural elements, or unusual viewpoints. This not only makes your portfolio more diverse but also increases the chances of your photos standing out in searches.
5. Master Your Equipment: Whether you’re using a smartphone or a DSLR, learn how to use your camera settings. Adjust ISO, aperture, and shutter speed to suit the scene. Keep your lens clean, and invest in a tripod for stability during low-light or long exposure shots.
6. Focus on Sharpness and Clarity: Blurry or out-of-focus images are a quick rejection reason. Use autofocus carefully, and always review your shots before leaving the scene. Post-processing sharpening can also help enhance details.
7. Keep Up with Trends and Themes: Stay inspired by current trends—nature, minimalism, lifestyle, or technology. Combining your personal style with popular themes can boost your photos’ appeal.
Remember, capturing unique and high-quality photos is a skill that improves with practice. Keep experimenting, review your work critically, and don’t shy away from pushing your creative boundaries. Over time, your portfolio will not only grow in size but also in quality, making rejection less likely and your success more assured.
Properly Tagging and Describing Your Photos for Better Visibility
When it comes to getting your photos noticed on Shutterstock, how you tag and describe them can make a huge difference. Think of it like giving your images a map—helping viewers and the platform find them easily. The right tags and descriptions can boost your visibility and increase the chances of acceptance.
First, be specific and relevant with your tags. Instead of generic words like “nature” or “city,” use precise terms that accurately describe your photo. For example, if you uploaded a picture of a sunset over a mountain lake, you might tag it with “sunset,” “mountain lake,” “reflections,” “orange sky,” “nature scene,” and “outdoor.” This helps target the right audience and search queries.
Next, craft a clear and engaging description. Think of it as telling a little story about your photo. Mention key elements, the mood, or the context. For example: “A stunning sunset reflecting off a tranquil mountain lake, with vibrant orange and pink hues illuminating the sky.” Such descriptions give viewers and Shutterstock’s algorithms more context, making your photo easier to find.
Here are some tips to optimize your tags and descriptions:
- Use relevant keywords: Focus on what the photo truly depicts.
- Avoid overstuffing: Don’t add irrelevant tags just to get more views; it can hurt your credibility and visibility.
- Stay consistent: Use similar tagging styles across your portfolio for better branding.
- Update tags and descriptions: If your photo gets rejected or not viewed often, revisit and refine your tags and descriptions based on trending keywords or similar successful images.
Remember, the goal is to make your photo easy to discover for those searching for exactly what you captured. Well-thought-out tags and descriptions are your best friends in this journey, so invest a little time in getting them just right!
Reviewing Shutterstock’s Content Policies and Technical Requirements
Before uploading your photos, it’s essential to familiarize yourself with Shutterstock’s content policies and technical standards. Not doing so is a common reason for rejection, and it’s easily preventable once you know the rules.
Shutterstock has strict guidelines to ensure all images meet quality, legal, and ethical standards. Here’s a quick overview of what to keep in mind:
Content Policies
- No illegal or infringing content: Your photos should not contain copyrighted material, trademarks, or any content that infringes on intellectual property rights.
- Model releases and property releases: If your photo features identifiable people or private property, you need the appropriate releases. Failing to have these can lead to rejection or legal issues.
- Profanity or sensitive content: Avoid images with offensive, graphic, or sensitive themes that could be deemed inappropriate.
- Authenticity: Manipulated or heavily edited images should still be truthful representations unless clearly stated.
Technical Requirements
| Requirement | Details |
|---|---|
| File Format | JPEG for photos, TIFF can also be accepted for high-quality images |
| Resolution | Minimum of 4 megapixels (e.g., 2400 x 1600 pixels) |
| File Size | Maximum of 50MB per image |
| Color Profile | sRGB is preferred to ensure color consistency |
| Focus and Sharpness | Images should be sharp and in focus; avoid blurriness unless stylistically intentional |
It’s also a good idea to review Shutterstock’s content submission guidelines regularly, as policies can change. Taking the time to ensure your images comply with all policies and technical specs saves you from frustrating rejections and helps your portfolio grow smoothly.
By understanding and adhering to these policies and requirements, you’re setting yourself up for success. It shows Shutterstock that you’re serious about quality and professionalism, making it more likely for your photos to be approved and appreciated by a global audience.
Final Checklist Before Submitting Your Photos to Shutterstock
Before you hit that submit button and share your images with the world, it’s essential to run through a final checklist. This step can save you from unnecessary rejections and help you present your best work. Think of it as a quality control measure—making sure everything is polished and ready for prime time.
Here are some key points to review:
- Image Quality: Is your photo sharp, well-exposed, and free of noise or pixelation? Use tools like Adobe Lightroom or Photoshop to fine-tune your images, ensuring they look professional.
- Focus and Composition: Does the main subject stand out? Is the composition balanced? Cropping should enhance the image, not cut off important parts.
- Color and Exposure: Are the colors vibrant but natural? Check for blown-out highlights or crushed shadows. Adjust levels or curves if necessary.
- Metadata Accuracy: Have you added relevant keywords, titles, and descriptions? Accurate metadata helps your photos get discovered by the right audience.
- File Format and Size: Are your images saved in JPEG format with the recommended resolution (usually at least 4MP)? Ensure the file size meets Shutterstock’s guidelines without sacrificing quality.
- Model and Property Releases: If your photo features recognizable people or private property, do you have the necessary releases uploaded? These are crucial for acceptance, especially for commercial use.
- Compliance with Shutterstock Guidelines: Review Shutterstock’s contributor guidelines. Make sure your images don’t contain prohibited content like copyrighted works, offensive material, or watermarks.
Taking a few extra minutes to double-check these points can make all the difference. Remember, Shutterstock values high-quality, compliant images, so putting in the effort now pays off with fewer rejections and quicker approvals.
Conclusion and Additional Resources for Shutterstock Contributors
Uploading photos to Shutterstock can be an exciting journey, especially when you see your work appreciated and purchased by users worldwide. While the process might seem daunting at first, understanding the platform’s expectations, optimizing your images, and following best practices can significantly boost your success rate.
Keep in mind:
- Quality beats quantity—focus on creating compelling, well-edited images.
- Stay updated on Shutterstock’s guidelines—these can evolve over time.
- Engage with the contributor community—sharing tips and experiences can provide valuable insights.
For those looking to improve further, here are some additional resources:
- Shutterstock Contributor Help Center – Your go-to resource for guidelines, tips, and technical support.
- Shutterstock Blog – Regular updates, success stories, and industry insights.
- Photography Forums and Communities – Join discussions, ask questions, and learn from fellow photographers.
- Adobe Photoshop & Lightroom – Essential tools for editing and enhancing your images.
- Unsplash – Explore free high-quality images for inspiration and understanding of what works well in stock photography.
Remember, patience and persistence are key. Keep honing your skills, stay compliant, and don’t be discouraged by initial rejections. With dedication, you’ll find your niche and build a portfolio that stands out on Shutterstock. Happy uploading!