When it comes to making your marketing stand out, visuals are everything. Shutterstock offers a vast library of high-quality images that can be perfect for your campaigns. But sometimes, just a beautiful photo isn’t enough—you need to add some compelling text to grab attention and convey your message quickly. Whether it’s a catchy headline, a call-to-action, or a brief description, adding text to Shutterstock images can elevate your marketing efforts. It’s a simple yet powerful way to make your visuals more engaging, memorable, and effective. Let’s explore how you can do this seamlessly and creatively!
Choosing the Right Shutterstock Images for Your Marketing Campaigns
Picking the perfect Shutterstock image is the first step toward a successful marketing campaign. The right image should resonate with your target audience, align with your brand message, and evoke the desired emotion. Here are some tips to help you select the best images:
- Define Your Campaign Goals: Know what you want to achieve. Are you aiming to inspire, inform, or sell? Your goal will guide your image choice.
- Identify Your Target Audience: Consider demographics like age, gender, location, and interests. Choose images that appeal directly to these groups.
- Use Relevant Keywords: When searching on Shutterstock, use specific keywords related to your campaign. For example, if promoting a fitness product, search for images like “people exercising” or “healthy lifestyle.”
- Consider the Mood and Tone: Decide on the mood you want to portray—happy, professional, energetic, calm—and select images that match this tone.
- Check Image Composition and Quality: Look for images with clear focus, good lighting, and space where you can add text without clutter.
Once you’ve selected images that fit your campaign’s theme and audience, you can then think about how to enhance them with text. Remember, the goal is to complement the visual with your message, not overshadow it. Keep the image’s original impact intact while adding your marketing message in a way that feels natural and compelling. This thoughtful approach ensures your visuals will resonate and drive engagement effectively.
Tools and Software for Adding Text to Photos
When it comes to adding text to your Shutterstock photos, the good news is that there are plenty of tools out there—ranging from simple online editors to more advanced graphic design software. The right choice depends on your specific needs, your familiarity with design tools, and the complexity of the text you want to add.
Let’s take a quick look at some popular options:
- Canva: This user-friendly online platform is perfect for beginners. It offers a wide array of fonts, templates, and design elements. Plus, you can easily upload your Shutterstock images and add text with just a few clicks.
- Adobe Photoshop: For those who want more control and professional features, Photoshop is a great choice. It allows detailed text effects, precise positioning, and customization. However, it does have a steeper learning curve.
- GIMP: A free, open-source alternative to Photoshop. GIMP offers powerful editing tools, including text insertion, but might require some practice to master its interface.
- Pixlr: An online editor that’s easy to use and offers a lot of Photoshop-like features, including text overlays. Perfect for quick edits without installing software.
- Figma or Canva: Great for collaborative projects, especially if you’re working with a team or need feedback. These tools also support adding text seamlessly.
Most of these tools support exporting images in high-quality formats suitable for marketing, so you can confidently incorporate your customized Shutterstock photos into your campaigns.
Step-by-Step Guide to Adding Text to Shutterstock Photos
Ready to give your Shutterstock images that extra punch with some compelling text? Here’s a simple, step-by-step guide to help you get started, whether you’re using an online tool like Canva or a more advanced program like Photoshop.
Step 1: Select Your Shutterstock Photo
Start by choosing the perfect image from Shutterstock that aligns with your marketing message. Download it in a high-resolution format to ensure clarity once you add your text.
Step 2: Choose Your Editing Tool
Decide which software or online platform you’ll use. For beginners, Canva is a fantastic choice due to its intuitive interface. For more control, Photoshop or GIMP works well.
Step 3: Upload Your Image
Open your chosen tool and upload the Shutterstock photo. Most platforms have a simple drag-and-drop feature or an upload button to make this easy.
Step 4: Add Text to the Image
Look for the “Text” or “Add Text” option in your editor. Click on it to insert a text box onto your image. Type your marketing message, slogan, or call-to-action.
Step 5: Customize Your Text
- Font: Choose a font that matches your brand style. Keep it readable and professional.
- Size: Adjust the size to make sure your message stands out but doesn’t overpower the image.
- Color: Pick a color that contrasts well with the background for maximum visibility.
- Effects: Add shadows, outlines, or other effects to enhance readability and appeal.
Step 6: Position Your Text
Drag and place the text box where it fits best. Typically, top or bottom areas work well, but feel free to experiment with placement to highlight the image’s focal points.
Step 7: Review and Adjust
Take a moment to review your design. Make sure the text is clear, well-positioned, and not cluttered. Adjust font size, color, or placement as needed.
Step 8: Save and Export
Once you’re happy with your design, save your work. Export the image in a high-quality format suitable for your marketing channels, like JPEG or PNG.
And that’s it! With these simple steps, you can transform stunning Shutterstock photos into engaging marketing visuals that capture attention and convey your message effectively.
Tips for Selecting Fonts, Colors, and Placement
When it comes to adding text to Shutterstock photos for marketing, the choices you make about fonts, colors, and placement can make a huge difference in how your message is received. Let’s walk through some practical tips to help you make those choices confidently.
Choosing the Right Fonts: The font you pick should match the mood and tone of your message. For example, a fun, playful brand might go for rounded, whimsical fonts, while a professional corporate image calls for clean, straightforward typefaces. Always prioritize readability—avoid overly decorative fonts that can be hard to read at smaller sizes.
Colors Matter: Your text color should contrast well with the background to ensure clarity. If your photo has a busy or colorful background, consider using semi-transparent overlays or text boxes to help your text pop. Stick to a color palette that aligns with your brand identity. Tools like Adobe Color or Coolors can help you select harmonious color schemes.
Placement Tips: Strategic placement of your text can enhance the overall impact. Typically, placing text where it doesn’t obscure important parts of the image is best—think along the top or bottom thirds, or within clear negative space. Use grids or guides to align your text for a polished look. Remember, less is often more; avoid cluttering your image with too much text.
Additional Advice: Experiment with different font sizes and weights to create hierarchy—make your headline bold and larger, while supporting text can be smaller. Pay attention to line spacing and letter spacing for a balanced appearance. And don’t forget to preview your design on various devices to ensure readability everywhere!
Best Practices for Making Your Text Stand Out
Now that you’ve chosen your fonts, colors, and placement, it’s time to make sure your text truly stands out and captures attention. Here are some best practices to help your message cut through the visual noise.
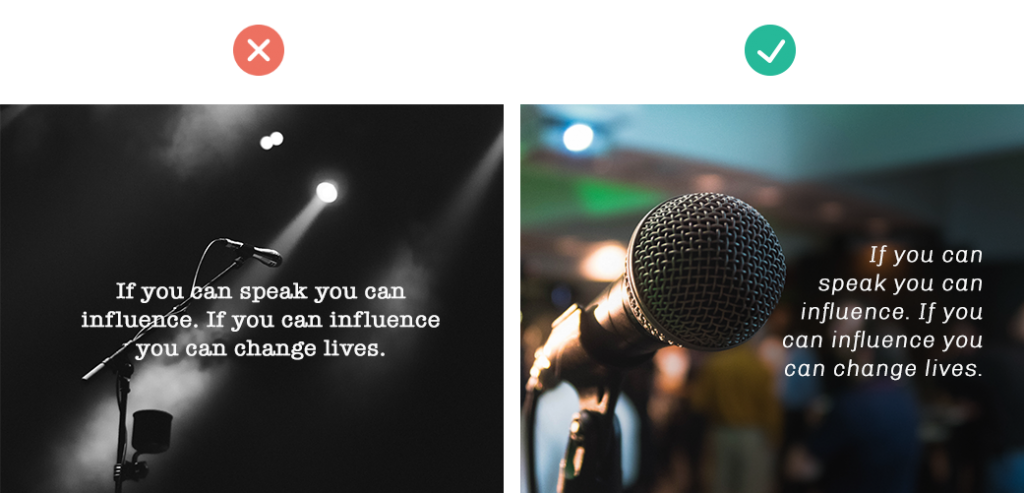
Use Contrast Effectively: The most basic rule for making text pop is contrast. Light text on a dark background, or vice versa, instantly grabs attention. If your photo has a complex background, add a subtle shadow or outline to your text. This creates separation and enhances readability.
Incorporate Text Effects Wisely: Shadows, outlines, or glow effects can help your text stand out without overwhelming the image. Use these effects sparingly—overdoing it can make your design look cluttered or unprofessional. Keep it simple, elegant, and aligned with your branding.
Utilize Hierarchy: Create visual hierarchy by varying font sizes, weights, and colors. Your headline should be the most prominent element, drawing immediate attention. Supporting text can be smaller and simpler. This guides viewers through your message naturally.
Leverage Negative Space: Don’t feel the need to fill every corner of your image with text. Negative space—areas without clutter—helps your message breathe and makes it more impactful. Strategic placement in these areas ensures your text isn’t lost or overlooked.
Test and Tweak: Always preview your design across different devices and lighting conditions. What looks great on a desktop might need adjustments for mobile screens. Don’t hesitate to tweak font sizes, colors, or placement based on feedback or your own observations. Sometimes, small changes can significantly improve visibility.
Remember, the goal is to communicate clearly and attractively. When your text is easy to read, visually appealing, and well-placed, it enhances your overall marketing effort and helps your message resonate with your audience.
Legal Considerations When Using Shutterstock Images and Adding Text
Before you dive into adding text to Shutterstock images, it’s super important to understand the legal landscape. While Shutterstock offers a vast library of royalty-free images, there are still some rules you need to follow to stay on the right side of copyright law.
First off, when you purchase or license an image from Shutterstock, you’re granted the right to use it in your projects, but this doesn’t mean you own the image outright. You’re typically allowed to use the image for commercial purposes, which is great for marketing, but there are restrictions—like not reselling the image as a standalone file or using it in a way that could be considered offensive or defamatory.
Adding text to an image generally doesn’t change its licensing status, but here are some key points to keep in mind:
- Check the license type: Shutterstock offers Standard and Enhanced licenses. The Standard license covers most marketing uses, but if you’re doing something more extensive (like large-scale billboards), you might need an Enhanced license.
- Avoid sensitive content: Be cautious with images that include identifiable people, trademarks, or copyrighted property. For images with identifiable individuals, you might need a model release to avoid legal issues.
- Respect trademarks and branding: If an image features recognizable logos or branded products, ensure you’re not infringing on trademark rights.
- Properly attribute if required: While Shutterstock images are typically royalty-free, some licenses or specific images might require attribution—so double-check the licensing details.
When adding text, avoid obscuring or misrepresenting the original image’s message or content. Also, be mindful that adding text can sometimes make an image more recognizable or associate it with your brand, so ensure your use aligns with your licensing rights.
In summary, always review your license agreement, respect the rights of others, and when in doubt, consult legal advice or Shutterstock’s licensing resources. Playing by the rules not only keeps you safe legally but also helps maintain a good reputation for your brand or marketing efforts.
Examples of Effective Text Overlays on Shutterstock Photos
Now, onto the fun part—seeing how the right text overlay can turn a simple Shutterstock photo into a compelling marketing tool. Effective overlays enhance the message, grab attention, and drive action. Let’s explore some real-world examples and tips to inspire your next project.
Example 1: Inspirational Quote on Nature Photo
Imagine a stunning Shutterstock image of a sunrise over mountains. Adding a bold, white font with a semi-transparent background for contrast, you could overlay an inspiring quote like:
“Every morning is a new beginning.”
This combination creates an emotional connection and encourages viewers to start their day positively. Keep the font clean and readable, and choose colors that complement the image without overwhelming it.
Example 2: Promotional Text on Business Image
Consider a Shutterstock picture of a modern workspace. Overlay a call-to-action (CTA) such as:
| Text Element | Details |
|---|---|
| Message | “Upgrade Your Skills Today!” |
| Font | Bold, sans-serif (like Arial or Helvetica) |
| Color | Bright yellow or orange for visibility |
| Placement | Centered or lower third of the image |
Using contrasting colors and strategic placement ensures your CTA stands out without cluttering the image. This approach is perfect for social media ads or email banners.
Example 3: Highlighting a Product on Lifestyle Photo
Picture an image of a person enjoying coffee in a cozy café. Overlay text like:
“Find Your Perfect Brew”
with a subtle drop shadow or outline to improve readability. Pairing a simple, friendly tone with appealing typography makes your message approachable and memorable.
Tips for Creating Effective Text Overlays:
- Keep it concise: Short, punchy phrases work best, especially on social media.
- Use high-contrast colors: Ensure text stands out against the background for maximum readability.
- Choose appropriate fonts: Match your font style to your brand tone—professional, playful, elegant, etc.
- Experiment with placement: Try different positions—centered, lower third, or along the edges—to find what looks best.
- Incorporate branding: Include your logo or brand colors subtly within the overlay for consistent branding.
By combining striking Shutterstock images with well-crafted text overlays, you can craft marketing visuals that not only catch the eye but also communicate your message effectively. Remember, simplicity and clarity are key, so don’t overcrowd your images—let the message shine!
Conclusion and Resources for Creating Engaging Marketing Visuals
In today’s digital landscape, compelling visuals are essential for capturing your audience’s attention and conveying your brand message effectively. Adding custom text to Shutterstock photos is a powerful way to personalize images and enhance their marketing impact. Remember, the key to successful visuals lies in balancing clear, readable text with eye-catching design elements. Experiment with different fonts, colors, and placements to find what resonates best with your target audience. Utilizing tools like Adobe Photoshop, Canva, or even online editors can streamline this process and bring your creative ideas to life.
To further improve your visual marketing skills, consider exploring the following resources:
- Design Tutorials: Websites like Adobe Creative Cloud and Canva Design School offer comprehensive guides on image editing and graphic design.
- Stock Photo Platforms: Besides Shutterstock, platforms such as Unsplash and Pexels provide free high-quality images for your projects.
- Marketing Blogs: Blogs like Moz and Buffer regularly publish tips on visual content marketing.
By leveraging these tools and resources, you can create impactful, engaging visuals that elevate your marketing campaigns and resonate with your audience. Consistent practice and staying updated with design trends will further enhance your ability to craft compelling marketing visuals that drive results.