Are you ready to take your WooCommerce store to the next level? If so, understanding how to add Quantity Per Attribute can be a game changer for your business. This feature allows customers to select different quantities for each product attribute—think sizes, colors, or other variations—making their shopping experience more personalized. In this guide, we’ll walk you through the ins and outs of setting this up, ensuring your store is as user-friendly and efficient as possible.
Understanding the Need for Quantity Per Attribute

So, why exactly do you need Quantity Per Attribute in your WooCommerce store? Here’s a breakdown of some compelling reasons:
- Enhanced Customer Experience: Allowing customers to specify quantities for different attributes like size or color can lead to a more streamlined shopping experience. They won’t have to add multiple products to the cart when one product can do the trick!
- Increased Sales Opportunity: Selling more variants of a product means increased sales. Letting customers choose quantities for specific attributes can lead to a higher average order value.
- Efficient Inventory Management: By having the ability to track how many of each attribute a customer wants, businesses can manage inventory levels more effectively. This reduces the risk of overselling or running out of stock.
- Flexibility for Custom Orders: If you’re selling customizable products, having the capability to specify quantities per attribute allows for tailored orders. This is particularly useful in situations like personalized gifts or bulk orders.
In short, the implementation of Quantity Per Attribute is not just a nice-to-have feature; it’s a smart way to improve both the customer journey and your bottom line. Ready to dive in and make this change? Let’s get started!
Step 1: Preparing Your WooCommerce Store

Before you dive into adding quantity per attribute in WooCommerce, it’s crucial to ensure that your store is set up correctly. This preparation phase might seem simple, but it lays the foundation for efficient management of your products and their attributes. Here’s a practical guide to help you get started:
- Check Your WooCommerce Version: Always ensure that you’re using the latest version of WooCommerce. Updates often come with new features and bug fixes that could enhance your store’s performance.
- Backup Your Store: Before making any changes, create a full backup of your website. This includes your database and all files. If anything goes wrong while installing plugins or changing settings, you can revert your store back to its original state.
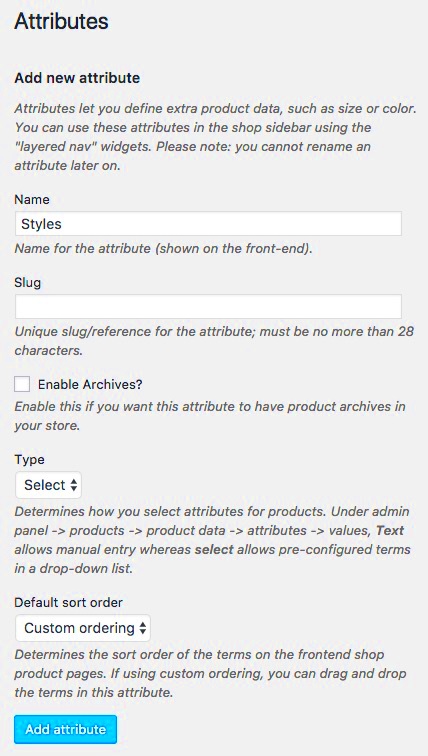
- Review Product Attributes: Go to your WooCommerce settings and review existing attributes. Ensure you have the attributes ready for the products where you want to manage quantity. This will save you time later on.
- Plan Your Product Structure: Think about how you want to structure your products. Consider the use of parent and child products (variable products) and how attributes play a role in this. It’s essential to have a clear structure for easy navigation.
By completing these steps, you’ll create a seamless environment in which to manage your quantities per attribute efficiently. So, take the time to prepare your store before moving forward, and it’ll pay off later!
Step 2: Installing Necessary Plugins
Now that your WooCommerce store is prepared, it’s time to enhance its functionality. To effectively manage quantity per attribute, you’ll need to install the right plugins. Not all WooCommerce plugins are created equal, so selection is key! Here’s how to pick the best options:
- Research Suitable Plugins: Look for plugins specifically designed to add or manage quantities by attributes. Popular options include WooCommerce Custom Fields or WooCommerce Advanced Product Quantities. Read reviews and check ratings to ensure you’re choosing a reliable plugin.
- Install and Activate: Once you’ve chosen a plugin, install it from your WordPress dashboard. Navigate to “Plugins” > “Add New,” search for the plugin’s name, and click “Install Now.” Don’t forget to activate it afterward!
- Review Documentation: Most plugins come with documentation or guides provided by the developers. Take time to read through it to understand how to utilize the plugin effectively.
- Test Functionality: After installation, create a test product to adjust the quantity per attribute. This will help you ensure that everything works smoothly before applying the changes to live products.
Installing the right plugins can significantly streamline your workflow, allowing you to manage your inventory better. It might take a little extra effort at the start, but these tools will provide great long-term advantages!
Step 3: Configuring Product Attributes
Once you’ve created your product in WooCommerce, the next step is to configure the product attributes. This is where you define the specific variations available for your product, such as size, color, or material. By setting up attributes properly, you can provide your customers with a more tailored shopping experience, allowing them to choose the exact product that meets their needs.
To get started, follow these steps:
- Navigate to the product edit page in your WooCommerce dashboard.
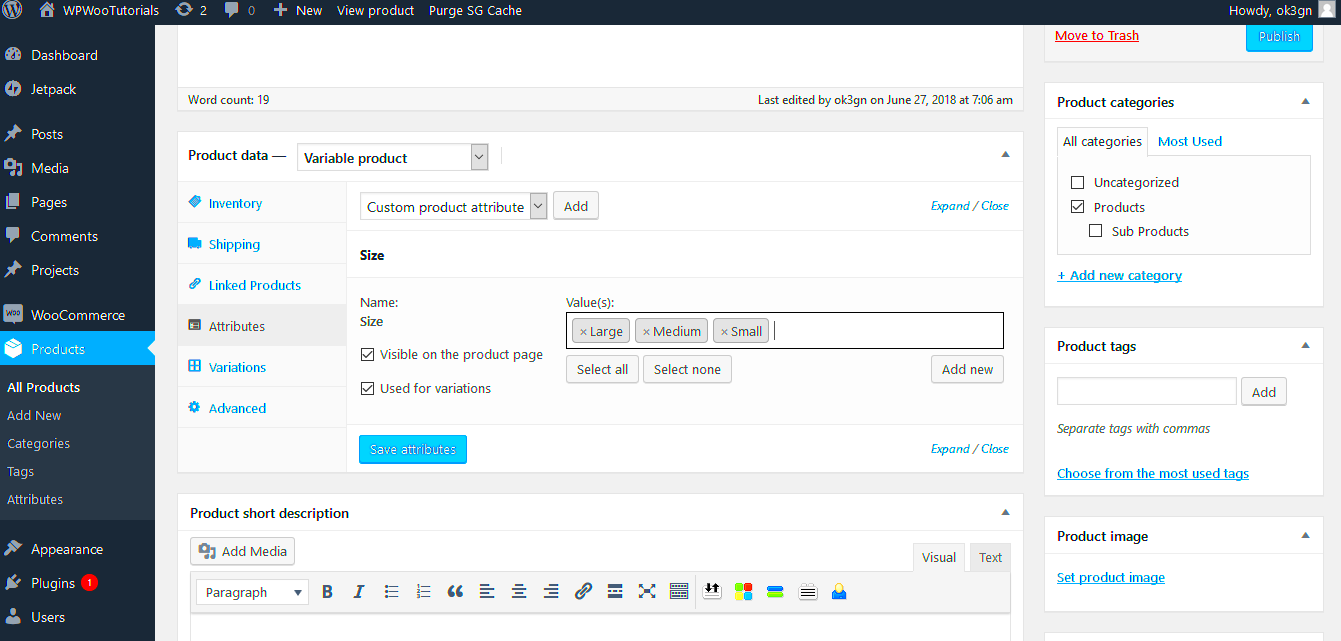
- Scroll down to the ‘Product data’ section and select the ‘Attributes’ tab.
- Here, you can either select existing attributes or create new ones. If you’re creating a new attribute, click on the ‘Custom product attribute’ dropdown and then ‘Add’.
- Type your attribute name (e.g., Color) and add the values (e.g., Red, Blue, Green) separated by a vertical bar (|).
- Don’t forget to check the ‘Used for variations’ box if you plan to create product variations based on these attributes.
- Click ‘Save attributes’ to keep your changes.
Configuring product attributes correctly is vital for setting up the product variations later on. Think about what matters most to your customers and how they might want to filter products. Remember, the clearer and more specific you are, the easier it will be for customers to navigate your offerings!
Step 4: Adding Quantity per Attribute
Now that you’ve configured your product attributes, you’re almost there! The next step involves specifying the quantity available for each attribute variation. This feature is particularly useful for products that come in limited stock or might have different availability based on specific options. By doing this, you can manage your inventory more effectively and prevent overselling.
To add quantity per attribute, follow these steps:
- Return to the ‘Product data’ section and select the ‘Variations’ tab.
- You will see a dropdown menu displaying all your configured attributes. For each attribute variation, click on the dropdown and select an option (e.g., Red, Blue).
- After choosing an attribute, you will be prompted to enter the stock quantity available for that specific variation.
- Fill in the ‘Stock quantity’ field for each variation accordingly. (Example: Red: 10, Blue: 5)
- Ensure you check ‘Manage stock?’ to enable stock management for the product variations.
This step is where you really tailor the availability of your products, so it’s crucial to keep your stock updated. Additionally, by managing quantities per attribute, you can provide a better shopping experience and avoid customer disappointment due to stockouts. Always ensure the numbers you input reflect actual inventory levels to keep your operation smooth and professional!
Step 5: Testing Your Configuration
Once you’ve set everything up to add quantity per attribute in WooCommerce, it’s crucial that you don’t just hit publish and call it a day. Instead, you’ll want to thoroughly test your configuration to ensure everything works as anticipated. Here’s how to go about it:
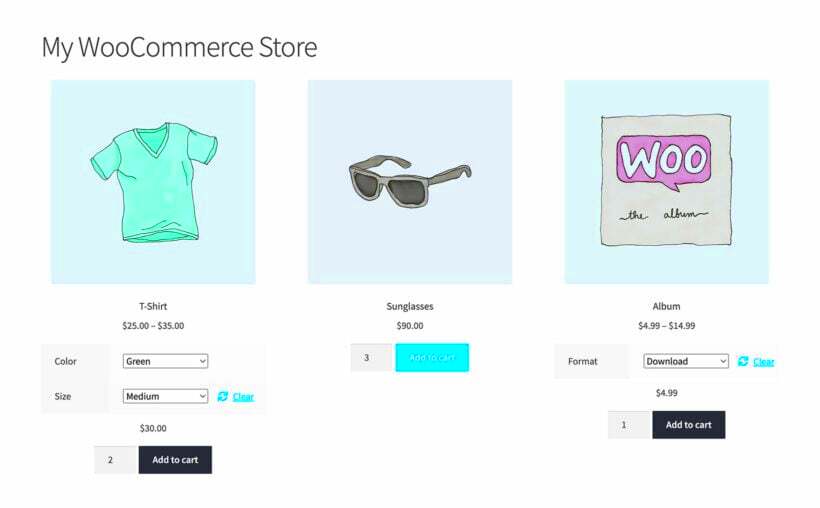
- Visit Your Product Page: Navigate to the product page where you made changes. Make sure you can see the attributes listed properly.
- Select Different Attributes: Try selecting each attribute option one by one. Observe if the quantity field updates accordingly. For instance, if you have a T-shirt in different sizes, selecting ‘Medium’ should show the corresponding available quantity.
- Add to Cart: Test the ‘Add to Cart’ function with various combinations. Make sure that when you add a product with a specific attribute, the correct quantity is being reflected in the cart.
- Check Cart and Checkout: Once in the cart, ensure that the selected attributes and their quantities are correctly displayed. Proceed through to checkout to verify that the information appears correctly in the order summary.
- Look for Conflicts: Finally, run a check to see if any plugins or theme customizations are clashing with your new setup. It’s good practice to disable other plugins temporarily to identify any issues.
Taking the time to test your setup will save you headaches down the line. If you encounter any hiccups along the way, check back to your configuration settings.
Common Issues and Troubleshooting
Even the best-laid plans can go awry, and you may run into some common issues while setting up quantity per attribute in WooCommerce. Here are a few you might encounter and how to tackle them:
| Issue | Possible Causes | Solutions |
|---|---|---|
| Attributes Not Displaying | Improper attribute settings or caching problems. | Check your attribute configuration in WooCommerce settings. Clear your cache to see if that solves the problem. |
| Quantity Not Updating | JavaScript conflicts or errors in the theme. | Inspect the browser console for errors, and try switching to a default theme to see if the issue persists. |
| Incorrect Cart Information | Misconfigured product data or compatibility issues with other plugins. | Double-check your product settings and try deactivating non-essential plugins. |
| Checkout Errors | Issues with payment gateways or shipping settings. | Test each payment method independently, and ensure that shipping options are fully configured. |
By familiarizing yourself with these common issues, you can address them proactively and ensure a smoother user experience for your customers. Remember, troubleshooting may require some trial and error, but with patience, you’ll have everything running flawlessly in no time!
Conclusion: Enhancing Customer Experience with Advanced Inventory Management
In today’s competitive eCommerce landscape, providing a seamless shopping experience is crucial. One of the excellent ways to elevate customer satisfaction is by implementing advanced inventory management techniques like adding quantity per attribute in WooCommerce.
By enabling customers to select multiple attributes—such as size, color, or style—while automatically updating the available stock, you’re not only making it easier for them to find exactly what they’re looking for but also minimizing the risk of overselling. This can lead to fewer canceled orders and improved customer trust in your store.
When customers can see exactly how many items are available for each chosen attribute, they feel empowered in their buying decisions. They’ll appreciate not having to guess whether a particular size might be out of stock, which is often a source of frustration.
Moreover, effective inventory management can significantly streamline your backend processes. When stock levels are accurately tracked across various attributes, you can quickly identify trends, restock items efficiently, and even phase out products that aren’t selling well. This insight not only helps with operational efficiency but also aids in enhancing your product offerings based on actual customer demand.
In summary, integrating a quantity per attribute system not only boosts your inventory management but plays a key role in improving the customer experience. By making shopping simpler and more transparent, you create loyal customers who are likely to return to your store time and again.
FAQs about Quantity Per Attribute in WooCommerce
If you’re considering adding quantity per attribute in WooCommerce, you probably have a few questions swirling in your mind. No worries, we’ve got you covered! Here are some frequently asked questions to help clear things up.
- What is “quantity per attribute” in WooCommerce?
Quantity per attribute allows you to define stock levels for different product variations, such as sizes or colors. This means you can manage inventory more accurately for each variation of a product.
- How do I set up quantity per attribute in WooCommerce?
To set this up, you typically use a combination of variable products and appropriate plugins that allow for stock management at the attribute level. Install a suitable inventory management plugin, and follow the instructions provided for setup.
- Will this affect my existing inventory?
Implementing quantity per attribute will not impact your existing inventory directly but may require some reconfiguration. Be sure to review each product’s existing stock and adjust as needed.
- Can I customize the stock messages shown to customers?
Absolutely! Many plugins allow you to customize stock messages to better inform customers about the availability of variations. This can enhance the shopping experience further.
- Is there a cost for the plugins needed to manage this?
Some plugins are free, while others offer advanced features at a cost. It’s wise to evaluate your specific needs and check reviews before making a purchase.
By addressing these FAQs, we hope to ease any concerns you may have about adding quantity per attribute in WooCommerce, allowing you to enhance your store’s efficiency and customer experience without a hitch!


