When you embark on creating a website using WordPress, knowing how to add pages is fundamental. Pages are essential components of your site, allowing you to organize your content seamlessly. Whether you’re establishing a home page, an about page, or a contact page, mastering this skill can make your site more user-friendly and appealing. Let’s dive into the nuts and bolts of adding pages in WordPress!
Understanding the Difference Between Posts and Pages
When it comes to WordPress, it’s crucial to understand the distinction between posts and pages. Although both are used to publish content, they serve different purposes and have distinct characteristics. Here’s a breakdown:
| Feature | Posts | Pages |
|---|---|---|
| Content Type | Dynamic and frequently updated | Static and meant for timeless content |
| Publication Time | Time-stamped and archived by date | No timestamps; listed hierarchically |
| Categories and Tags | Supports categorization and tagging | No categorization; can only use hierarchy |
| Interaction | Encourages comments and user interaction | Typically doesn’t allow comments |
| Purpose | Ideal for blogs, news updates, and articles | Perfect for About, Contact, and Policy pages |
Understanding these differences can help you effectively manage your WordPress site. So, whether you’re sharing your latest blog post or crafting a detailed service page, knowing when to use posts versus pages is essential for a well-organized website.
Accessing the WordPress Dashboard
The WordPress Dashboard is like the command center of your website. It’s where you can manage everything from posts and pages to plugins and themes. So, let’s take a quick stroll through how you can access it!
First, you need to navigate to your website. This is usually done by entering your website’s URL into your web browser, followed by “/wp-admin” (for example, www.yoursite.com/wp-admin). Once you press enter, you’ll be taken to the login screen.
Here’s what you need to do next:
- Enter Your Credentials: You’ll need to input your username and password. If you’ve forgotten them, there’s usually a “Lost your password?” link that can help you regain access.
- Check for Security Features: Sometimes, you may need to complete a CAPTCHA or two-factor authentication, depending on how you set up your website. Don’t worry; these are just there to protect your site!
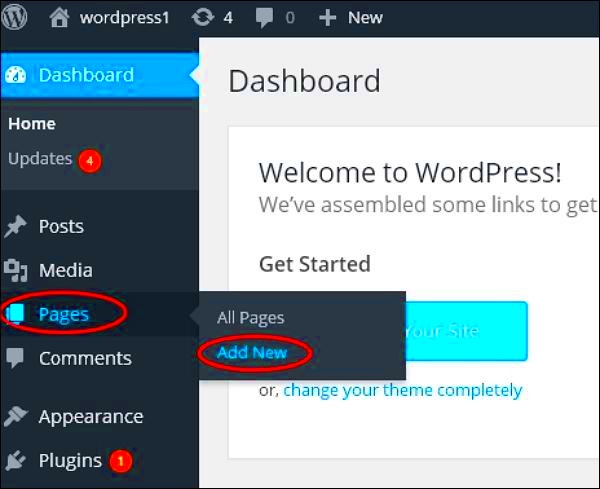
Once you’re logged in, you’ll be greeted by the WordPress Dashboard. Here, you’ll find a menu on the left side. This is where all the magic happens! You’ll see options like “Posts,” “Pages,” “Media,” “Plugins,” and much more.
Familiarizing yourself with this layout is key. The more comfortable you get with the Dashboard, the easier you’ll find it to add pages, posts, and interact with your site’s features. So, take a moment to explore and get to know your digital home!
Steps to Add a New Page
Now that you’re in the WordPress Dashboard, let’s dive into the exciting part: adding a new page to your website! Whether it’s a contact page, an about us page, or a blog entry, creating a page is simple and straightforward. Here’s how to do it:
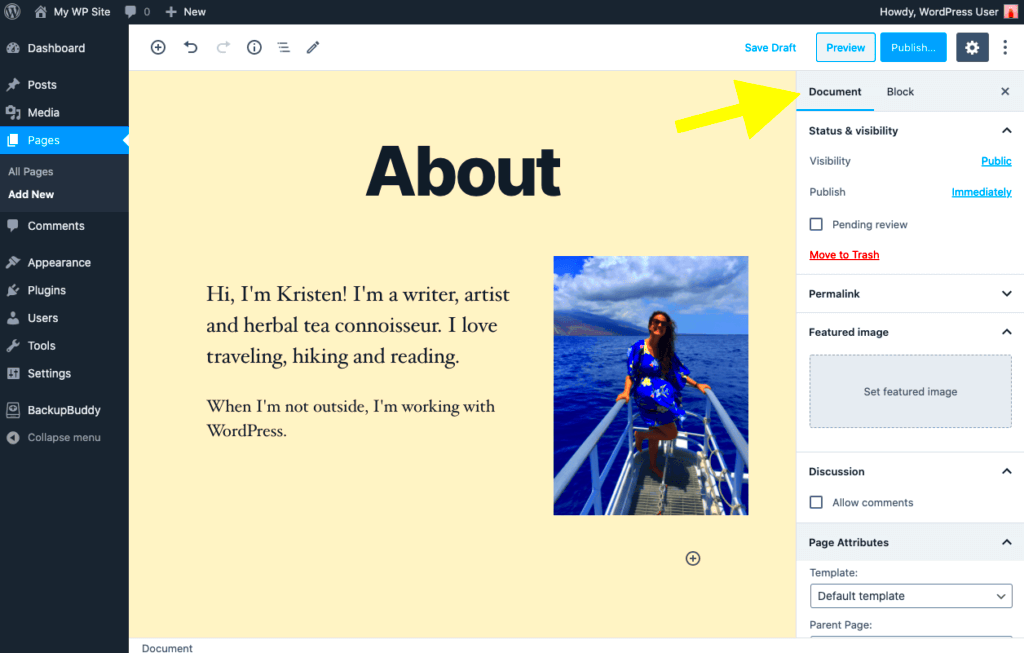
- Click on “Pages”: From your Dashboard, look at the menu on the left side and click on “Pages.” This will take you to a page where you can see all the pages you currently have.
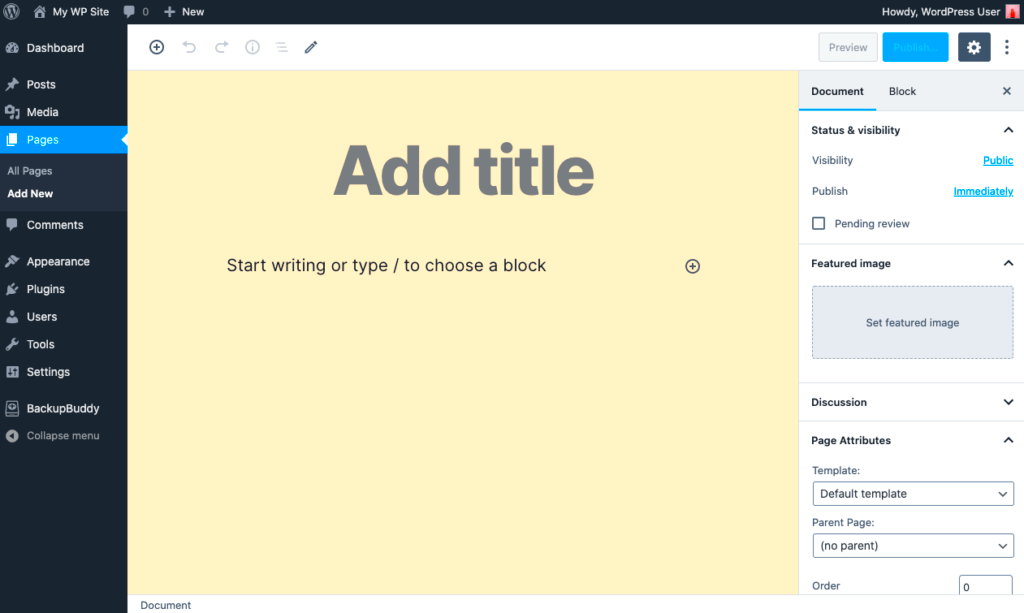
- Click “Add New”: At the top of the page, you’ll see an “Add New” button. Give it a click, and you’ll be taken to a blank page where you can build from scratch!
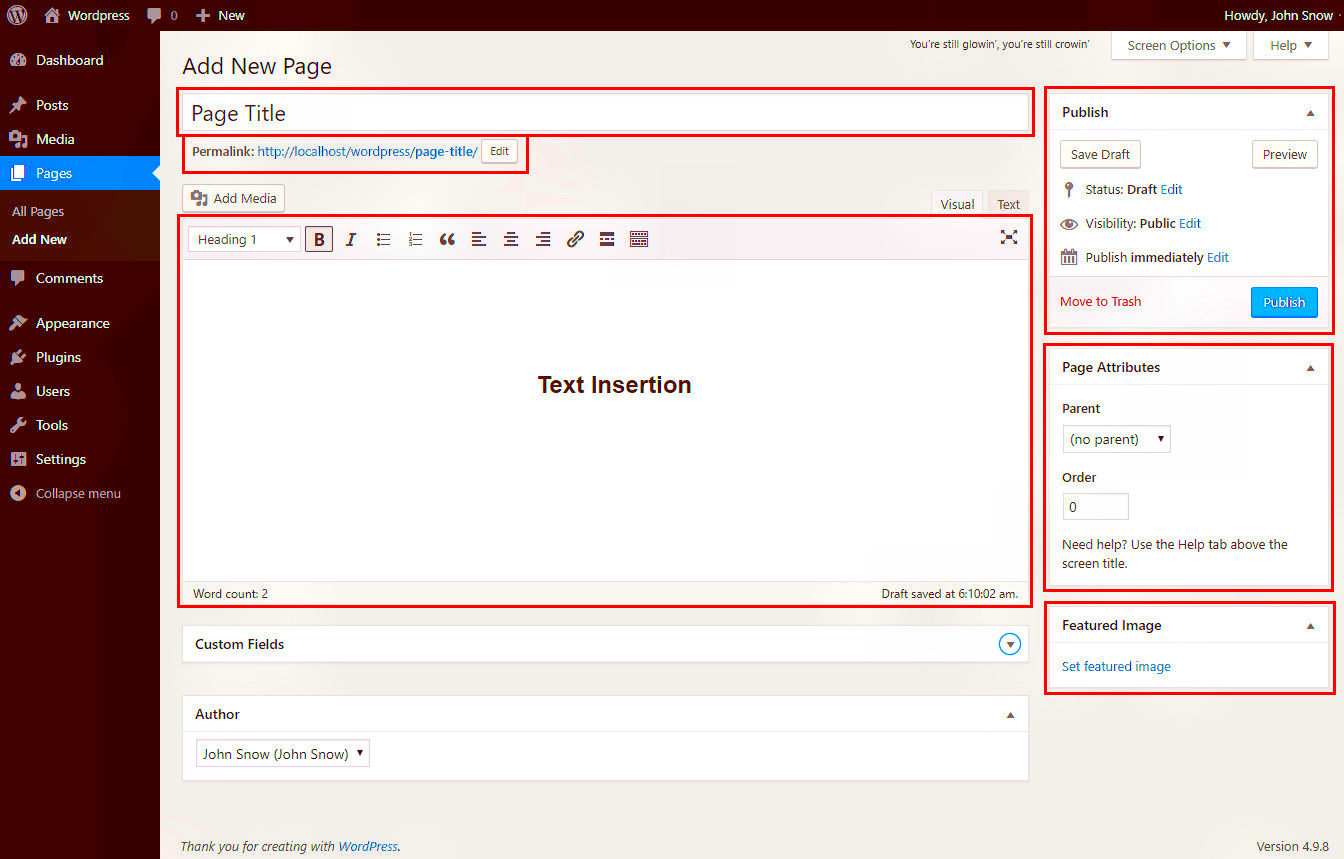
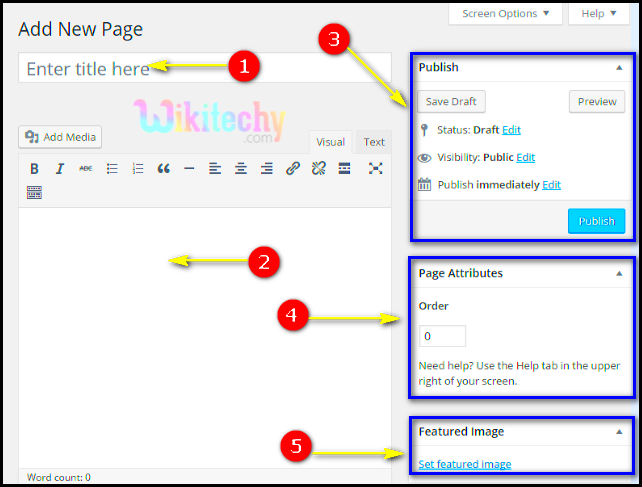
- Enter Your Page Title: At the top of the editor, you’ll see an area to type your page title. This is important because it informs both your visitors and search engines what your page is about. So, make it descriptive!
- Add Content: Just below the title, you’ll have a large text editor. Here’s where you can add all kinds of content—text, images, videos, and even buttons. Feel free to use the toolbar options to format your text as needed.
- Set a Featured Image (Optional): If your page needs a standout image, scroll down to the “Featured Image” section on the right sidebar. Click on “Set Featured Image” and upload an image from your media library or your computer.
- Publish Your Page: After you’ve added all your content, take a moment to review everything. Once you’re happy with it, hit the “Publish” button. Voila! Your new page is live.
And just like that, you’ve added a new page to your WordPress site! Remember, you can always go back and edit it later if you want to make changes. Happy creating!
5. Adding Content to Your Page
Once you’ve created a new page in WordPress, the next step is to fill it with engaging content. This is where you get to express your ideas and connect with your audience, so let’s break it down into manageable chunks.
First, you’ll find a rich text editor with various formatting tools at your disposal. This text editor functions much like any word processor, with options to bold, italicize, and underline your text. It’s essential to create a visually appealing and readable layout. Here are a few tips to enhance your content:
- Headings: Use headings (H2, H3) to structure your content. This not only makes it easier for readers to skim through but also improves SEO (Search Engine Optimization).
- Images: Incorporate relevant images or media by clicking the “Add Media” button. Remember to add alt text for accessibility and SEO benefits.
- Lists: Bullet points or numbered lists can help break down complex information, making it digestible.
- Links: Linking to other pages on your site or external resources adds value. Just highlight the text you want to link, click the link icon, and paste the URL.
Don’t forget to preview your content before publishing it. WordPress provides a handy “Preview” button that allows you to see how your page will look live. Take advantage of this feature to ensure everything appears just the way you like it!
6. Using Page Templates
WordPress offers a fantastic feature called page templates that can dramatically alter how your page looks and functions. Whether you want a simple layout or something more complex, templates allow for customization without requiring extensive coding knowledge.
To choose a page template, navigate to the “Page Attributes” section while editing your page. Here, you will find a dropdown menu labeled “Template.” If your current theme supports multiple templates, you’ll see options like “Default Template,” “Full Width,” or “Landing Page.” Each of these serves a different purpose:
| Template Name | Description |
|---|---|
| Default Template | The standard layout that includes your header, footer, and sidebar. |
| Full Width | A layout that removes the sidebar, providing a larger content area, great for landing pages. |
| Landing Page | A minimalist style often used for promotional pages, lacking headers and sidebars. |
Selecting the right template can enhance the user experience. For instance, if you’re creating a contact page, a full-width template might allow for a cleaner design. Always consider the purpose of your page when choosing a template, as it significantly impacts how visitors interact with your content. Don’t hesitate to experiment with different templates until you find the one that resonates with your vision!
7. Setting Page Attributes
When you create a new page in WordPress, you have the option to set various attributes that can enhance the structure and appearance of your site. Page attributes allow you to control how your pages relate to one another, making it easier for visitors to navigate your content. Here’s a breakdown of key attributes you can configure:
- Parent Page: This setting lets you designate a parent page for your new page. If you’re building a hierarchical structure, selecting a parent page can help organize your content logically. For example, if your parent page is “Services,” a child page could be “Web Design” beneath it.
- Template: Depending on your WordPress theme, you can choose from different templates to give your page a unique look. This feature is useful for pages that need special layout or functionality. For instance, you might want a full-width template for a landing page, while a default template works for most blog posts.
- Order: This setting allows you to reorder your pages. By assigning a numerical value, you can control the sequence in which your pages appear when browsers navigate through parent and child relationships.
To set these attributes, simply go to the “Page Attributes” section in the page editor. Adjust as needed, and your changes will help create a more user-friendly site structure. Remember, effective use of page attributes can significantly impact user experience and improve site navigation.
8. Publishing Your Page
After you’ve added the content, images, and configured your page attributes in WordPress, the next crucial step is publishing your page. This is where all your hard work comes to fruition, allowing visitors to access your freshly created content! Here’s how to publish your page smoothly:
- Review Your Content: Before hitting that publish button, take a moment to proofread everything. Check your text for typos, ensure that images are correctly placed, and confirm that links are functional. It’s much easier to make tweaks before your audience sees it.
- Preview the Page: Use the “Preview” option to see how your page will look live. This gives you a clear idea of layout, appearance, and any last-minute adjustments you may want to make.
- Publish Settings: In the editor, you’ll find options to publish immediately or schedule a future publication date. If you’re planning to publish at a later time, use the “Publish” dropdown to choose your desired date and time.
- Visibility Options: You can also set the visibility of your page to public, password-protected, or private, allowing you to control who can view your content.
Once everything looks good, simply press the “Publish” button. Voila! Your new page is now live for your audience to see. Don’t forget to promote it on your social channels or through your email newsletters to attract more visitors to your fresh content!
Editing and Updating Existing Pages
Editing and updating existing pages in WordPress is a breeze, and it’s an essential skill for keeping your website fresh and relevant. You might want to edit a page to correct typos, update information, or improve the layout. Whatever the reason, WordPress makes it user-friendly. Here’s how you can do it:
- Log in to your WordPress Admin Dashboard: Start by logging in to your website. This is where all the magic happens.
- Navigate to the Pages Section: On the left sidebar, find and click on “Pages.” This will take you to a list of all your published and draft pages.
- Select the Page to Edit: Browse through the list and click on the title of the page you want to edit. This opens the WordPress editor.
- Make Your Changes: Whether you want to adjust the text, add images, or change the formatting, the block editor makes it simple. Just click on the block you want to change and start editing!
- Preview Your Changes: Before hitting that “Update” button, it’s wise to preview your updates. Click on “Preview” to see how your changes will look on the live site.
- Update the Page: Once you’re satisfied with your edits, click the “Update” button. Voila! Your changes are now live for your visitors to see.
Remember, regularly updating pages not only keeps your content accurate but also boosts your website’s SEO and user engagement. So, get into the habit of revisiting your pages often!
Best Practices for Structuring Pages
Creating well-structured pages in WordPress is crucial for both user experience and search engine optimization. A neatly organized page helps visitors find information quickly while optimizing it for search engines ensures that your content gets the visibility it deserves. Here are some best practices to consider:
- Use Clear and Descriptive Headings: Headings (H1, H2, H3) act as signposts, guiding users through your content. Make sure your headings are relevant and descriptive.
- Incorporate Short Paragraphs: Long blocks of text can be overwhelming. Aim for paragraphs that are 2-3 sentences long to make your content more accessible.
- Utilize Bullet Points and Lists: When you have multiple points to make, lists can help present them clearly. This also enhances readability.
- Add Visual Elements: Images, videos, and infographics can break up text and make your page more engaging. Ensure they’re relevant and well-optimized (compressed for quick loading).
- Implement Internal Linkages: Link to other relevant pages within your site. This not only improves navigation but also keeps users engaged longer.
- Optimize for Mobile: Many users browse on mobile devices, so make sure your pages are responsive and look great on all screen sizes.
- Consider Load Time: The load time of a page influences user experience and SEO. Compress images and remove unnecessary plugins to speed things up.
By following these best practices, you’ll create pages that are not only appealing but functional too! This will ultimately enhance the overall user experience and improve your chances of retaining visitors and achieving higher search engine rankings. Happy structuring!
Conclusion and Next Steps
In conclusion, adding pages in WordPress is a straightforward process that allows you to create a structured and informative website. By following the guidelines provided above, you should now be able to create, publish, and manage pages effectively. Here’s a quick recap of the essential steps:
- Access your WordPress dashboard: Log in to your WordPress site and navigate to the dashboard.
- Go to Pages: Click on the “Pages” section from the sidebar.
- Add New Page: Click the “Add New” button to create a new page.
- Utilize the Block Editor: Write your content using the Block Editor, adding media, and formatting as needed.
- Publish Your Page: Once you’re satisfied, press the “Publish” button to make it live.
- Manage Pages: Organize and manage your pages using the “All Pages” overview.
Additionally, consider optimizing your pages for SEO by leveraging tools like Yoast SEO, ensuring your content is discoverable by search engines.
Next Steps:
Now that you can add pages, it’s time to enhance your site further. Here are a few next steps you may consider:
- Create a Menu: Organize your pages in a navigation menu for better user experience.
- Add Content Strategies: Regularly update your pages with fresh content to engage visitors.
- Explore Plugins: Utilize plugins for additional functionalities, like contact forms or galleries.
- Monitor Analytics: Track your page performance using Google Analytics or similar tools.
By implementing these next steps, you can improve your WordPress site’s usability and performance, leading to a better experience for your visitors.

