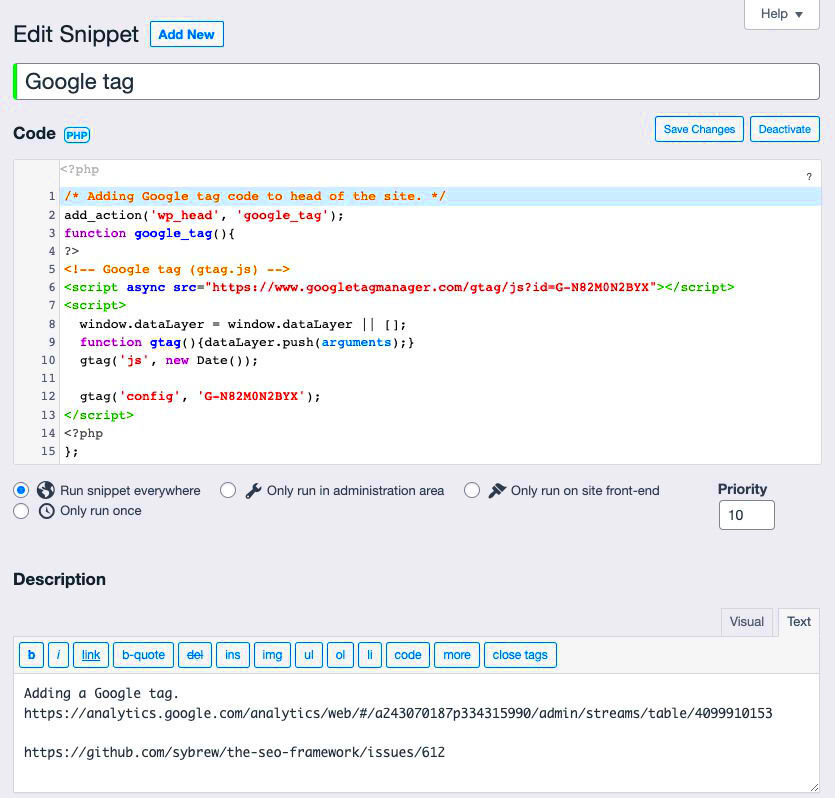
Google Tag Manager (GTM) is a powerful tool that helps you manage and deploy marketing tags (small snippets of code) on your website without having to modify the code directly. It simplifies the process of adding and updating various tags like Google Analytics, Facebook Pixel, or even custom HTML tags, all from a user-friendly interface. By utilizing GTM, you can streamline your tracking and enhance your overall marketing efforts.
Why Use Google Tag Manager for WordPress?
Using Google Tag Manager with your WordPress site comes with numerous benefits that can improve your marketing efficiency and data collection. Here’s why you should seriously consider incorporating GTM:
- Easy Implementation: With just a single code snippet added to your WordPress, GTM allows you to manage multiple tags, minimizing the need for direct edits to your theme files.
- Quick Updates: Want to change a tracking code or add a new tag? You can do it instantly through GTM without waiting for developer support.
- Version Control: GTM keeps a history of changes made, enabling you to revert to previous versions if something goes wrong.
- Preview and Debugging: The built-in preview and debugging tools allow you to test your tags in real time before they go live, ensuring everything works as intended.
- Enhanced Tracking: GTM enables advanced event tracking, helping you gather insights on user behavior like clicks, form submissions, and page views.
In summary, Google Tag Manager offers a seamless way to manage your tags and enhance your WordPress site’s marketing capabilities. Leveraging GTM can save you time, reduce dependency on developers, and provide deeper insights into user interactions.
3. Prerequisites for Adding Google Tag
Before diving into the nitty-gritty of adding a Google Tag to your WordPress site, you’ll want to ensure that you have everything set up correctly. Here’s a checklist of prerequisites that will make the process smoother and hassle-free:
- Website Access: You need administrative access to your WordPress dashboard. This is crucial since you’ll be installing tags and making changes that require higher permissions.
- Google Account: A valid Google account is essential. If you don’t have one, creating it is a quick and easy process, and it’s free!
- Understand Your Goals: Before adding tags, take a moment to define what you want to achieve. Whether it’s tracking conversions, monitoring user behavior, or setting up analytics, having clear goals will guide your tagging strategy.
- Compatible WordPress Theme: Ensure your current WordPress theme supports Google Tag Manager. Most modern themes do, but it’s always good to double-check.
- Backup your Site: Always a good practice! Before making any changes, consider backing up your website. This can save you from potential mishaps along the way.
By having these prerequisites in place, you’ll be setting yourself up for a successful implementation of Google Tag on your WordPress site, allowing you to track data smoothly!
4. Step 1: Create a Google Tag Manager Account
Okay, let’s get started with creating your Google Tag Manager (GTM) account! This is a pivotal first step that allows you to manage all your website tags in one convenient location. Here’s how to do it step-by-step:
- Visit the Google Tag Manager Website: Go to the Google Tag Manager site. You’ll land on a welcoming page.
- Sign In: Click on the “Sign in” button. If you’re not already signed in with your Google account, do so here.
- Create an Account: After signing in, click on the “Create Account” button. Here, you’ll be prompted to enter some information:
- Your Account Name (usually your business name).
- Your Country.
- Setup Container: Next, you’ll be asked to set up a container. A container holds all the tags for a specific website or app. Enter your website name and choose “Web” as the target platform.
- Agree to the Terms: You’ll need to review and accept Google’s Terms of Service and Data Processing Terms. Make sure to read through these carefully, as they outline important guidelines.
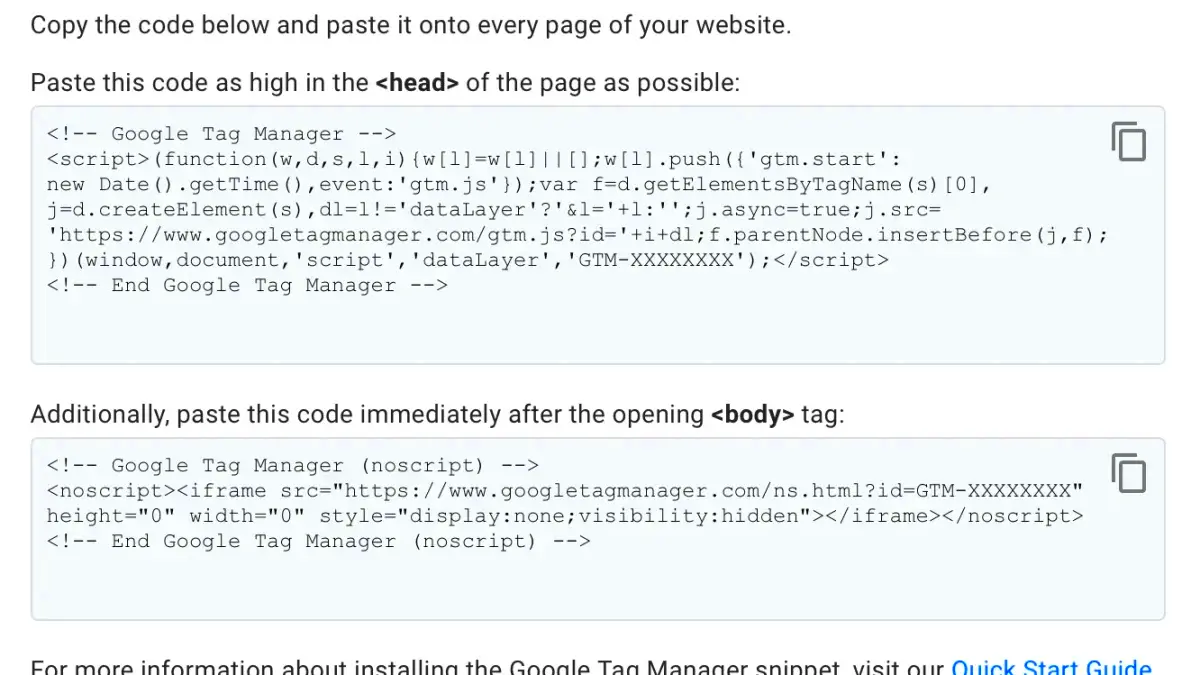
- Get Your GTM Code: Once your account is created, Google Tag Manager will provide you with two snippets of code. You’ll need these for the next steps. Copy these snippets and keep them handy!
Congratulations! You’ve successfully created your Google Tag Manager account. This is the backbone for managing and deploying your tags efficiently. Stay tuned for the next steps where we’ll integrate GTM with your WordPress site!
Step 2: Set Up a New Container
Setting up a new container in Google Tag Manager is a crucial step in the process of adding tracking tags to your WordPress site. This container will house all your tags, triggers, and variables. Think of it as a digital toolbox that helps you manage your tracking setup.
Here’s how to set up a new container step by step:
- Log in to Google Tag Manager: Start by logging into your Google Tag Manager account. If you don’t have one, it’s as easy as creating a new Google account.
- Create a New Account: If this is your first time using Tag Manager, you’ll need to create an account. Click on the “Create Account” button, and fill in your account name, country, and container name.
- Select Your Target Platform: Choose whether you want to create a web container, app container, or another type of container. For WordPress, select “Web” to track your website.
- Accept the Terms: Google will prompt you to accept their terms of service. Make sure to read through them and check the box to agree.
- Set Up Container: Now, click on the “Create” button, and you’re one step closer! A new container will be ready to hold all your tags.
Once your container is set up, you’ll be taken to the Tag Manager dashboard, where you can begin adding tags. Remember, each container can manage various tags, so it’s a versatile tool that saves time and helps you stay organized.
Step 3: Obtain the Google Tag Manager Code
After setting up your new container, the next step involves obtaining the Google Tag Manager code. This code snippet plays a vital role in connecting your WordPress site with Google Tag Manager, allowing it to read and execute all the tags you’ll be setting up. Don’t worry; it’s pretty straightforward!
Here’s how to obtain the Google Tag Manager code:
- Find Your Container ID: Once your container is created, you’ll be directed to a page that displays your container ID in the format “GTM-XXXXXX.” This ID is essential as it uniquely identifies your container.
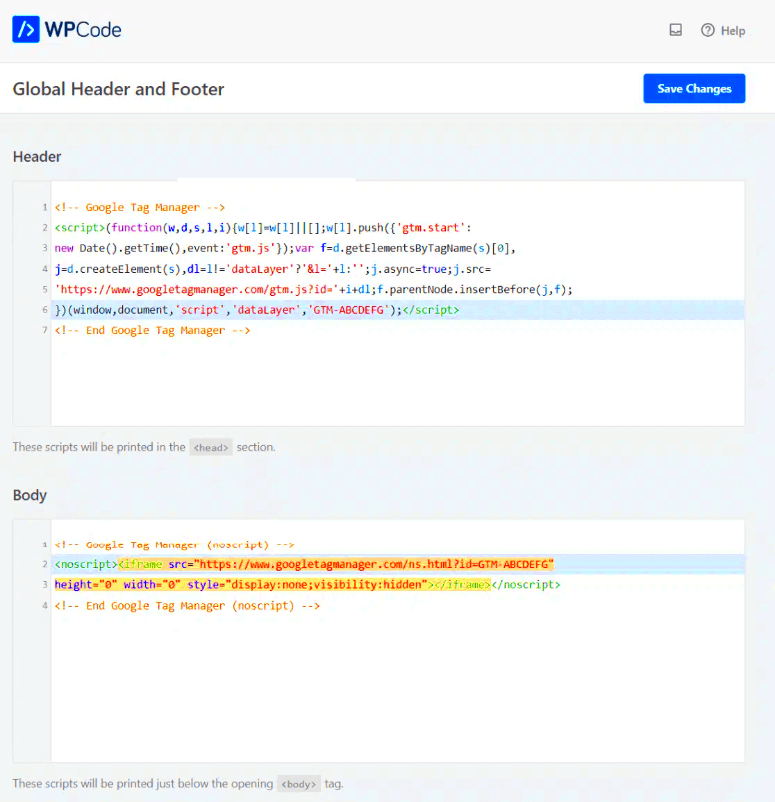
- Get the Code Snippet: Below your container ID, you’ll see the code snippets you need to add to your WordPress site. It usually consists of two parts: a header snippet and a body snippet.
- Copy the Code: Click on the code snippets to highlight them, then right-click and select “Copy.” Make sure you get both parts: the first goes into your site’s header, and the second into the body.
- Instructions for Placement: Google will provide you with clear instructions for where to place these snippets in your WordPress theme. Typically, the header code goes into the
<head>section, while the body code goes immediately after the opening<body>tag.
And that’s it! You’ve now successfully obtained the Google Tag Manager code. This snippet is the link between your website and Google Tag Manager, enabling you to manage your tracking scripts effortlessly. Once it’s implemented, you can start adding and managing various tags without diving into the code every time.
Step 4: Install Google Tag Manager on Your WordPress Site
Now that you have your Google Tag Manager account set up and you’ve created a container for your website, it’s time to get it installed on your WordPress site. This step is crucial because it allows you to manage all of your website’s tags in one place. Here’s how you can do it in a few simple steps:
- Access your WordPress Admin Dashboard: Log in to your WordPress site where you’ll be making the changes.
- Navigate to Theme Editor: Go to Appearance and then click on Theme Editor. Here, you’ll find the files of your active theme. It’s important to note that changes made here can affect your site, so be careful!
- Add Google Tag Manager Code: Locate the
header.phpfile on the right-hand side. You’ll need to add the Google Tag Manager code snippet that you copied earlier. It usually goes right after the opening<head>tag. - Insert the second snippet: You’ll also need to add a second code snippet just after the opening
<body>tag, which can usually be found infooter.phpfile. - Save Changes: Don’t forget to hit the Update File button after you’ve added the snippets to save your changes.
And just like that, you’ve got Google Tag Manager installed on your WordPress site! Now you can start adding various tags and tracking your site’s performance without any hassle.
Method 1: Using a Plugin
If diving into the code isn’t quite your style or you want an easier route, using a plugin is a fantastic way to install Google Tag Manager on your WordPress site. Several plugins can handle this for you, making the process simpler and less intimidating!
Here’s how you can go about it using a plugin:
- Choose a Google Tag Manager Plugin: There are various options out there, such as DuracellTomi’s Google Tag Manager for WordPress or Google Tag Manager by WP-Optimize. Do a bit of research and pick one that suits you!
- Install the Plugin: Head over to Plugins in your WordPress dashboard, click on Add New, search for the plugin you chose, and hit Install Now.
- Activate the Plugin: After installation, don’t forget to click on Activate so the plugin can start working for you.
- Configure the Plugin: With the plugin activated, go to its settings page, typically found in the Settings menu. You’ll need to paste your Google Tag Manager container ID, which looks like
GTM-XXXXXX, into the appropriate field. - Save Changes: Make sure you save any changes you have made to finalize the setup.
And voilà! Your Google Tag Manager is now integrated with your WordPress site through a plugin. This method is particularly user-friendly and allows you to manage your tags without any coding necessary!
Method 2: Adding Code Manually
If you’re comfortable with a bit of coding, adding Google Tag Manager to your WordPress site manually can be a breeze. This method gives you more control over where exactly your tags go, which can be incredibly beneficial for advanced users. Here’s how to do it:
- Access Your Theme Editor:
First, you’ll need to log in to your WordPress dashboard. From there, navigate to Appearance > Theme Editor. Be cautious here, as making incorrect changes can affect your site layout.
- Add Code to Header:
Find the
header.phpfile on the right side. Once you open it, look for the closing </head> tag. This is precisely where you’ll paste the Google Tag Manager (GTM) code snippet that you’ve acquired from your GTM account. - Include Code in Footer:
If Google has provided a second code snippet to add to the footer, locate the
footer.phpfile similarly and paste the code immediately before the closing </body> tag. - Save Your Changes:
Don’t forget to click Update File after you’ve added the code. This ensures that your changes are saved.
Voila! You’ve manually added Google Tag Manager to your WordPress site. But how do you know it’s actually working? Let’s move on to the next step and verify the installation!
Step 5: Verifying the Installation
Now that you’ve added Google Tag Manager to your WordPress site, it’s crucial to ensure that everything is functioning correctly. Verification is a straightforward process, but it’s essential to get it right to ensure your tracking works as intended. Here’s how you can validate your installation:
- Use Google Tag Assistant Extension:
The easiest way to check if your tags are firing correctly is by using the Google Tag Assistant Chrome extension. Install it, navigate to your website, and click on the Tag Assistant icon. It will analyze your page and alert you if there are any issues.
- Check Real-Time Reports in Google Analytics:
If your Google Tag Manager is linked to Google Analytics, go to your Analytics dashboard. Under Real-Time, you can see if any active users are being tracked. If you make a change on your website, you should see that activity reflected almost immediately.
- Use Preview and Debug Mode:
Another method within Google Tag Manager is to use the Preview mode. Click on the Preview button inside your GTM account, and it will show you a debug panel at the bottom of your website when it’s active. This panel helps identify if each tag is firing correctly.
By following these steps, you can confidently ensure that your Google Tag Manager is set up properly, paving the way for effective tracking and analytical insights on your WordPress site. Happy tracking!
Common Issues and Troubleshooting
Adding Google Tag to your WordPress site can sometimes come with its fair share of hiccups. So, let’s address some common issues and how you can resolve them quickly!
- Incorrect Installation: One of the most frequent issues is a misaligned tag installation. Ensure you have copied your Google Tag Manager ID correctly. Even a small typo can prevent it from working!
- Conflicts with Other Plugins: If you have multiple tracking or optimization plugins, they might conflict with Google Tag Manager. To troubleshoot, disable other plugins one by one to identify the culprit.
- Cache Problems: If you don’t see your tags firing, your website might be caching an old version. Clear your site cache and your browser cache, then check again.
- Permission Issues: Make sure that your user role has sufficient permission to add tags. Only Administrators can add or edit Google Tags on WordPress.
- Check Tags in Preview Mode: Google Tag Manager has a built-in Preview Mode that allows you to check if your tags are firing as intended before deploying them live.
- Ad Blockers: Sometimes, ad blockers can prevent Google Tags from loading properly. Disable any ad blockers temporarily to check if that’s the issue.
By being aware of these common pitfalls, you can navigate through any bumps in the road more easily. If you find that something still doesn’t work as expected, checking Google’s extensive documentation or community forums can provide you with additional troubleshooting steps.
Conclusion: Enhancing Your WordPress Site with Tags
Integrating Google Tags into your WordPress site isn’t just a task; it’s a stepping stone to unlocking insightful analytics and improving your marketing strategies. With tags, you can track user behavior, optimize your ads, and ultimately enhance your site’s performance.
Here’s why leveraging Google Tags is essential for your website:
- Data-Driven Decisions: By tracking user interactions, you can make informed decisions based on real data.
- Enhanced Marketing: Google Tags allows for advanced marketing tactics, such as remarketing and conversion tracking.
- Simplified Management: All your tracking codes can be managed in one place, simplifying your workflow.
To get the most out of your tags, always stay updated with new features and best practices. Regularly monitor your analytics dashboard to note changes in user behavior and adapt your strategies accordingly. So, ready to take your WordPress site to the next level? Start implementing Google Tags today and watch your online presence thrive!

