Google Tag Manager (GTM) is a powerful tool that simplifies the process of managing and deploying marketing tags on your website without extensive coding knowledge. With GTM, you can streamline your tracking setup, enhance your data collection, and improve your marketing efforts. Imagine having all your tags organized in one central place, making it easy to manage everything from conversion tracking to remarketing. Sounds good, right? That’s the magic of GTM!
Why Use Google Tag Manager?

Now that you know what GTM is, let’s explore some of the compelling reasons to implement it on your WordPress website. Here are some key benefits:
- Simplified Tag Management: GTM allows you to add, edit, or remove tags without needing to dive into the code every time. This means less hassle for you and fewer chances of messing things up on your site!
- Faster Page Load Times: By using GTM asynchronously, you can minimize the load on your web pages. This can lead to noticeable improvements in user experience and SEO.
- Version Control: GTM keeps an organized history of changes. If a new tag causes issues, you can quickly roll back to a previous version without starting from scratch.
- Built-in Debugging Tools: You can preview and debug your tags before they go live, ensuring everything works smoothly without affecting your users.
- Integration with Marketing Tools: GTM seamlessly integrates with various Google tools like Google Analytics and Google Ads, making your marketing efforts more cohesive and efficient.
In short, by leveraging the power of Google Tag Manager, you can enhance your website’s performance, gain valuable insights, and ultimately drive better results for your business. Isn’t that what we all aim for?
Prerequisites for Adding Google Tag Manager

Before diving into the world of Google Tag Manager (GTM), it’s important to ensure that you have everything in place. Adding GTM to your WordPress website is a straightforward process, but a few prerequisites can make it effortless. Let’s walk through them!
- WordPress Website: First and foremost, you need a WordPress website. Make sure you’re using a self-hosted version of WordPress.org, as GTM cannot be added to WordPress.com sites without a Business plan.
- Admin Access: You’ll need admin access to your WordPress dashboard. This is crucial because you’ll be editing your site’s theme or installing plugins.
- Google Account: A Google account is essential. If you don’t already have one, take a moment to create it. It’s free and easy!
- Bare Minimum Knowledge: Familiarity with basic terms related to website management—like what tags, triggers, and variables are—will help you understand how GTM works. However, don’t worry, there are plenty of resources to help you!
- Plugins (if required): Depending on your approach, you might need to install plugins that facilitate the integration of GTM into WordPress. Popular choices include “Insert Headers and Footers” or a dedicated GTM plugin.
Once you have these prerequisites in check, you’re all set to add Google Tag Manager to your WordPress site! It’s like laying the groundwork before building your house—essential for a sturdy structure.
Creating a Google Tag Manager Account

Now that you’ve got the essentials sorted, it’s time to create your Google Tag Manager account! Don’t sweat it—it’s pretty simple. Let’s step through the process together!
- Navigate to the GTM Website: Go to the Google Tag Manager website. You’ll be greeted with a user-friendly interface, making it easy for you to get started.
- Sign In: Click on the “Start for free” button. If you’re not already logged into your Google account, you’ll be prompted to do so. Enter your credentials and get ready to click!
- Create a New Account: Once logged in, you’ll see a prompt to create a new account. Fill in the necessary details, including:
- Account Name: This is typically your business or website name.
- Country: Select the country where your business operates.
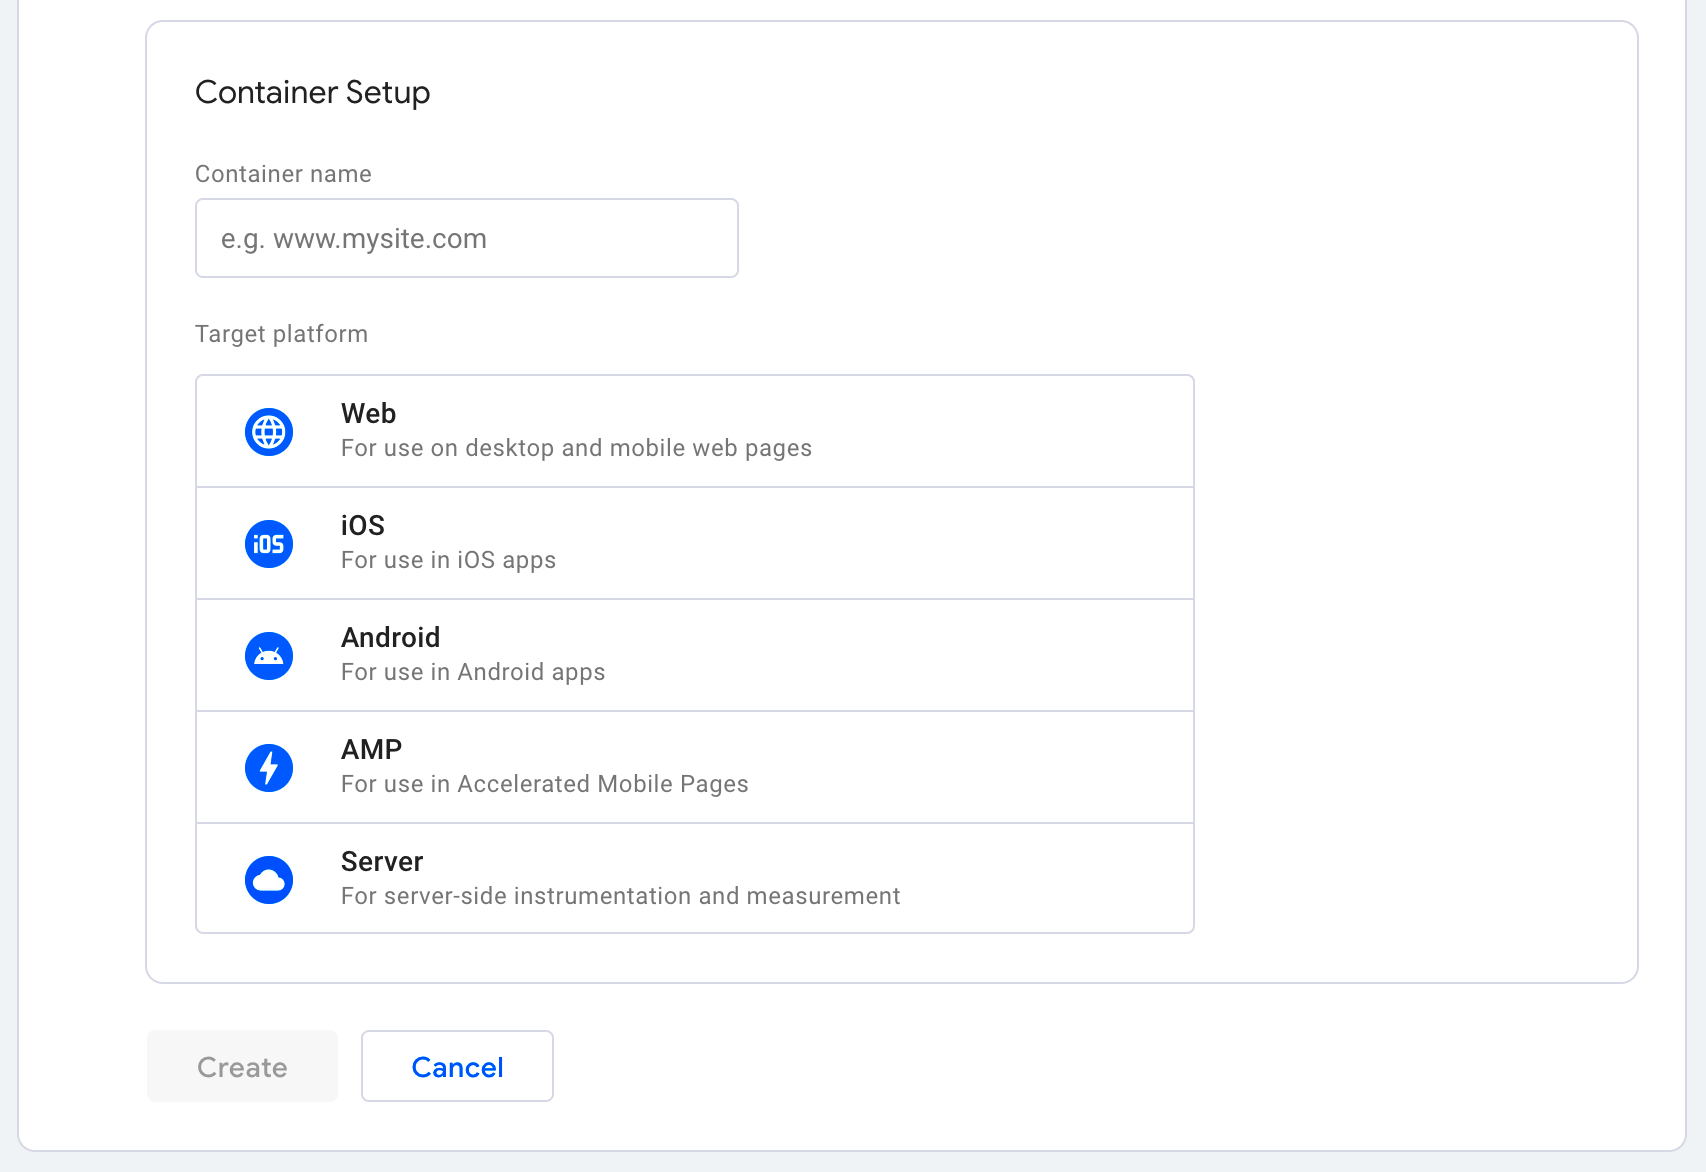
- Container Setup: Next, create a container. This is where all your tags will live. Enter your website’s name and select “Web” for a web container. Click “Create” to proceed.
- Accept Terms of Service: You’ll be required to accept Google’s Terms of Service. Read through them and if you agree, accept by clicking the button.
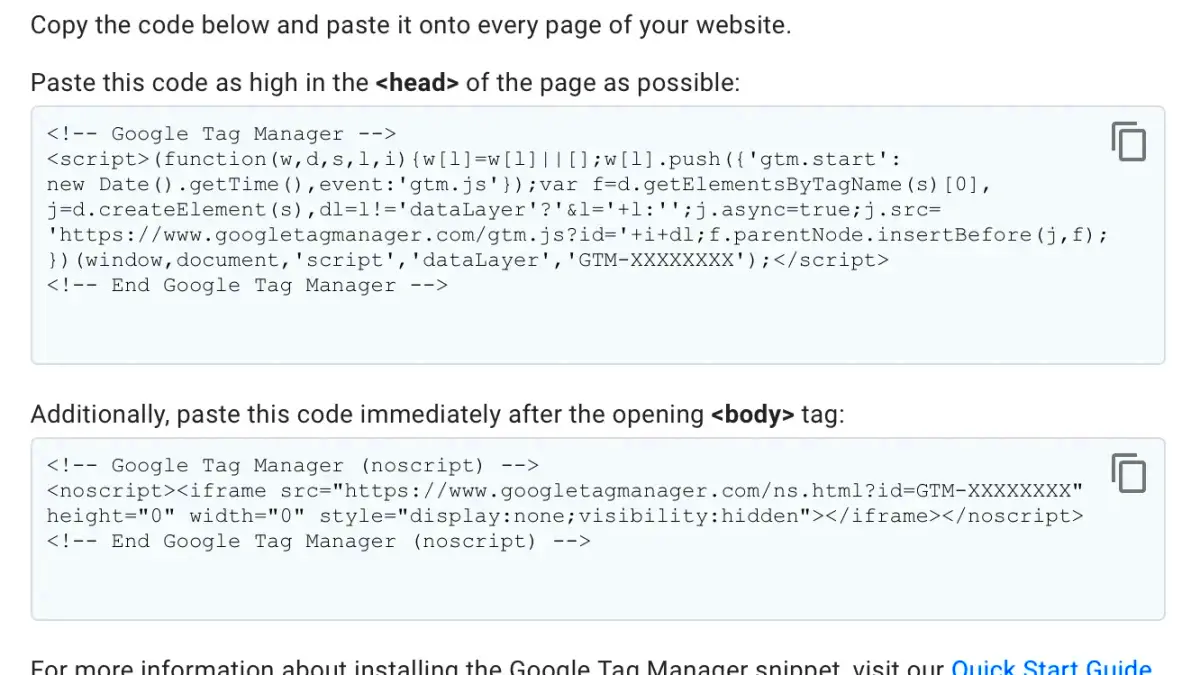
- Install the GTM Code: After confirming, Google will give you a snippet of code. This code will need to be added to your website. Don’t worry; we’ll go over that in the next steps.
And voilà! You’ve just created your Google Tag Manager account. With this account, you’re now ready to start tracking and analyzing your site’s performance like a pro!
Obtaining Your Google Tag Manager Code
Before you can begin tracking your website’s data efficiently, you first need to obtain your Google Tag Manager (GTM) code. This code acts as a container for all the tags you want to deploy on your website. Let’s break down how you can get this code easily.
Here’s a step-by-step guide to obtaining your GTM code:
- First, you need to sign in to your Google Tag Manager account. If you haven’t created one, it’s time to do so!
- Once you’re in, click on the Create Account button. Fill out the necessary details, such as your account name, country, and your site name.
- After creating your account, a pop-up will appear prompting you to create a container. You’ll need to select Web for your platform.
- Upon confirming, GTM will generate your unique container. This is where the magic happens! You should see a screen displaying two snippets of code: the Head and Body snippets.
- Make sure to copy both snippets because you’ll need them shortly. These snippets allow Google Tag Manager to communicate with your website.
Before you leave, double-check that you’ve copied the snippets correctly. Having the right code is crucial; otherwise, it won’t function properly on your site. Now that you have your GTM code, you’re ready for the next step!
Adding Google Tag Manager to Your WordPress Website
Alright! Now that you have your Google Tag Manager code, it’s time to integrate it into your WordPress website. Don’t worry; the process is straightforward and doesn’t require you to be a coding wizard. Here’s how to do it:
There are several methods to add GTM to your WordPress site. Here’s a rundown of the most common ones:
- Using a Plugin: This is the simplest method!
- Manually Inserting Code: This method requires some coding, but it’s not too tricky.
Method 1: Using a Plugin
If you prefer a hassle-free approach, consider using a plugin like Insert Headers and Footers or DuracellTomi’s Google Tag Manager for WordPress:
- Install and activate the plugin.
- Navigate to the plugin settings and paste your GTM code into the appropriate fields for the header and body sections.
- Save your changes, and voila! Your GTM code is live!
Method 2: Manually Inserting Code
If you like getting your hands dirty, here’s how to manually add the GTM code:
- In your WordPress dashboard, go to Appearance > Editor.
- Locate the header.php file. It’s essential to back up your site before making changes here!
- Paste the GTM Head code right before the closing tag.
- Next, find the footer.php file, and paste the GTM Body code immediately after the opening tag.
- Save your changes, and you’re done!
- Google Tag Manager for WordPress: This plugin is simple to use and allows you to add GTM by just entering your container ID.
- DuracellTomi’s Google Tag Manager for WordPress: This robust plugin not only lets you add GTM but also gives you options to manage other tags and enhance your tracking capabilities.
- Insert Headers and Footers: While not exclusively for GTM, this plugin provides a handy way to insert scripts into the header or footer of your pages without touching theme files.
- Go to your WordPress admin dashboard.
- Navigate to Plugins > Add New.
- Search for the plugin by name, install and activate it.
- Enter your GTM container ID in the appropriate plugin settings.
- Get Your GTM Code: First, sign in to your Google Tag Manager account, and create a new account if you haven’t already. Once your account is created, you’ll see your GTM code snippets—one for the head section and another for the body.
- Access WordPress Theme Editor: Go to your WordPress admin dashboard and navigate to Appearance > Theme Editor.
- Edit Header.php: Find the
header.phpfile in your theme files. This is where you’ll insert the first GTM code snippet (the one for the head). - Insert the GTM Code: Paste the first code snippet right before the closing
</head>tag. Next, find thefooter.phpfile and paste the second code snippet immediately after the opening<body>tag. - Save Your Changes: After you’ve added both snippets, make sure to save your changes and check your site to ensure everything is working correctly.
- Install the Google Tag Assistant extension from the Chrome Web Store.
- Once installed, click on the Tag Assistant icon in your browser.
- Enable the Tag Assistant and reload your website.
- Click on the Tag Assistant icon again to see the results. It should display any Google tags present on the page, along with their statuses.
- Log in to your Google Tag Manager account.
- Select the container you’ve installed on your website.
- Click on “Preview” in the top right corner.
- This will notify you to visit your website. Once there, you’ll see a debug console at the bottom of the page when you refresh.
- This console will show you if your tags are firing correctly.
- Container ID Mismatch: Ensure that the container ID in your WordPress installation matches the one in your Google Tag Manager account.
- Cache Issues: Clear your website cache and browser cache, especially if you’re using caching plugins.
- JavaScript Errors: Check for any JavaScript errors on your website that might be stopping GTM from executing.
- Make sure that the preview mode is enabled in Google Tag Manager before visiting your website.
- Ensure pop-ups are allowed in your browser, as the debug mode sometimes relies on them.
- You have configured triggers correctly, and they are set to fire at the right times.
- All required fields in your tags are completed accurately.
- GTM allows for dynamic and flexible tracking without code changes.
- Setting it up on a WordPress site can be done in a few simple steps.
- Mastering GTM can lead to better insights and enhanced marketing efforts.
- Analytics Mania – Offers tutorials and tips specific to GTM.
- Bounce Magnet – Features practical strategies for using GTM effectively.
Whichever method you choose, you’ll be all set to start tracking your site’s performance, user behavior, and much more! Happy tagging!
7. Using a Plugin to Implement Google Tag Manager
If you’re looking for a quick and user-friendly way to integrate Google Tag Manager (GTM) into your WordPress site, using a plugin is your best bet. This method is especially handy for those who may not be comfortable working directly with code or who simply want to streamline the process.
Several plugins can help you set up GTM with just a few clicks. Here’s a quick rundown on some popular options:
To install a plugin, follow these simple steps:
Using a plugin not only saves time but also often comes with additional features that can enhance your tracking efforts. So, if you’re not ready for the direct coding route, this is a fantastic option!
8. Manually Adding Google Tag Manager Code
If you prefer a more hands-on approach or want to have full control over your website’s code, manually adding Google Tag Manager to your WordPress site might be the route for you. Though it requires a bit more effort than using a plugin, it’s not as daunting as it sounds.
Here’s a step-by-step guide to help you through the process:
Manually adding GTM might take a little more time, but it can be really satisfying to see your work come to life. Plus, you’ll have a better understanding of how your website operates from a coding perspective! Just remember to keep a backup of your theme files, just in case you need to revert any changes.
9. Verifying the Installation
After you’ve added Google Tag Manager to your WordPress website, it’s essential to verify that the installation is functioning correctly. This step assures you that the tags you plan to use, like Google Analytics or Facebook Pixel, will track data accurately. Let’s walk through how to check if Google Tag Manager is set up properly.
First, you can use Google Tag Assistant, a Chrome extension that allows you to check if your tags are working as intended. Follow these steps:
Another method is to use the preview mode in Google Tag Manager itself:
Verifying your installation is crucial for ensuring that the data you collect is accurate and valuable. So, don’t skip this important step!
10. Common Issues and Troubleshooting
Even the most experienced webmasters encounter hiccups when setting up Google Tag Manager on their WordPress sites. If you find your tags aren’t firing or the data isn’t showing up as expected, don’t fret! Here are some common issues and troubleshooting tips to help you get back on track:
1. Tags Not Firing
If your tags aren’t firing, consider these potential causes:
2. Preview Mode Fails
If you can’t see the debug mode when you activate preview mode, try these tips:
3. Tag Manager Recipe or Configuration Issues
If you’ve customized tags, make sure:
By following these troubleshooting steps, you can typically resolve most issues that arise after adding Google Tag Manager to your WordPress site. And remember, Google offers a robust community and abundant resources for further assistance!
11. Conclusion
Adding Google Tag Manager (GTM) to your WordPress website is not just a technical task; it’s a significant step towards enhancing your website’s performance and tracking capabilities. By integrating GTM, you can efficiently manage and deploy marketing tags (snippets of code) without having to modify the actual code of your website each time. This not only saves you time but also allows for greater flexibility in how you track user behaviors, conversions, and other key metrics.
Throughout this blog post, we’ve walked you through the process of adding GTM to your WordPress site, from creating a GTM account to installing the tracking code and ensuring it works effectively. Whether you are a seasoned web developer or a WordPress newbie, the steps we’ve outlined are straightforward and user-friendly. The benefits that come with using Google Tag Manager—such as streamlined analytics setup and better data management—make it a must-have tool for anyone serious about improving their online presence.
In summary:
So don’t hesitate! Take the plunge into the world of advanced tracking and analytics. You’ll be glad you did!
12. Additional Resources for Learning
If you’re eager to dive deeper into the world of Google Tag Manager and enhance your skills even further, there are plenty of resources available to help you along the journey. Here’s a curated list that can aid in your learning process:
Online Courses
Official Documentation
The official Google Tag Manager documentation provides in-depth information about all the features and functionalities available:
Blogs & Websites
Several blogs are dedicated to digital marketing and analytics, and they regularly publish insightful content related to GTM:
By exploring these additional resources, you can refine your skills and leverage Google Tag Manager to its fullest potential. Enjoy the learning process!


